Python | Multiple Face Recognition using dlib
Last Updated :
03 Jan, 2023
This article aims to quickly build a Python face recognition program to easily train multiple images per person and get started with recognizing known faces in an image.
In this article, the code uses ageitgey’s face_recognition API for Python. This API is built using dlib’s face recognition algorithms and it allows the user to easily implement face detection, face recognition and even real-time face tracking in your projects or from the command line.
Library Installation:
At first, make sure the required libraries are installed on your computer.
pip install face_recognition Scikit-learn dlib docopt
If you want dlib to use CUDA on GPU, make sure CUDA and cuDNN are installed correctly then install dlib using pip. For detailed instructions for installation on different platforms, check out face_recognition’s Installation Guide.
Now, create a directory with the training images for each person in the below format. Make sure that you’ve enough training images (at least 5 for each person) otherwise Support Vector Classifier (SVC) (that is used in this program – produces meaningless results on very small datasets.
File structure:
face_recognize.py
test_image.jpg
train_dir/
    person_1/
        person_1_face-1.jpg
        person_1_face-2.jpg
        .
        .
        person_1_face-n.jpg
    person_2/
        person_2_face-1.jpg
        person_2_face-2.jpg
        .
        .
        person_2_face-n.jpg
    .
    .
    person_n/
        person_n_face-1.jpg
        person_n_face-2.jpg
        .
        .
        person_n_face-n.jpg
Face Encoding:
The face_recognition API generates face encodings for the face found in the images. A face encoding is basically a way to represent the face using a set of 128 computer-generated measurements. Two different pictures of the same person would have similar encoding and two different people would have totally different encoding.
After all the face encodings are generated, Support Vector Classifier (SVC) with scikit-learn is trained on the face encodings along with their labels from all the known faces in the training directory. Finally, the API detects all the faces in the test image you provide and the trained SVC predicts all the known faces in the test image.
Code : To recognize multiple faces.
import face_recognition
import docopt
from sklearn import svm
import os
def face_recognize(dir, test):
encodings = []
names = []
if dir[-1]!='/':
dir += '/'
train_dir = os.listdir(dir)
for person in train_dir:
pix = os.listdir(dir + person)
for person_img in pix:
face = face_recognition.load_image_file(
dir + person + "/" + person_img)
face_bounding_boxes = face_recognition.face_locations(face)
if len(face_bounding_boxes) == 1:
face_enc = face_recognition.face_encodings(face)[0]
encodings.append(face_enc)
names.append(person)
else:
print(person + "/" + person_img + " can't be used for training")
clf = svm.SVC(gamma ='scale')
clf.fit(encodings, names)
test_image = face_recognition.load_image_file(test)
face_locations = face_recognition.face_locations(test_image)
no = len(face_locations)
print("Number of faces detected: ", no)
print("Found:")
for i in range(no):
test_image_enc = face_recognition.face_encodings(test_image)[i]
name = clf.predict([test_image_enc])
print(*name)
def main():
args = docopt.docopt(__doc__)
train_dir = args["--train_dir"]
test_image = args["--test_image"]
face_recognize(train_dir, test_image)
if __name__=="__main__":
main()
|
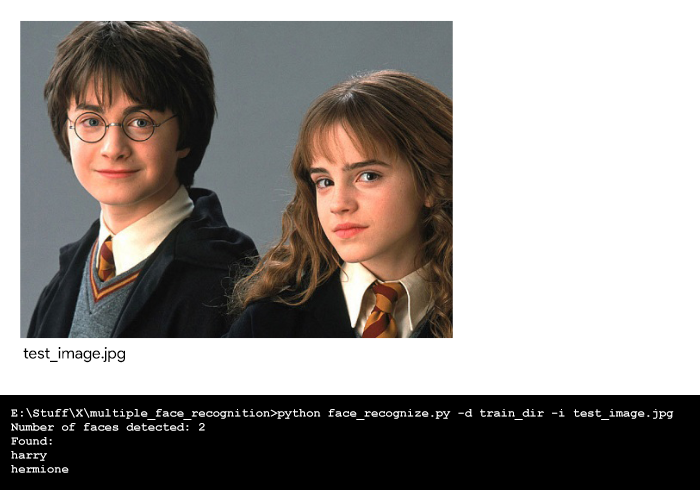
How to run it on the terminal:
python face_recognize.py -d train_dir -i test_image.jpg
Output:
Share your thoughts in the comments
Please Login to comment...