In Spring Boot, Event-driven architecture is a paradigm, and it can be software component communication through the production, detection, and consumption of events. Spring Cloud Stream is a popular framework built on top of Spring Boot that can be used to simplify the development of event-driven microservices and provide the abstractions and tools to build, deploy, and scale event-driven applications effortlessly.
The Spring Cloud stream can abstract the complexities of the messaging middleware by providing a simplified programming model and introducing concepts like binder, binding, and channels.
Key Terminologies:
- Binder: Binders can be used to connect the application to a messaging middleware like RabbitMQ.
- Bindings: Bindings can be defined as the relationships between the input/output channels and destinations in the messaging system.
- Channels: It can represent the input and output channels through the messages that flow in and out of your application.
Implementation of Event-driven applications with Spring Cloud Stream
We can develop a simple event-driven application using RabbitMQ messaging middleware. In this, we can create the course and the student publisher sends the message through the RabbitMQ broker and the receiver can receive the queue message.
Step 1: We can create the spring project using InteljIdea on creating the project add the below dependencies into your project.
Dependencies:
- Spring Web
- Spring Cloud Stream
- Spring for RabbitMQ
- Lombok
- Spring Dev Tools
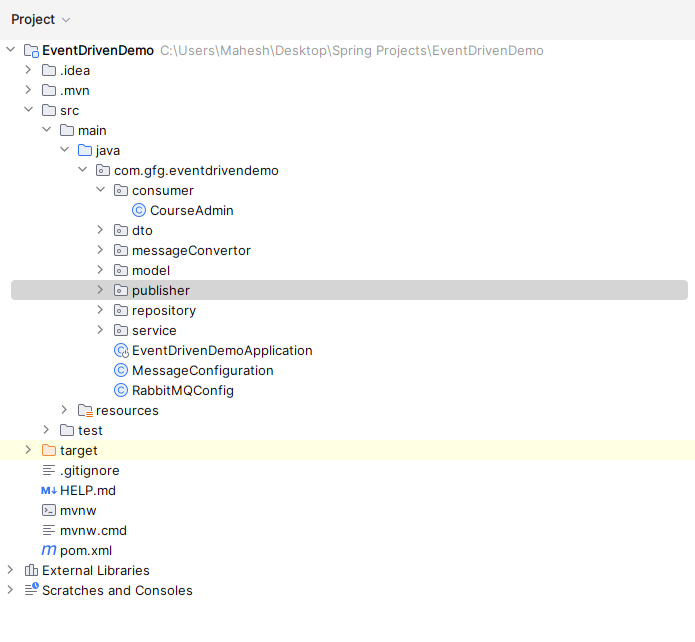
Once create the spring boot project your project file structure looks like the below image.
File Structure:
Step 2: Open the application.properties file and put the code below for the mongodb database and RabbitMQ server configuration.
application.properities file:
spring.data.mongodb.uri=mongodb://localhost:27017/EventDemo
server.port=8081
#RabbitMQ connection properties
spring.rabbitmq.host=localhost
spring.rabbitmq.port=5672
spring.rabbitmq.username=guest
spring.rabbitmq.password=guest
spring.rabbitmq.virtual-host=/
Step 3: If you want to work with RabbitMQ message broker we need to download and install into your system.
RabbitMQ Download using this link
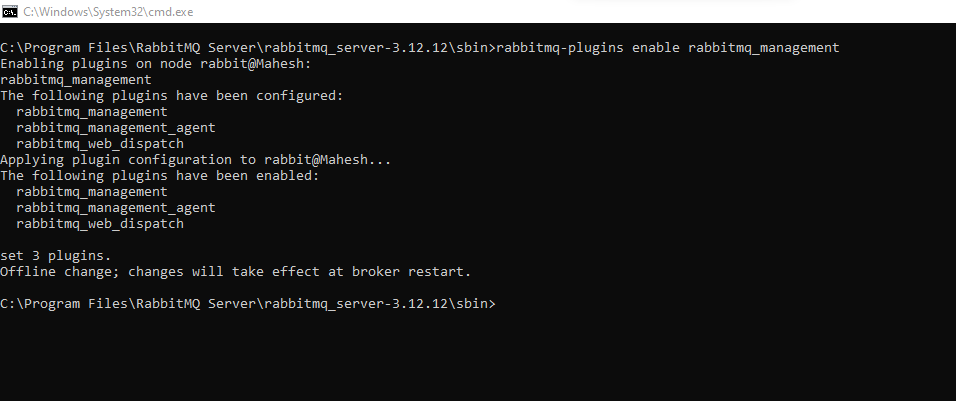
Step 4: Once download the rabbit open the server sbin path and using the below command to enable the RabbitMQ plugins into your system.
Command:
rabbitmq-plugins enable rabbitmq_management
Refer the below image for better understanding:
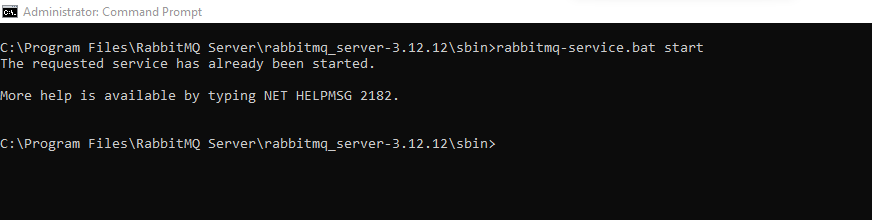
Once enable the RabbitMQ plugins using below the command and run the server into your system.
service.bat start
Refer the below image:
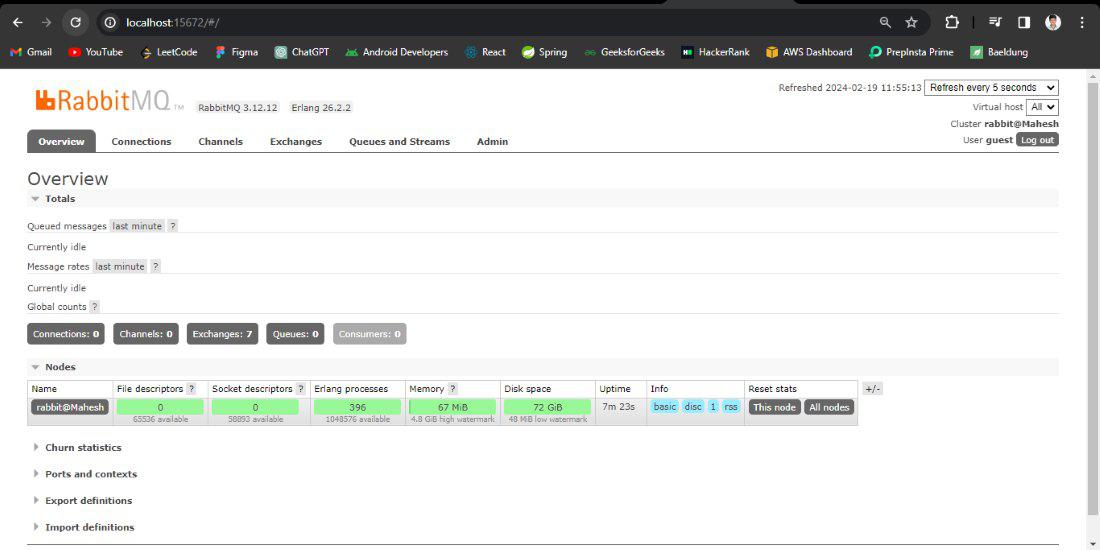
Once start the server and its dashboard open in the port number 15672 and if ask the username and password both are gives as guest.
RabbitMQ Dashboard:
Step 5: Create the new package and it named as model and in that package create the class named as Course
Go to src > java > com.gfg.eventdrivendemo > model > Course and put the below code:
Java
package com.gfg.eventdrivendemo.model;
import lombok.AllArgsConstructor;
import lombok.Data;
import lombok.NoArgsConstructor;
import org.springframework.data.annotation.Id;
@Data
@AllArgsConstructor
@NoArgsConstructor
public class Course {
@Id
private String id;
private String tutorialName;
private String description;
}
|
Step 6: create the class in the same package and it named as Student.
Go to src > java > com.gfg.eventdrivendemo > model > Student and put the below code:
Java
package com.gfg.eventdrivendemo.model;
import lombok.AllArgsConstructor;
import lombok.Data;
import lombok.NoArgsConstructor;
import org.springframework.data.annotation.Id;
import org.springframework.data.mongodb.core.mapping.Document;
@Document
@Data
@AllArgsConstructor
@NoArgsConstructor
public class Student {
@Id
String id;
String studentName;
String email;
String branch;
}
|
Step 7: Create the new package and it named as repository and in that package create the interface named as CourseRepository
Go to src > java > com.gfg.eventdrivendemo > repository > CourseRepository and put the below code:
Java
package com.gfg.eventdrivendemo.repository;
import com.gfg.eventdrivendemo.model.Course;
import org.springframework.data.mongodb.repository.MongoRepository;
import org.springframework.stereotype.Repository;
@Repository
public interface CourseRepository extends MongoRepository<Course, String> {
}
|
Step 8: create the one more interface in the same package and it named as StudentRepository
Go to src > java > com.gfg.eventdrivendemo > repository > StudentRepository and put the below code:
Java
package com.gfg.eventdrivendemo.repository;
import com.gfg.eventdrivendemo.model.Student;
import org.springframework.data.mongodb.repository.MongoRepository;
import org.springframework.stereotype.Repository;
@Repository
public interface StudentRepository extends MongoRepository<Student,String> {
}
|
Step 9: Create the new package and it named as dto and in that package create the class named as CourseDTO
Go to src > java > com.gfg.eventdrivendemo > dto > CourseDTO and put the below code:
Java
package com.gfg.eventdrivendemo.dto;
import lombok.AllArgsConstructor;
import lombok.Data;
import lombok.NoArgsConstructor;
import org.springframework.data.annotation.Id;
@Data
@AllArgsConstructor
@NoArgsConstructor
public class CourseDTO {
@Id
String id;
private String title;
private String description;
}
|
Step 10: In the same package create the one more class named as StudentDTO
Go to src > java > com.gfg.eventdrivendemo > dto > StudentDTO and put the below code:
Java
package com.gfg.eventdrivendemo.dto;
import lombok.AllArgsConstructor;
import lombok.Data;
import lombok.NoArgsConstructor;
import org.springframework.data.annotation.Id;
@Data
@AllArgsConstructor
@NoArgsConstructor
public class StudentDTO {
@Id
String id;
private String name;
private String email;
}
|
Step 11: Create the new package and it named as service and in that package create the class named as CourseService
Go to src > java > com.gfg.eventdrivendemo > service > CourseService and put the below code:
Java
package com.gfg.eventdrivendemo.service;
import com.gfg.eventdrivendemo.dto.CourseDTO;
import com.gfg.eventdrivendemo.model.Course;
import com.gfg.eventdrivendemo.repository.CourseRepository;
import org.springframework.beans.factory.annotation.Autowired;
import org.springframework.stereotype.Service;
import java.util.List;
import java.util.stream.Collectors;
@Service
public class CourseService {
@Autowired
private CourseRepository courseRepository;
public List<CourseDTO> getAllCourses() {
List<Course> courses = courseRepository.findAll();
return courses.stream()
.map(this::convertToDTO)
.collect(Collectors.toList());
}
public CourseDTO createCourse(CourseDTO courseDTO) {
Course course = convertToEntity(courseDTO);
Course savedCourse = courseRepository.save(course);
return convertToDTO(savedCourse);
}
private CourseDTO convertToDTO(Course course) {
CourseDTO courseDTO = new CourseDTO();
courseDTO.setId(course.getId());
courseDTO.setTitle(course.getTutorialName());
courseDTO.setDescription(course.getDescription());
return courseDTO;
}
private Course convertToEntity(CourseDTO courseDTO) {
Course course = new Course();
course.setId(courseDTO.getId());
course.setTutorialName(courseDTO.getTitle());
course.setDescription(courseDTO.getDescription());
return course;
}
}
|
Step 12: In the same package create the more class named as StudentService
Go to src > java > com.gfg.eventdrivendemo > service > StudentService and put the below code:
Java
package com.gfg.eventdrivendemo.service;
import com.gfg.eventdrivendemo.dto.StudentDTO;
import com.gfg.eventdrivendemo.model.Student;
import com.gfg.eventdrivendemo.repository.StudentRepository;
import org.springframework.beans.factory.annotation.Autowired;
import org.springframework.stereotype.Service;
import java.util.List;
import java.util.stream.Collectors;
@Service
public class StudentService {
@Autowired
private StudentRepository studentRepository;
public List<StudentDTO> getAllStudents() {
List<Student> students = studentRepository.findAll();
return students.stream()
.map(this::convertToDTO)
.collect(Collectors.toList());
}
public StudentDTO createStudent(StudentDTO studentDTO) {
Student student = convertToEntity(studentDTO);
Student savedStudent = studentRepository.save(student);
return convertToDTO(savedStudent);
}
private StudentDTO convertToDTO(Student student) {
StudentDTO studentDTO = new StudentDTO();
studentDTO.setId(student.getId());
studentDTO.setName(student.getStudentName());
studentDTO.setEmail(student.getEmail());
return studentDTO;
}
private Student convertToEntity(StudentDTO studentDTO) {
Student student = new Student();
student.setId(studentDTO.getId());
student.setStudentName(studentDTO.getName());
student.setEmail(studentDTO.getEmail());
return student;
}
}
|
Step 13: Create the main package create the class named as MessageConfiguration
Go to src > java > com.gfg.eventdrivendemo > MessageConfiguration and put the below code:
Java
package com.gfg.eventdrivendemo;
import org.springframework.amqp.core.*;
import org.springframework.amqp.rabbit.connection.ConnectionFactory;
import org.springframework.amqp.rabbit.core.RabbitTemplate;
import org.springframework.amqp.support.converter.Jackson2JsonMessageConverter;
import org.springframework.amqp.support.converter.MessageConverter;
import org.springframework.context.annotation.Bean;
import org.springframework.context.annotation.Configuration;
@Configuration
public class MessageConfiguration {
public static final String ROUTINGKEY = "greek_routing-key";
public static final String QUEUE = "Greek for Greeks Queue";
public static final String EXCHANGE = " Greek for greeks topic";
@Bean
public Queue queue() {
return new Queue(QUEUE);
}
@Bean
public TopicExchange topicExchange() {
return new TopicExchange(EXCHANGE);
}
@Bean
public Binding binding(Queue queue, TopicExchange topicExchange) {
return BindingBuilder.bind(queue).to(topicExchange).with(ROUTINGKEY);
}
MessageConverter converter() {
return new Jackson2JsonMessageConverter();
}
@Bean
AmqpTemplate template(ConnectionFactory connectionFactory) {
RabbitTemplate template = new RabbitTemplate(connectionFactory);
template.setMessageConverter(converter());
return template;
}
}
|
Step 14: Create the main package create the class named as RabbitMQConfig
Go to src > java > com.gfg.eventdrivendemo > RabbitMQConfig and put the below code:
Java
package com.gfg.eventdrivendemo;
import org.springframework.amqp.support.converter.MessageConverter;
import org.springframework.amqp.rabbit.connection.ConnectionFactory;
import org.springframework.amqp.rabbit.core.RabbitTemplate;
import org.springframework.beans.factory.annotation.Autowired;
import org.springframework.context.annotation.Bean;
import org.springframework.context.annotation.Configuration;
@Configuration
public class RabbitMQConfig {
@Autowired
private MessageConverter customMessageConverter;
@Bean
public RabbitTemplate rabbitTemplate(ConnectionFactory connectionFactory) {
RabbitTemplate rabbitTemplate = new RabbitTemplate(connectionFactory);
rabbitTemplate.setMessageConverter(customMessageConverter);
return rabbitTemplate;
}
}
|
Step 15: Create the new package and it named as MessageConvertor and create the class named as CustomMessageConvertor
Go to src > java > com.gfg.eventdrivendemo > MessageConvertor > CustomMessageConvertor and put the below code:
Java
package com.gfg.eventdrivendemo.messageConvertor;
import com.fasterxml.jackson.core.JsonProcessingException;
import com.fasterxml.jackson.databind.ObjectMapper;
import com.gfg.eventdrivendemo.dto.CourseDTO;
import org.springframework.amqp.core.Message;
import org.springframework.amqp.core.MessageProperties;
import org.springframework.amqp.support.converter.MessageConverter;
import org.springframework.stereotype.Component;
@Component
public class CustomMessageConverter implements MessageConverter {
private final ObjectMapper objectMapper;
public CustomMessageConverter(ObjectMapper objectMapper) {
this.objectMapper = objectMapper;
}
@Override
public Message toMessage(Object object, MessageProperties messageProperties) throws org.springframework.messaging.converter.MessageConversionException {
try {
String jsonString = objectMapper.writeValueAsString(object);
return new Message(jsonString.getBytes(), messageProperties);
} catch (JsonProcessingException e) {
throw new org.springframework.messaging.converter.MessageConversionException("Error converting object to JSON", e);
}
}
@Override
public Object fromMessage(Message message) throws org.springframework.messaging.converter.MessageConversionException {
try {
String jsonString = new String(message.getBody());
return objectMapper.readValue(jsonString, CourseDTO.class);
} catch (Exception e) {
throw new org.springframework.messaging.converter.MessageConversionException("Error converting JSON to object", e);
}
}
}
|
Step 16: Create the new package and it named as MessageConvertor and create the class named as StudentMessageConvertor
Go to src > java > com.gfg.eventdrivendemo > MessageConvertor > StudentMessageConvertor and put the below code:
Java
package com.gfg.eventdrivendemo.messageConvertor;
import com.fasterxml.jackson.core.JsonProcessingException;
import com.fasterxml.jackson.databind.ObjectMapper;
import com.gfg.eventdrivendemo.dto.StudentDTO;
import org.springframework.amqp.core.Message;
import org.springframework.amqp.core.MessageProperties;
import org.springframework.amqp.support.converter.MessageConverter;
import org.springframework.stereotype.Component;
@Component
public class StudentMessageConverter implements MessageConverter {
private final ObjectMapper objectMapper;
public StudentMessageConverter(ObjectMapper objectMapper) {
this.objectMapper = objectMapper;
}
@Override
public Message toMessage(Object object, MessageProperties messageProperties) throws org.springframework.messaging.converter.MessageConversionException {
try {
String jsonString = objectMapper.writeValueAsString(object);
return new Message(jsonString.getBytes(), messageProperties);
} catch (JsonProcessingException e) {
throw new org.springframework.messaging.converter.MessageConversionException("Error converting object to JSON", e);
}
}
@Override
public Object fromMessage(Message message) throws org.springframework.messaging.converter.MessageConversionException {
try {
String jsonString = new String(message.getBody());
return objectMapper.readValue(jsonString, StudentDTO.class);
} catch (Exception e) {
throw new org.springframework.messaging.converter.MessageConversionException("Error converting JSON to object", e);
}
}
}
|
Step 17: Create the new package and it named as publisher and create the class named as CoursePublisher
Go to src > java > com.gfg.eventdrivendemo > publisher > CoursePublisher and put the below code:
Java
package com.gfg.eventdrivendemo.publisher;
import com.gfg.eventdrivendemo.MessageConfiguration;
import com.gfg.eventdrivendemo.dto.CourseDTO;
import com.gfg.eventdrivendemo.dto.StudentDTO;
import com.gfg.eventdrivendemo.service.CourseService;
import com.gfg.eventdrivendemo.service.StudentService;
import org.springframework.amqp.rabbit.core.RabbitTemplate;
import org.springframework.beans.factory.annotation.Autowired;
import org.springframework.http.HttpStatus;
import org.springframework.http.ResponseEntity;
import org.springframework.web.bind.annotation.*;
import java.util.List;
@RestController
@RequestMapping("/students")
public class CoursePubisher {
@Autowired
private StudentService studentService;
@Autowired
RabbitTemplate rabbitTemplate;
@Autowired
MessageConfiguration messageConfiguration;
@GetMapping
public List<StudentDTO> getAllStudents() {
return studentService.getAllStudents();
}
@PostMapping
public ResponseEntity<StudentDTO> createStudent(@RequestBody StudentDTO studentDTO) {
StudentDTO createdStudent = studentService.createStudent(studentDTO);
rabbitTemplate.convertAndSend(messageConfiguration.EXCHANGE,messageConfiguration.ROUTINGKEY,createdStudent);
return new ResponseEntity<>(createdStudent, HttpStatus.CREATED);
}
}
|
Step 18: Create the new package and it named as publisher and create the class named as StudentPublisher
Go to src > java > com.gfg.eventdrivendemo > publisher > StudentPublisher and put the below code:
Java
package com.gfg.eventdrivendemo.publisher;
import com.gfg.eventdrivendemo.MessageConfiguration;
import com.gfg.eventdrivendemo.dto.CourseDTO;
import com.gfg.eventdrivendemo.service.CourseService;
import org.springframework.amqp.rabbit.core.RabbitTemplate;
import org.springframework.beans.factory.annotation.Autowired;
import org.springframework.http.HttpStatus;
import org.springframework.http.ResponseEntity;
import org.springframework.web.bind.annotation.*;
import java.util.List;
@RestController
@RequestMapping("/tutorial")
public class RegisterPublisher {
@Autowired
private RabbitTemplate rabbitTemplate;
@Autowired
MessageConfiguration messageConfiguration;
@Autowired
private CourseService courseService;
@GetMapping
public List<CourseDTO> getAllCourses() {
return courseService.getAllCourses();
}
@PostMapping
public ResponseEntity<CourseDTO> createCourse(@RequestBody CourseDTO courseDTO) {
CourseDTO createdCourse = courseService.createCourse(courseDTO);
rabbitTemplate.convertAndSend(messageConfiguration.EXCHANGE,messageConfiguration.ROUTINGKEY,createdCourse);
return new ResponseEntity<>(createdCourse, HttpStatus.CREATED);
}
}
|
Step 19: Open the main class and put the below code:
Java
package com.gfg.eventdrivendemo;
import org.springframework.boot.SpringApplication;
import org.springframework.boot.autoconfigure.SpringBootApplication;
@SpringBootApplication
public class EventDrivenDemoApplication {
public static void main(String[] args) {
SpringApplication.run(EventDrivenDemoApplication.class, args);
}
}
|
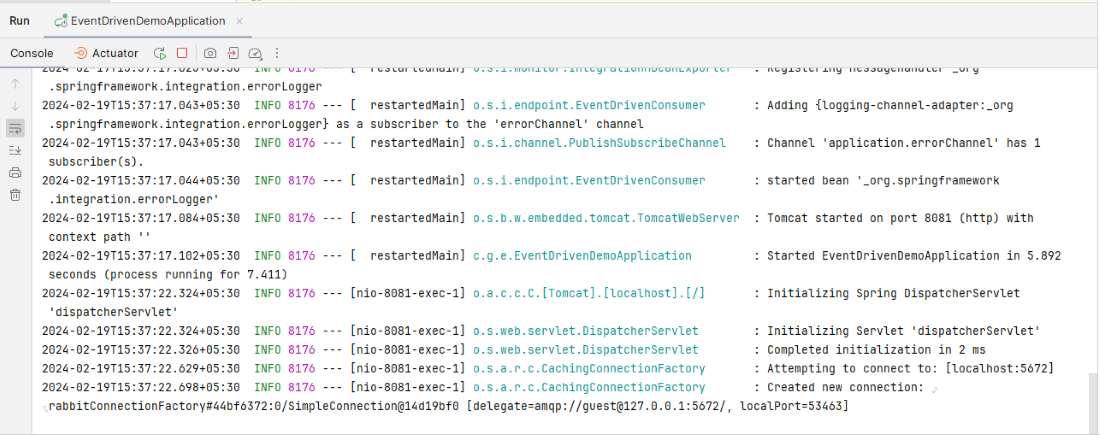
Step 20: Once created the project successfully run the application as spring project it can be start at 8081. Refer the below image for better understanding.
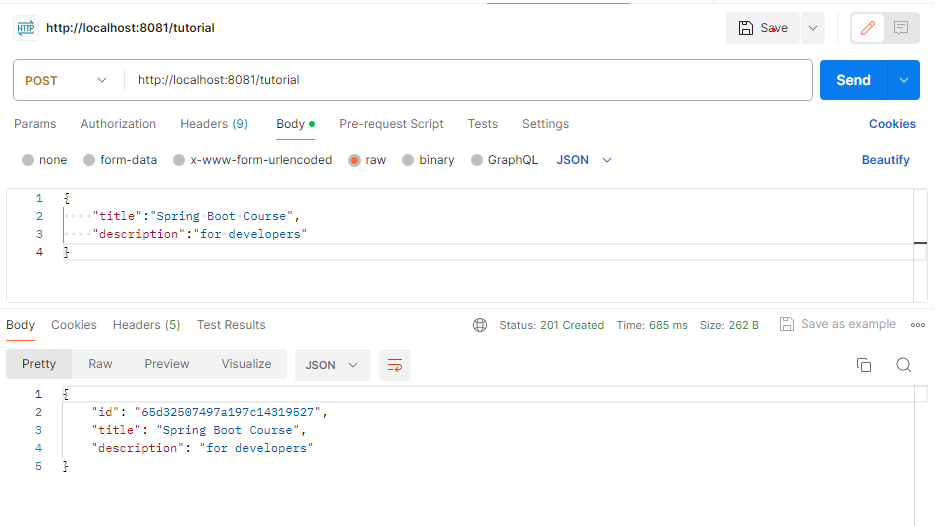
Course publisher:
Student Publisher:

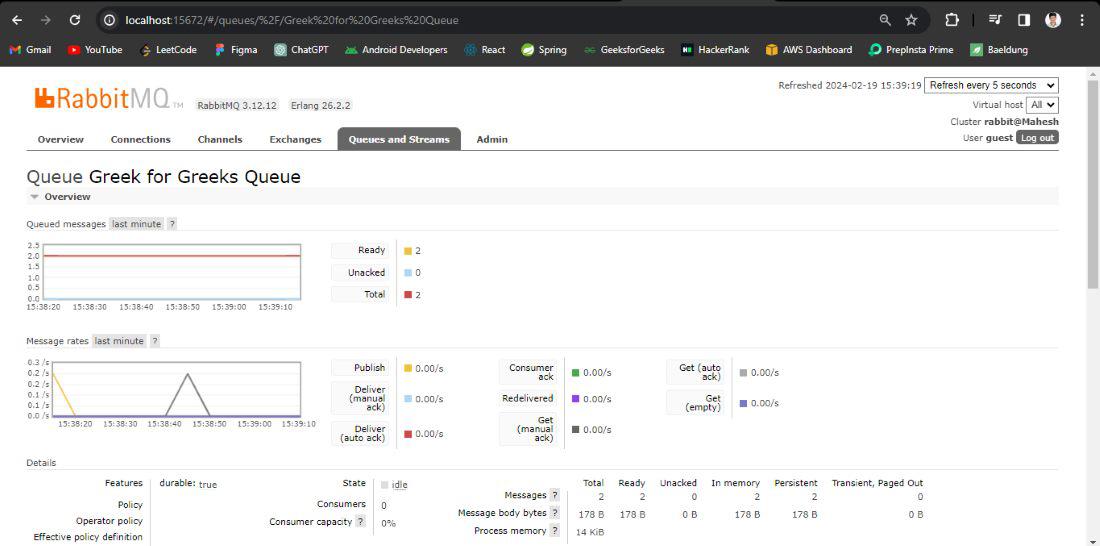
Message Queue at RabbitMQ Output:
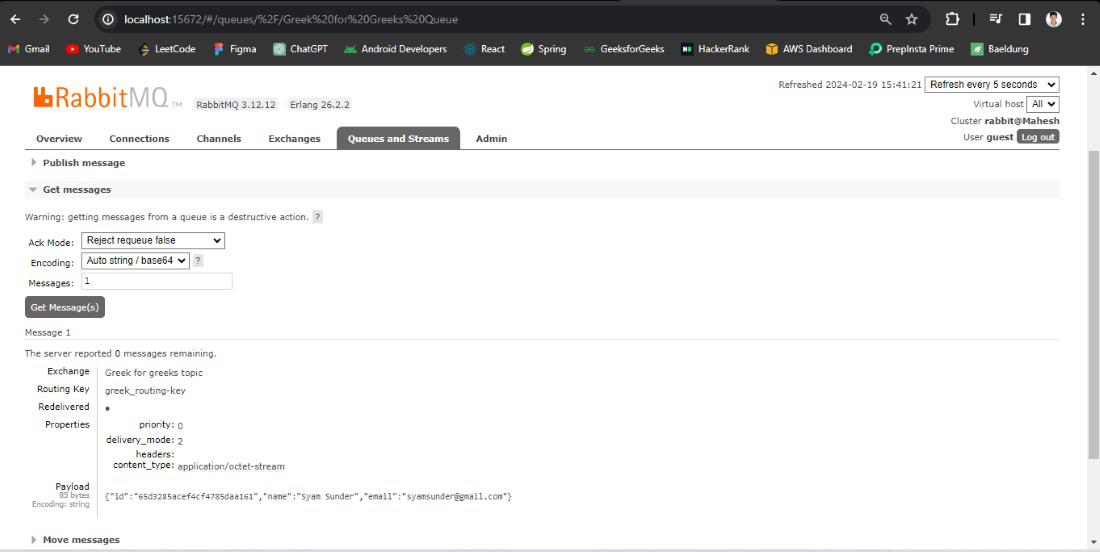
Queue Message Output:
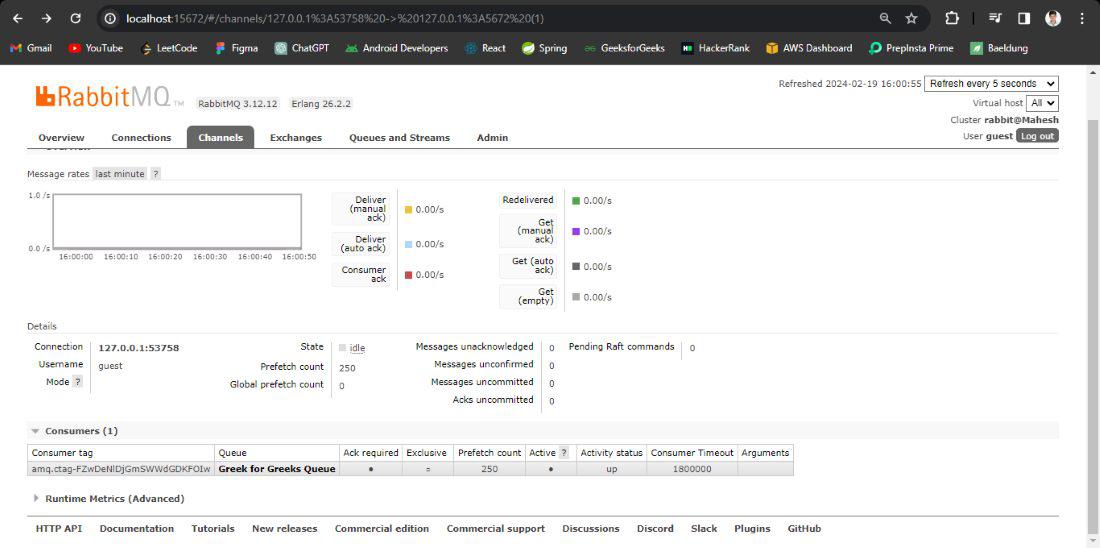
RabbitMQ Channel Output:
Share your thoughts in the comments
Please Login to comment...