Ensuring timestamp storage in UTC with SQLAlchemy
Last Updated :
16 Oct, 2023
In modern web applications, handling timestamps is a common requirement. Storing timestamps in a standardized format, such as UTC (Coordinated Universal Time), ensures consistency and simplifies data manipulation across different time zones. This article explores best practices and provides a step-by-step implementation guide for storing timestamps in UTC using SQLAlchemy.
Ensuring Timestamp Storage in UTC with SQLAlchemy
SQLAlchemy, a powerful Python library for working with databases, offers various techniques to ensure proper storage and retrieval of timestamps in UTC. When working with timestamps in a database using SQLAlchemy in Python, it is crucial to ensure consistent time representation across different time zones. Storing timestamps in UTC (Coordinated Universal Time) format helps prevent issues related to time zone conversions and daylight saving time changes.
Steps to Ensure Timestamp Storage in UTC with SQLAlchemy
Let us see a step-by-step process of storing timestamp in UTC using SQLAlchemy in Python.
Step 1: Create a schema in the MySQL Server
The first step would be to create a schema in MySQL Workbench if it does not exist already.
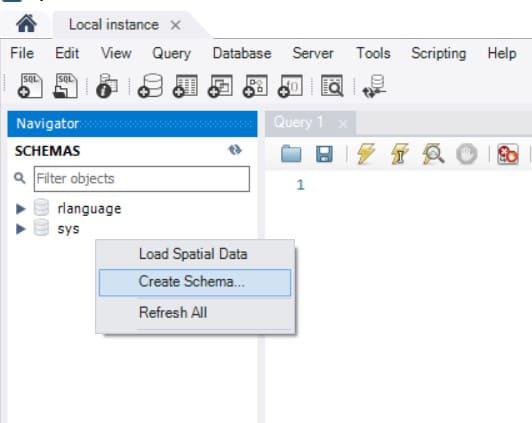
Creating a Schema in MySQL Server
Step 2: Import necessary modules
Then, import the sqlalchemy modules that are required to perform basic functionalities of SQLAlchemy such as creating a connection, defining columns, etc. The declarative_base module provides a base class for declarative class definitions. It is used to create a base class from which all mapped classes will inherit. The sessionmaker provides a way to interact with the database.
from sqlalchemy import create_engine, Column, Integer, DateTime, func
from sqlalchemy.ext.declarative import declarative_base
from sqlalchemy.orm import sessionmaker
Step 3: Create a Database Connection
To begin, establish a connection to your MySQL database using SQLAlchemy. Replace the username, password, host and database name with the actual credentials that you have given to your database. If your password contains the @ symbol, it can interfere with the connection URL’s syntax, as the ‘@' symbol is used to separate the username and password in the URL. To include a special character like ‘@' in your password, you need to URL-encode it. The quote_plus of urllib.parse module is used to URL-encode special characters in the database password. It takes a string as input and returns the encoded version.
from urllib.parse import quote_plus
password = 'password'
encoded_password = quote_plus(password)
db_url = f'mysql+mysqlconnector://username:{encoded_password}@localhost/database_name'
Step 4: Defining the Table Structure
Next, you can define your table structure using Python classes. Define your table class with the desired table name and columns. The ‘created_at‘ column is defined as a DateTime type with the ‘timezone=True’ argument, ensuring it stores time zone-aware timestamps. The ‘server_default=func.now()’ sets the default value for this column to the current timestamp.
Base = declarative_base()
class MyTable(Base):
    __tablename__ = 'table_name'
    id = Column(Integer, primary_key=True)
    created_at = Column(DateTime(timezone=True), server_default=func.now())
Step 5: Creating the Table
With the table structure defined, create the table in your MySQL database using the following code. This line of code will generate the table based on the structure defined in MyTable.
Base.metadata.create_all(engine)
Step 6: Store timestamps in UTC
Create a new instance of MyTable, and by adding it to the session and committing the changes, a new record with the current UTC timestamp is inserted into the table.
Session = sessionmaker(bind=engine)
session = Session()

record = MyTable()
session.add(record)
session.commit()
Step 7: Retrieving and Displaying Timestamps
To retrieve and display the stored UTC timestamps, query the table and access the ‘created_at’ column. The ‘result‘ represents the retrieved record.
result = session.query(MyTable).first()
print("ID:", result.id)
print("Created At (UTC):", result.created_at)
Example:
Python
from sqlalchemy import create_engine, Column, Integer, DateTime, func
from sqlalchemy.ext.declarative import declarative_base
from sqlalchemy.orm import sessionmaker
Base = declarative_base()
class MyTable(Base):
__tablename__ = 'my_table'
id = Column(Integer, primary_key=True)
created_at = Column(DateTime(timezone=True), server_default=func.now())
from urllib.parse import quote_plus
password = 'your password'
encoded_password = quote_plus(password)
engine = create_engine(
Base.metadata.create_all(engine)
Session = sessionmaker(bind=engine)
session = Session()
record = MyTable()
session.add(record)
session.commit()
result = session.query(MyTable).first()
print("ID:", result.id)
print("Created At (UTC):", result.created_at)
|
Output:

UTC timestamp in SQLAlchemy
The output displays the ID and the UTC timestamp for the retrieved record.
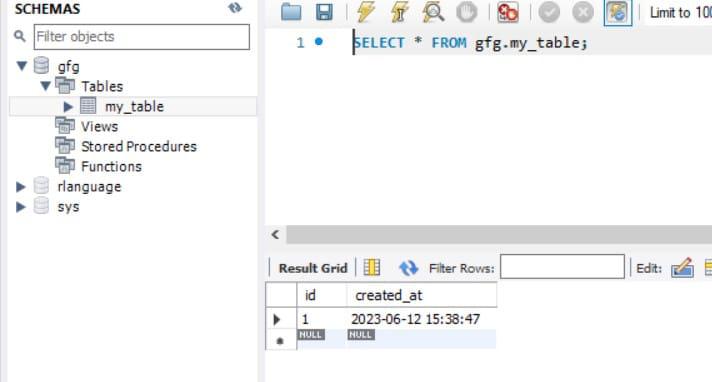
UTC timestamp storage in SQLAlchemy
Share your thoughts in the comments
Please Login to comment...