SQLAlchemy Core provides a powerful feature for performing updates on multiple tables in a database. This allows us to update related data in multiple tables in a single transaction, ensuring data consistency and integrity. In this approach, we define the tables using SQLAlchemy’s Table object and construct update statements using the update function.
Before proceeding, make sure you have Python and MySQL servers installed. You can install the SQLAlchemy library and MySQL Connector library in Python by executing the following command in your terminal:
pip install SQLAlchemy
pip install mysql-connector-python
Multiple Table Updates using SQLAlchemy
By using the SQLAlchemy Core’s multiple table update feature, we can easily update related data in different tables within a single transaction, ensuring consistency and reducing the need for multiple round trips to the database. It provides a convenient and efficient way to update data across multiple tables in a database system.
The process starts by creating an SQLAlchemy engine and connecting it to the database. Then define the tables using the Table object from SQLAlchemy’s SQL module. To perform an update on a table, specify the table object and use the values() method to set the new values for the columns we want to update.
Steps to Update Multiple Tables
In this code example, we are using SQLAlchemy to interact with a MySQL Server database. The code showcases how to create a database connection, define tables using SQLAlchemy’s Table object, perform insertions into the tables, and update records. The example demonstrates the basic usage of SQLAlchemy’s create_engine, MetaData, Table, insert, and update functions.
Step 1: Create a schema
First, create a schema in the MySQL Server.
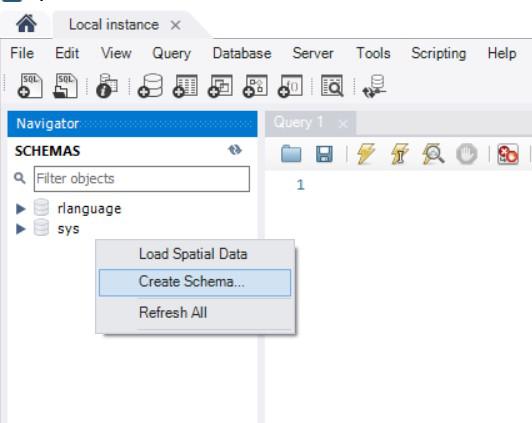
Creating a Schema in MySQL Server Workbench
Created a Schema named ‘gfg‘.
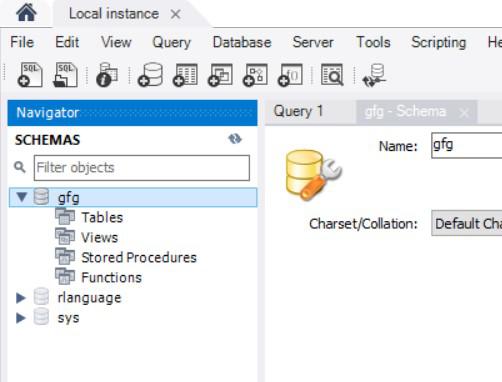
gfg schema created
Step 2: Import necessary modules
The next step is to import various SQLAlchemy modules which are used to create a database and to perform basic operations like insert or update.
from sqlalchemy import create_engine, MetaData, Table, Column, Integer, String
from sqlalchemy.sql import insert,update
Step 3: Setting up the Database Connection
To begin, establish a connection to your MySQL database using SQLAlchemy. The create_engine() function is used to create an SQLAlchemy engine that represents a connection to the database. It takes the database URL as a parameter and returns an engine object.
Make sure to replace the placeholder values (username, password, host, and database_name) with your actual MySQL credentials. If your password contains the ‘@' symbol, it can interfere with the connection URL’s syntax, as the ‘@' the symbol is used to separate the username and password in the URL. To include a special character ‘@' in your password, you need to URL-encode it.
from urllib.parse import quote_plus

password = 'password'
encoded_password = quote_plus(password)
engine = create_engine('mysql+mysqlconnector://username:'+encoded_password+
   '@localhost:3306/database_name')
conn = engine.connect()
Step 4: Create Tables
Next, we will create two tables that we will later use to update their values. In this example, we created a ‘users’ table and an ‘orders’ table.
metadata = MetaData()

table1 = Table('table_name', metadata,
              Column('id', Integer, primary_key=True),
              Column('name', String(255)),
              Column('email', String(255))
              )

table2 = Table('table_name', metadata,
               Column('id', Integer, primary_key=True),
               Column('user_id', Integer),
               Column('product', String(255)),
               Column('quantity', Integer)
               )

metadata.create_all(engine)
Step 5: Insert values
Next, we will insert some values to the tables using the insert() which takes the table name as the parameter, and the values() function which takes a list of values as the parameters.
values1 = [
    {'id':1, 'name':'John', 'email':'john@example.com'},
    {'id':2, 'name':'Jane', 'email':'jane@example.com'}
    ]

values2 = [
    {'id':1, 'user_id':1, 'product':'Product A', 'quantity':5},
    {'id':2, 'user_id':2, 'product':'Product B', 'quantity':15}
]
ins = insert(table1).values(values1)
conn.execute(ins)
conn.commit()

ins = insert(table2).values(values2)
conn.execute(ins)
conn.commit()
Once the values are inserted, we can check the table created in the MySQL Server Workbench.
Step 6: Update tables
To perform multiple table updates using SQLAlchemy Core, we need to define the tables and their relationships using SQLAlchemy’s table constructs. Then, we can use SQLAlchemy’s update() function to update multiple tables in a single transaction.
stmt1 = update(users).values(name='John Do').where(users.c.id == 1)
conn.execute(stmt1)
conn.commit()
Step 7: Close the Session
Finally, close the session to release the database connection:
session.close()
Creating Tables using SQLAlchemy
Here’s an example that demonstrates how to update multiple tables using SQLAlchemy. First we will create two tables and insert some values into it.
Python3
from sqlalchemy import create_engine, MetaData, Table, Column, Integer, String
from sqlalchemy.sql import insert,update
from urllib.parse import quote_plus
password = 'password'
encoded_password = quote_plus(password)
'@localhost/database_name')
conn = engine.connect()
metadata = MetaData()
users = Table('users', metadata,
Column('id', Integer, primary_key=True),
Column('name', String(255)),
Column('email', String(255))
)
orders = Table('orders', metadata,
Column('id', Integer, primary_key=True),
Column('user_id', Integer),
Column('product', String(255)),
Column('quantity', Integer)
)
metadata.create_all(engine)
user_values = [
{'id':1, 'name':'John', 'email':'john@example.com'},
{'id':2, 'name':'Jane', 'email':'jane@example.com'}
]
order_values = [
{'id':1, 'user_id':1, 'product':'Product A', 'quantity':5},
{'id':2, 'user_id':2, 'product':'Product B', 'quantity':15}
]
ins = insert(users).values(user_values)
conn.execute(ins)
conn.commit()
ins = insert(orders).values(order_values)
conn.execute(ins)
conn.commit()
|
Output:
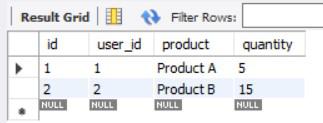
Orders Table
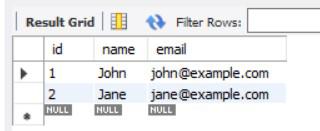
Users Table
Updating Multiple Tables
In this example, we will update multiple tables – ‘orders’ and ‘users’ with different values based on some condition. We update the name column in the 'users' table for a specific user (id=1) and update the product column and quantity in the 'orders' table for the same user (user_id=1) with different values.
Python3
from sqlalchemy import create_engine, MetaData, Table, Column, Integer, String
from sqlalchemy.sql import insert, update
from urllib.parse import quote_plus
password = 'password'
encoded_password = quote_plus(password)
encoded_password+'@localhost/database_name')
conn = engine.connect()
metadata = MetaData()
users = Table('users', metadata,
Column('id', Integer, primary_key=True),
Column('name', String(255)),
Column('email', String(255))
)
orders = Table('orders', metadata,
Column('id', Integer, primary_key=True),
Column('user_id', Integer),
Column('product', String(255)),
Column('quantity', Integer)
)
stmt1 = update(users).values(name='John Do').where(users.c.id == 1)
stmt2 = update(orders).values(product='New Product',
quantity=20).where(orders.c.user_id == 1)
conn.execute(stmt1)
conn.commit()
conn.execute(stmt2)
conn.commit()
conn.close()
|
Output:
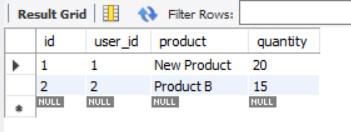
Orders table after Updating
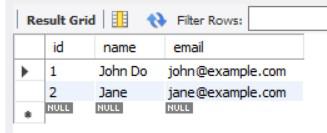
Users table after Updating
Share your thoughts in the comments
Please Login to comment...