Django REST Framework is used to create web APIs very easily and efficiently. This is a wrapper around the Django Framework. There are three stages before creating an API through the REST framework, Converting a Model’s data to JSON/XML format (Serialization), Rendering this data to the view, and Creating a URL for mapping to the views.
Django REST API – CRUD with DRF
For this tutorial, we will be building simple REST APIs for supermarket applications. This store contains a variety of food, beverages, and household products, organized into various categories. These categories have subcategories and subcategories have items under them. Each item has a price for which it can be sold. Now we should be able to add, update, view, and delete such records from our database using DRF APIs.
Let’s assume you have Django set up and installed in your system. In case you don’t have any set up at all then refer to the below articles –
Install Django REST Framework
To install Django REST Framework on Windows, Linux or any operating system, one would need pip package. To check how to install pip on your operating system, check out – PIP Installation – Windows || Linux.
Now, run a simple command,
pip install djangorestframework

After installing the REST framework, go to settings.py, and in INSTALLED_APPS add ‘rest_framework’ at the bottom.
Python3
INSTALLED_APPS = [
'django.contrib.admin',
'django.contrib.auth',
'django.contrib.contenttypes',
'django.contrib.sessions',
'django.contrib.messages',
'django.contrib.staticfiles',
'rest_framework',
]
|
For more information refer to our article Django REST Framework Installation.
Creating App for Django REST Framework
After installing the DRF and adding it to settings.py, let’s create an app using the command –
python manage.py startapp api
A folder with the name api would have been registered by now.

Let’s add this app to INSTALLED_APPS and urls.py also.
In, settings.py,
Python3
INSTALLED_APPS = [
'django.contrib.admin',
'django.contrib.auth',
'django.contrib.contenttypes',
'django.contrib.sessions',
'django.contrib.messages',
'django.contrib.staticfiles',
'rest_framework',
'api.apps.ApiConfig',
]
|
Now, add api urls in urls.py. In gfg_shopping.urls.py,
Python3
from django.contrib import admin
from django.urls import path, include
urlpatterns = [
path('admin/', admin.site.urls),
path('api/', include('api.urls')),
]
|
Creating Model in Django
Now let’s create our model. We will create an item model. This model will be used by API to perform the CRUD operations.
Python3
from django.db import models
class Item(models.Model):
category = models.CharField(max_length=255)
subcategory = models.CharField(max_length=255)
name = models.CharField(max_length=255)
amount = models.PositiveIntegerField()
def __str__(self) -> str:
return self.name
|
Now after our app gets ready let’s create the serializer for our Item class.
Serializing Django Objects
Serializers in Django REST Framework converts the objects into data types that are understandable by javascript and front-end frameworks. Serializers also provide deserialization, allowing parsed data to be converted back into complex types, after first validating the incoming data. The two major serializers that are most popularly used are ModelSerializer and HyperLinkedModelSerialzer.
For this tutorial, we will use the ModelSerializer. If you want to know more about creating serializers manually then refer to the below articles –
ModelSerializer
ModelSerializer is a layer of abstraction over the default serializer that allows to quickly create a serializer for a model in Django. It provides a shortcut that lets you automatically create a Serializer class with fields that correspond to the Model fields. The ModelSerializer class is the same as a regular Serializer class, except that:
- It will automatically generate a set of fields for you, based on the model.
- It will automatically generate validators for the serializer, such as unique_together validators.
- It includes simple default implementations of .create() and .update().
Now let’s create our serlializers.py file in the api folder and add the below code –
Python3
from django.db.models import fields
from rest_framework import serializers
from .models import Item
class ItemSerializer(serializers.ModelSerializer):
class Meta:
model = Item
fields = ('category', 'subcategory', 'name', 'amount')
|
Create Views for Django
To render data into frontend, and handle requests from user, we need to create a view. In Django REST Framework, we call these viewsets, so let’s create a view in apis/views.py,
Python3
from rest_framework.decorators import api_view
from rest_framework.response import Response
from .models import Item
from .serializers import ItemSerializer
@api_view(['GET'])
def ApiOverview(request):
api_urls = {
'all_items': '/',
'Search by Category': '/?category=category_name',
'Search by Subcategory': '/?subcategory=category_name',
'Add': '/create',
'Update': '/update/pk',
'Delete': '/item/pk/delete'
}
return Response(api_urls)
|
In the above code, the api_view decorator takes a list of HTTP methods that a views should response to. Other methods will response with the Method Not Allowed.
Now let’s update our api/urls.py file –
Python3
from django.urls import path
from . import views
urlpatterns = [
path('', views.ApiOverview, name='home')
]
|
Now let’s un our server. Run the following commands –
python manage.py makemigrations
python manage.py migrate
python manage.py runserver
Now head to http://127.0.0.1:8000/api/

Now let’s implement our CRUD Operations through our API.
CRUD Opetration with Django Rest Framework
Django Rest Framework – Create View
Now our create view will use the POST method for inserting data into our database. Let’s create our add_items function in the views.py file.
Python3
from rest_framework import serializers
from rest_framework import status
@api_view(['POST'])
def add_items(request):
item = ItemSerializer(data=request.data)
if Item.objects.filter(**request.data).exists():
raise serializers.ValidationError('This data already exists')
if item.is_valid():
item.save()
return Response(item.data)
else:
return Response(status=status.HTTP_404_NOT_FOUND)
|
Now let’s update our urls.py file and add the endpoint for the create view function we just created.
Python3
from django.urls import path
from . import views
urlpatterns = [
path('', views.ApiOverview, name='home'),
path('create/', views.add_items, name='add-items'),
]
|
Visit http://127.0.0.1:8000/api/create/

Django Rest Framework – Read View
Now our list view will use the GET method for retrieving data from our database. Let’s create our view_items function in the views.py file. This view_items function will either show all the data or filtered data queried by the user according to the category, subcategory, or name.
In views.py
Python3
@api_view(['GET'])
def view_items(request):
if request.query_params:
items = Item.objects.filter(**request.query_params.dict())
else:
items = Item.objects.all()
if items:
serializer = ItemSerializer(items, many=True)
return Response(serializer.data)
else:
return Response(status=status.HTTP_404_NOT_FOUND)
|
In urls.py
Python3
from django.urls import path
from . import views
urlpatterns = [
path('', views.ApiOverview, name='home'),
path('create/', views.add_items, name='add-items'),
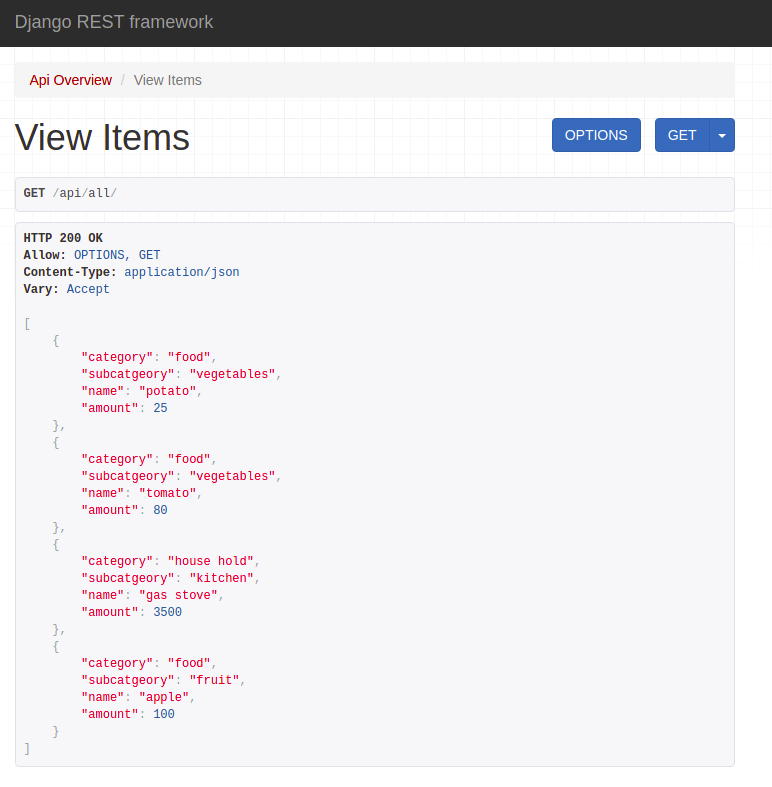
path('all/', views.view_items, name='view_items'),
]
|
Now visit http://127.0.0.1:8000/api/all/
This view function also lets us filter by category or subcategory. You can use either of the following URLs i.e. http://127.0.0.1:8000/api/?category=category_name or http://127.0.0.1:8000/api/?subcategory=category_name to filter for both category and subcategory respectively. You can also use http://127.0.0.1:8000/api/all/?name=item_name to search for a specific item.
If we visit http://127.0.0.1:8000/api/all/?category=food our search result will narrow down to –

Django Rest Framework – Update View
Now for our update view function we will use the POST method. Let’s create our update_items function in the views.py file. This view function will update a particular item from the database. It will filter the item with the help of the primary key.
In views.py
Python3
@api_view(['POST'])
def update_items(request, pk):
item = Item.objects.get(pk=pk)
data = ItemSerializer(instance=item, data=request.data)
if data.is_valid():
data.save()
return Response(data.data)
else:
return Response(status=status.HTTP_404_NOT_FOUND)
|
In urls.py
Python3
from django.urls import path
from . import views
urlpatterns = [
path('', views.ApiOverview, name='home'),
path('create/', views.add_items, name='add-items'),
path('all/', views.view_items, name='view_items'),
path('update/<int:pk>/', views.update_items, name='update-items'),
]
|
Now head to http://127.0.0.1:8000/api/all/?name=potato

Django Rest Framework – Delete View
For our delete view function we will use the DELETE method. Let’s create our delete_items function in the views.py file. This view function will delete a particular item from the database.
In views.py
Python3
@api_view(['DELETE'])
def delete_items(request, pk):
item = get_object_or_404(Item, pk=pk)
item.delete()
return Response(status=status.HTTP_202_ACCEPTED)
|
In urls.py
Python3
from django.urls import path
from . import views
urlpatterns = [
path('', views.ApiOverview, name='home'),
path('create/', views.add_items, name='add-items'),
path('all/', views.view_items, name='view_items'),
path('update/<int:pk>/', views.update_items, name='update-items'),
path('item/<int:pk>/delete/', views.delete_items, name='delete-items'),
]
|
Now visit http://127.0.0.1:8000/api/item/pk/delete/. See the below GIF for better understanding.

Share your thoughts in the comments
Please Login to comment...