CSS Google Fonts
Last Updated :
18 Sep, 2023
What is Google Fonts in CSS?
CSS Google Fonts is a service by Google that provides a diverse collection of web fonts for free. It allows web developers to easily integrate custom fonts into their websites using CSS. Google Fonts, launched in 2010, is the largest free and open-source font library online, available for personal and commercial use.
Google Fonts provides us with API, we have to call that API so that we get a JavaScript file or say script file which we have to include in our HTML code so that we can use different Google fonts.
How to Add Google Fonts to CSS?
There are two common methods that can be used to use Google fonts in our HTML files.
We will explore all the above methods along with their basic implementation with the help of examples.
Add Google Fonts using Link Tag in CSS
In this approach, we are using the Google Fonts link in the HTML <head> section to import the font, and then use it in the CSS styles.
Syntax:
<link href=’https://fonts.googleapis.com/css?family=Font+Name’ rel=’stylesheet’>
Note: Replace Font+Name with the name of the font you want to use.
Example 1: Here is the basic example of using Google fonts by link tag.
HTML
<!DOCTYPE html>
<html>
<head>
<title>CSS Google fonts</title>
<link href=
rel='stylesheet'>
<style>
h1 {
font-family: 'Lobster', cursive;
}
p {
font-family: 'Pacifico', cursive;
}
</style>
</head>
<body>
<h1>GeeksforGeeks</h1>
<p>A Computer Science Portal</p>
</body>
</html>
|
Output:
.png)
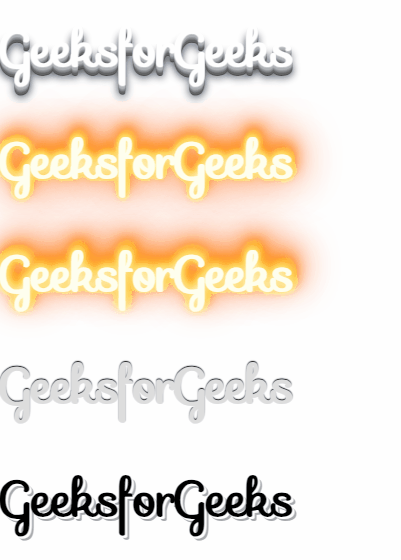
Adding Google Font Effects
In this apporach, we use four headers (h1) styled with different effects from the “Sofia” font-family: 3D,fire,fire-animation,emboss, and shadow-multiple, all displaying the text “GeeksforGeeks.”
Note: To apply special font effects from the Google API, add effect=effectname to the URL. Then use the class “font-effect-effect name” for elements that will have the specific effect applied.
Example: In this example we are using above-explained method.
HTML
<!DOCTYPE html>
<html>
<head>
<link rel="stylesheet"
href=
<style>
body {
font-family: "Sofia", sans-serif;
font-size: 20px;
}
</style>
</head>
<body>
<h1 class="font-effect-3d">
GeeksforGeeks
</h1>
<h1 class="font-effect-fire">
GeeksforGeeks
</h1>
<h1 class="font-effect-fire-animation">
GeeksforGeeks
</h1>
<h1 class="font-effect-emboss">
GeeksforGeeks
</h1>
<h1 class="font-effect-shadow-multiple">
GeeksforGeeks
</h1>
</body>
</html>
|
Output:
Styling Google Fonts
In this approach, we link the “Audiowide” font from Google Fonts and applies it to the entire webpage’s text using CSS. The font size is set to 20px, and there’s a text shadow for added visual effect.
Example: In this example we are using the above-explained apporach.
HTML
<!DOCTYPE html>
<html>
<head>
<link rel="stylesheet"
href=
<style>
body {
font-family: "Audiowide", sans-serif;
font-size: 20px;
text-shadow: 4px 4px 4px gray;
}
</style>
</head>
<body>
<h1>GeeksforGeeks</h1>
</body>
</html>
|
Output:
.png)
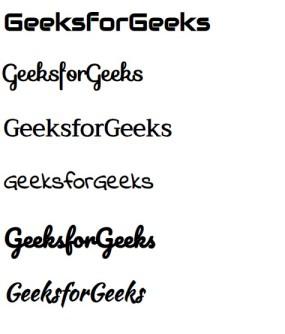
Using Multiple Google Fonts
In this approach, we are using Google Fonts to import six different font styles and applies them to <h1> elements with corresponding classes. Each <h1> showcases a distinct font, creating varied typography styles for headings.
Example: In this example we are using above-explained approach.
HTML
<!DOCTYPE html>
<html>
<head>
<link rel="stylesheet"
href=
<style>
h1.font1 {
font-family: "Audiowide", sans-serif;
}
h1.font2 {
font-family: "Sofia", sans-serif;
}
h1.font3 {
font-family: "Trirong", serif;
}
h1.font4 {
font-family: "Indie Flower", cursive;
}
h1.font5 {
font-family: "Pacifico", cursive;
}
h1.font6 {
font-family: "Kaushan Script", cursive;
}
</style>
</head>
<body>
<h1 class="font1">
GeeksforGeeks
</h1>
<h1 class="font2">
GeeksforGeeks
</h1>
<h1 class="font3">
GeeksforGeeks
</h1>
<h1 class="font4">
GeeksforGeeks
</h1>
<h1 class="font5">
GeeksforGeeks
</h1>
<h1 class="font6">
GeeksforGeeks
</h1>
</body>
</html>
|
Output:
Add Google Fonts using @import in CSS
In this approach, we are using the @import rule in your CSS file to import the Google Fonts, and then apply it to the desired elements.
Syntax:
@import url('https://fonts.googleapis.com/css?family=Lobster');
Example 1: Here we are using the @import method to add different Google fonts in our code example.
HTML
<!DOCTYPE html>
<html>
<head>
<title>CSS Google Fonts</title>
<style>
@import url(
h1 {
font-family: 'Lobster', cursive;
}
p {
font-family: 'Pacifico', cursive;
}
</style>
</head>
<body>
<h1>GeeksforGeeks</h1>
<p>A Computer Science Portal..!</p>
</body>
</html>
|
Output:
.png)
Share your thoughts in the comments
Please Login to comment...