How to Create Primary Partitions in Windows 10?
Last Updated :
24 Jan, 2024
The Windows Operating System comes with a feature where an extensive amount of memory can be stored without any hassle. To make it user-friendly, the large Windows Memory Space gets divided into some parts. These parts are known as the Windows Memory Partition. As per the need, users can create their own Windows 10 Partition.
Two types of Windows Memory Division can be created. One is the Windows Primary Memory Partition and another is the Windows Logical Memory Partition. Generally, when one Windows Memory Area is created it is considered as the Logical Partition. Creation of a Primary Partition in Windows devices are bit tricky.
In this article, we will discuss the required methods to Develop a Primary Partition in Windows OS without causing any errors.
Quick Preview to Create Windows Primary Partition:
- Open Command Prompt in Administrative format.
- Go inside the Disk Part feature with the proper command.
- Select the disk number.
- Create a Primary Partition & assign a Disk Number.
- Format the disk to get started with Disk Utility.
Quick Highlight on Primary Disk Partition on Windows OS:
- The Primary Partition of Windows is one of the memory partitions of the Hard Disk.
- The Primary Partition is known as the space where the OS is installed.
- All Windows devices come with one Primary Partition by default.
- There can’t be more than one Primary partition in the device normally.
- At a time, only one Primary Partition can be active.
Methods to Create Primary Partitions in Windows 10 OS
For Making Windows 10 Primary Partition, the following two methods should be executed. We will start with the Disk Management process.
Method 1: Create Primary Partitions in Windows Using Disk Management
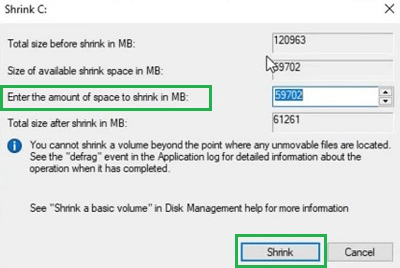
Step 1: Open the Disk Management option and right-click on the Primary Partition which is selected at that point. Click on Shrink Volume.

Step 2: Set up the Size you want in your New Primary Partition. Click on the Shrink option.
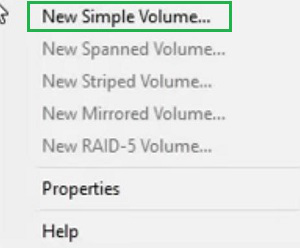
Step 3: Now, when the New Space will be created right-click on it. Go for the New Simple Volume option.
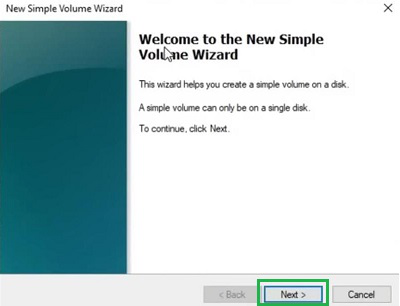
Step 4: Click on the Next option.
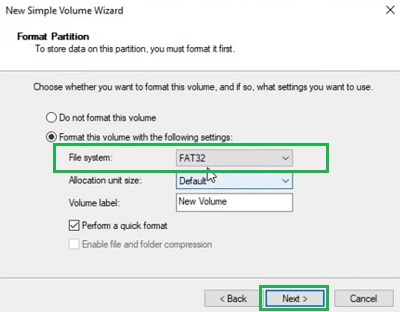
Step 5: In the Next Window, be sure to change the File System to FAT32. Otherwise, it will not act as the Primary Partition. Click Next.
Step 6: Select Finish to complete the process.

Hooray! Using the Disk Management option, you have successfully created the Primary Partition on a Windows 10 device.
Method 2: Create Primary Partitions in Windows Using Command Prompt
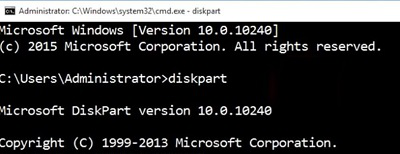
Step 1: Execute the Command Prompt in the Administrative Format. Run the following command. The Command will help to get into the Disk Part section.
Command: diskpart
Step 2: Now, the below-mentioned command will help to select the Disk from where you will break the Primary Partition. Note the number of the disk.
Command: list disk

Step 3: Now, this command will help to get into the Disk Number. And you can make the necessary changes there.
Command: select disk <disk-number>

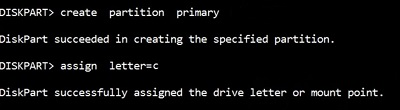
Step 4: It is time to execute the two consecutive commands. The First Command will make the Primary partition. The Second Command will allocate the Disk Number for the New Partition.
First Command: create partition primary
Second Command: assign letter = <any alphabet>
Step 5: Now, at last, the new disk should be formatted to use it properly. Execute the following command in the prompt and wait until it completes.
Command: format fs=ntfs quick

So, these are the simple two methods you can use to Implement a Primary Windows Partition within a few minutes. However, you should have to use the Command Prompt method to Create a Simple Primary Partition. The Primary Partion CMD Method is much less error-prone and the success rate is much more than the Disk Management method.
Also Read
FAQs to Create Primary Partitions in Windows 10
How to create Primary Partitions in Windows 10?
For creating Primary Partition in Windows 10, the following steps should be executed.
- Execute Command Prompt in Administrative format.
- Execute the command diskpart.
- Run the command list disk and note down the disk number.
- Execute the command select disk <disk-number>
- Create Primary partition with the command create partition primary.
- Assign the Disk Number there and format the newly created partition.
Why create Partition Primary?
The Primary Partition in Windows is very much necessary. The Primary Partition indicates that some operating system is installed on that Hard Drive. When you access the Boot Menu, it will access the Primary Partition as the OS files are present there. If you have any issues in Primary Partition, then the OS will also misbehave.
Can you have 2 Primary Partitions?
Yes! You can have 2 or more two Primary Partitions on your device. You can even have 5 Primary Partitions. However, you can only activate one primary partition at a certain time. And the OS which will be installed in that Partition will only work on your device.
Share your thoughts in the comments
Please Login to comment...