How to Change The Primary Group of a User in Linux?
Last Updated :
06 Dec, 2023
In the field of Linux system administration, learning the modification of the primary group is essential. In this article, we are going to deliver concise details about user groups and how to manage them.
What is a Primary Group?
In Linux, every user is associated with a primary group. The primary group is a fundamental concept in Unix-like operating systems, including Linux, and it determines the initial group ownership of files created by the user. When a user creates a file, it is owned by the user’s primary group by default. Each user is a member of one primary group specified in the user’s entry in the /etc/passwd file. The primary group is important because it dictates the default group ownership of files and directories created by the user.
Difference Between Primary Group vs Secondary Group
|
The major group to which a user belongs is known as the primary group. There is exactly one main group for each user.
|
In addition to the primary group, a user may also belong to other groups known as secondary groups. Users may be a part of several secondary groupings.
|
|
By default, the user’s primary group owns any files and directories that are created by the user.
|
The ownership of files and folders by default is unaffected by secondary groups.
|
|
Establishes the initial group permissions for the user’s generated files and folders.
|
Secondary groups don’t affect permissions in that way. The user’s default group and specific file permissions regulate permissions.
|
|
Users can change their primary group using the usermod command.
|
Users can add themselves to secondary groups using the usermod or useradd commands.
|
|
Specified in the user’s entry in the /etc/passwd file under the group ID (GID) field.
|
secondary group information is stored in the /etc/group file.
|
|
The default ownership setting for files and folders created by the user is the primary group.
|
Secondary groups do not affect the user-created files’ default ownership.
|
|
designed to specify the user’s primary affiliation and is frequently applied to collaborative project work.
|
used to grant specific permissions or access rights over and beyond what the main group offers.
|
|
A primary group named “users” for all regular users
|
Secondary groups like “wheel” for administrative access or “audio” for sound-related permissions.
|
How to change the primary group of a user in Linux?
In the Linux Operating system, we have multiple options and commands available to change the primary group of a user. But there are two effective methods available for changing the primary group of a user:
- Method 1: Change the primary group using the usermod command
- Method 2: Change the primary group using /etc/passwd
- Method 3: Change the primary group using the newgrp command
So, let’s see each of the listed methods one by one:
Method 1: Change the primary group using the usermod command
Follow the below-mentioned steps to change the primary group using the usermod command in Linux.
Step 1: Check the primary group of a user (if doesn’t exist)
Syntax:
sudo groups username
- sudo: For granting root privileges, because the command will execute only if root permission is granted.
- groups: It is a command used to check the details groups of a particular user.
Command:
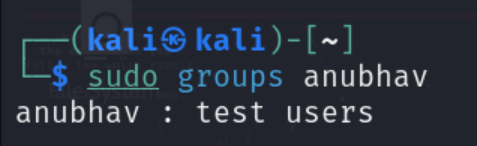
sudo groups anubhav
Here, we are checking whether the primary group for a user exists or not. In the below screenshot, we can see that the user “anubhav” is present in the group “users“. This will assure us that change the primary group in the following steps.

Checking Primary Group of User
Step 2: Create a new group for the current user
Syntax:
sudo groupadd groupname
Command:
sudo groupadd test
Here, we are creating a new group. In the below screenshot is demonstrated to create a group “test” and further used for making it as a primary group of “anubhav”.

Creating New Group
Step 3: Setting or Modifying a User’s Primary Group
Syntax:
sudo usermod -g groupname username
- usermod: It is a command user to change/modify the user’s properties.
- -g: It is used to make the user’s primary group. The group should exist.
Command:
sudo usermod -g test anubhav
Here, we are adding the primary group, In the below screenshot we can see that “test” is assigned as the primary group of “anubhav”.

Adding User To Group
Step 4: Check/Verify the related group of a particular user
Command:
sudo groups anubhav
Here, we can again check the user’s group, In the screenshot below “test” is added to the primary group of “anubhav”.
Verifying the Group Changes
Method 2: Change the primary group using /etc/passwd
Follow the below-mentioned steps to change the primary group using the /etc/passwd in Linux.
Step 1: Create a new group for a user (if doesn’t exist)
Syntax:
sudo groupadd groupname
- groupadd: command to create a new group
Command:
sudo groupadd gfg
Here, we are creating a new group, In the below screenshot we have created the group “gfg” and we will make it the primary group.

Creating Group
Step 2: Take a backup of the/etc/passwd file
Syntax:
sudo cp /etc/passwd backup-filename
- /etc/passwd: It is a plain text file that stores the user account information on Linux.
Command:
sudo cp /etc/passwd /etc/passwd.backup
Before we proceed to make changes in the/etc/passwd file, we need to create a backup. In the below screenshot, we have created a backup. In the worst scenario, if the system will show the errors then we can reset to its default setting by using the backup file.

Backup of /etc/passwd file
Step 3: Alterusers/changes in /etc/passwd
Command:
sudo nano /etc/passwd
We can make changes using any Linux text editor. In the below screenshot, we are using the “nano” text editor to make it changes.

Opening /etc/passwd in nano editor
Step 4: Add a groupname in the user’s entry

Adding Group name in user’s entry
Here, we need to mention the group name to make it a primary group. In the below screenshot, we have added an entry of a new group “gfg” after the GID(Group Identification).
Method 3: Change the primary group using the newgrp command
Follow the below-mentioned steps to change the primary group using the newgrp command in Linux.
Step 1: Check the current groups of a particular user
Syntax:
sudo groups username
- groups: It lists the Linux groups that the user belongs to.
Command:
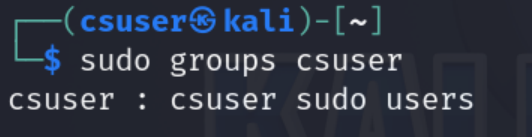
sudo groups csuser
Here, we are checking whether the primary group for a user exists or not. In the below screenshot, we can see that the “users”, and “sudo” is a groups of “csuser”.
Checking Group Exists or Not
Step 2: Create a new group (if doesn’t exist)
Syntax:
sudo groupadd groupname
- groupadd: It is a command to create a new group.
Command:
sudo groupadd tech
Here, we have created a new group “tech” and we will make it a primary group of particular users.

Creating New Group
Step 3: Append/Add group to the respective user
Syntax:
sudo usermod -aG groupname username
- usermod: It is used to modify/change in a user’s properties
- a: append the group
- G: For specifying the groupname
Command:
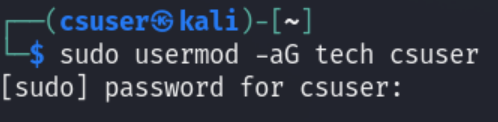
sudo usermod -aG tech csuser
Here, we need to append the group that we have created before such that we can make it as primary group of users. In the below screenshot, we have added the group “tech” in “csuser”.
Appending group to the respective user
Step 4: Adding new primary group
Syntax:
newgrp newgroupname
- newgrp: It is the command used for creating a primary group only for the current session.
Command:
newgrp tech
Here, we are making a primary group of particular users. In the below screenshot, we have created “tech” as a primary group using the newgrp for the current user.

Adding New Primary Group using newgrp command
Step 4: Verify the current group
Command:
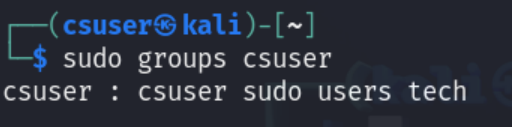
sudo groups csuser
Here, we can check the primary user. In the below screenshot, we can see that “tech” is added to the primary group of “csuser”.
Checking the Primary User
Conclusion
In conclusion, changing the primary group of a user in Linux is essential for effective file management and access control. This process can be accomplished using the usermod command or by manually editing the /etc/passwd file. By understanding the significance of primary groups and following the proper steps, administrators can ensure secure user environments and streamlined permissions within the Linux system.
Share your thoughts in the comments
Please Login to comment...