Create a Map with Google Map Api using React-Native
Last Updated :
22 Mar, 2024
In this project, we’ll explore how to integrate Google Maps into a React Native application. We’ll create a dynamic map that allows users to view their current location and interact with markers on the map. This project aims to provide a practical guide for developers looking to incorporate maps into their mobile applications using React Native.
Output Preview: Let us have a look at how the final output will look like

Prerequisites / Technologies used:
Approach to create Map Application:
- Our approach involves using the react-native-maps library, which provides components for integrating Google Maps into React Native applications. Key functionalities of our map include:
- Displaying the user’s current location on the map.
- Adding custom markers to specific locations on the map.
- Dynamically updating the map based on user interactions.
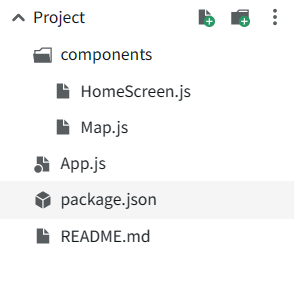
Project Structure:
package.json:
"dependencies": {
    "react-native-maps": "1.10.0",
    "@expo/vector-icons": "^14.0.0",
    "react-native-paper": "4.9.2"
}
Steps to Create the React-Native App:
Step 1. Set up a new React Native project:
Use Expo CLI or React Native CLI to create a new project. For Expo CLI, you can use the following command:
expo init MyMapProject
For React Native CLI, you can use:
npx react-native init MyMapProject
Step 2. Navigate to the project directory:
Once the project is created, navigate to the project directory in your terminal:
cd MyMapProject
Step 3. Install the required dependencies:
Install the necessary dependencies for integrating Google Maps into your React Native project:
npm install react-native-maps @react-native-community/geolocation
Step 4. Write the HomeScreen component:
Create another component file, HomeScreen.js, where you’ll use the Map component and define the initial region for the map.
Javascript
import React from 'react';
import { SafeAreaView } from 'react-native';
import Map from './Map';

const HomeScreen = () => {
    const initialRegion = {
        latitude: 37.78825, // Initial latitude
        longitude: -122.4324, // Initial longitude
        latitudeDelta: 0.0922,
        longitudeDelta: 0.0421,
    };

    return (
        <SafeAreaView style={{ flex: 1 }}>
            <Map initialRegion={initialRegion} />
        </SafeAreaView>
    );
};

export default HomeScreen;
//Map.js

import React from 'react';
import {
    View,
    StyleSheet
} from 'react-native';
import MapView,
{
    Marker
} from 'react-native-maps';

const Map = ({ initialRegion }) => {
    return (
        <View style={styles.container}>
            <MapView
                style={styles.map}
                initialRegion={initialRegion}>
                <Marker
                    coordinate={{
                        latitude: initialRegion.latitude,
                        longitude: initialRegion.longitude,
                    }}
                    title="Your Location"
                />
            </MapView>
        </View>
    );
};

const styles = StyleSheet.create({
    container: {
        ...StyleSheet.absoluteFillObject,
        justifyContent: 'flex-end',
        alignItems: 'center',
    },
    map: {
        ...StyleSheet.absoluteFillObject,
    },
});

export default Map;
import React from 'react';
import HomeScreen
    from './components/HomeScreen';

const App = () => {
    return <HomeScreen />;
};

export default App;
Step 5. Run the application:
Ensure that you have either an Android emulator or iOS simulator set up on your machine. Then, run the following command to start the application:
npx react-native run-android
or
npx react-native run-ios
Output:
Share your thoughts in the comments
Please Login to comment...