Crafting a stunning CRUD Application with MERN stack
Last Updated :
05 Mar, 2024
Creating a CRUD (Create, Read, Update, Delete) application using the MERN stack is an excellent way to build dynamic web applications with JavaScript technologies. The MERN stack consists of MongoDB, Express.js, React, and Node.js, offering a full-stack JavaScript solution for building modern web applications. In this article, we will get through the process of creating a stunning CRUD application using the MERN stack.
Output Preview:

Prerequisites:
Approach to CRUD Application using MERN:
Here we will create a simple Note Taking application to show CRUD Operations
- Plan application requirements, database schema, and user interface layout.
- Develop backend with Node.js and Express, connecting to MongoDB and implementing CRUD operations.
- Create frontend with React, managing state, integrating with backend, and handling user input.
- Test and debug both backend and frontend code for reliability and correctness.
Steps to create MERN Application:
Step 1: Create a folder for the project.
mkdir note-app
cd note-app
Step 2: Create the rect app using the following command.
npx create-react-app client
Step 3: Install the required dependencies:
npm i axios
Folder Structure:
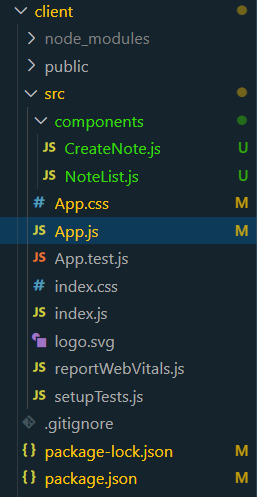
The updated dependencies in package.json file of frontend will look like:
"dependencies": {
    "@testing-library/jest-dom": "^5.17.0",
    "@testing-library/react": "^13.4.0",
    "@testing-library/user-event": "^13.5.0",
    "axios": "^1.6.7",
    "react": "^18.2.0",
    "react-dom": "^18.2.0",
    "react-scripts": "5.0.1",
    "web-vitals": "^2.1.4"
}
Example: Create the required files and add the following codes.
CSS
body {
font-family: 'Arial', sans-serif;
background-color: #f7f7f7;
margin: 0;
padding: 0;
justify-content: center;
align-items: center;
height: 100vh;
}
.container {
width: 80%;
max-width: 1000px;
margin: 20px auto;
padding: 20px;
background-color: #ffffff;
box-shadow: 0 0 20px rgba(0, 0, 0, 0.1);
border-radius: 10px;
}
h2 {
color: #333;
text-align: center;
}
ul {
list-style: none;
padding: 0;
}
li {
margin: 10px 0;
padding: 15px;
background-color: #ffffff;
box-shadow: 0 0 10px rgba(0, 0, 0, 0.1);
border-radius: 10px;
transition: transform 0.2s, box-shadow 0.2s;
}
li:hover {
transform: translateY(-5px);
box-shadow: 0 5px 15px rgba(0, 0, 0, 0.2);
}
button {
margin-right: 5px;
padding: 10px 0;
cursor: pointer;
background-color: #4caf50;
color: #fff;
border: none;
border-radius: 5px;
font-size: 14px;
width: 100%;
transition: background-color 0.2s;
}
button:hover {
background-color: #45a049;
}
.form-container {
display: flex;
flex-direction: column;
margin-bottom: 20px;
}
.form-container label {
margin-bottom: 10px;
color: #555;
}
.form-container input,
.form-container textarea {
padding: 10px;
margin-bottom: 15px;
border: 1px solid #ccc;
border-radius: 5px;
transition: border-color 0.2s;
width: 100%;
}
.form-container input:focus,
.form-container textarea:focus {
border-color: #4caf50;
}
.update-form button {
background-color: #337ab7;
}
.update-form button:hover {
background-color: #2e6da4;
}
|
Javascript
import React, { useState, useEffect } from 'react';
import axios from 'axios';
import NoteList from './components/NoteList';
import CreateNote from './components/CreateNote';
import './App.css';
const App = () => {
const [notes, setNotes] = useState([]);
useEffect(() => {
.then(response => {
setNotes(response.data);
console.log(response.data)
})
.catch(error =>
console.error('Error fetching notes:', error));
}, []);
const handleCreateNote = (newNote) => {
setNotes([...notes, newNote]);
.then(response =>
console.log('Note created:', response.data))
.catch(error =>
console.error('Error creating note:', error));
};
const handleUpdateNote = (noteId) => {
console.log(`Update note with ID: ${noteId}`);
};
const handleDeleteNote = (noteId) => {
setNotes(notes.filter(note => note._id !== noteId));
axios.delete(`http:
.then(response =>
console.log('Note deleted:', response.data))
.catch(error =>
console.error('Error deleting note:', error));
};
return (
<div className="container">
<CreateNote onCreate={handleCreateNote} />
<NoteList notes={notes}
onUpdate={handleUpdateNote}
onDelete={handleDeleteNote} />
</div>
);
};
export default App;
|
Javascript
import React, { useState } from 'react';
const CreateNote = ({ onCreate }) => {
const [title, setTitle] = useState('');
const [content, setContent] = useState('');
const handleCreate = () => {
if (!title || !content) {
alert('Please enter both title and content.');
return;
}
const newNote = {
title: title,
content: content,
status: 'active',
};
onCreate(newNote);
setTitle('');
setContent('');
};
return (
<div>
<h2>Create Note</h2>
<label>Title:</label>
<input type="text" value={title}
onChange={(e) => setTitle(e.target.value)}
name='name' /><br />
<label>Content:</label>
<textarea value={content}
onChange={(e) => setContent(e.target.value)} /><br />
<button onClick={handleCreate}>Create Note</button>
</div>
);
};
export default CreateNote;
|
Javascript
import React from 'react';
const NoteList = ({ notes, onUpdate, onDelete }) => {
return (
<div>
<h2>Notes</h2>
<ul>
{notes.map((note) => (
<li key={note._id}>
<strong>{note.title}</strong>
<p>{note.content}</p>
<p>Status: {note.status}</p>
<button onClick={() =>
onUpdate(note._id)}>Update</button>
<button onClick={() =>
onDelete(note._id)}>Delete</button>
</li>
))}
</ul>
</div>
);
};
export default NoteList;
|
Step 4 :To start the frontend run the following command.
npm start
Step 5: Now create your backend with the following command
mkdir backend
cd backend
npm init -y
Step 6: Install the required dependencies.
npm install express mongoose cors body-parser
Project Structure:
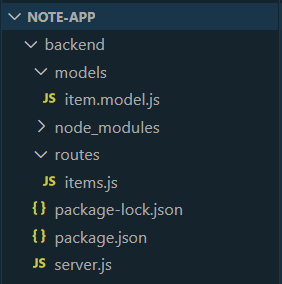
The updated dependencies in package.json file of backend will look like:
"dependencies": {
    "body-parser": "^1.20.2",
    "cors": "^2.8.5",
    "express": "^4.18.2",
    "mongoose": "^8.1.3"
}
Example: Create the required files and add the following codes.
Javascript
const express = require('express');
const mongoose = require('mongoose');
const cors = require('cors');
const bodyParser = require('body-parser');
const app = express();
const PORT = process.env.PORT || 5000;
app.use(cors());
app.use(bodyParser.json());
mongoose.connect('YOUR MONGODB URI',
{ useNewUrlParser: true, useUnifiedTopology: true });
const connection = mongoose.connection;
connection.once('open', () => {
console.log('MongoDB database connection established successfully');
});
const itemRouter = require('./routes/items');
app.use('/items', itemRouter);
app.listen(PORT, () => {
console.log(`Server is running on port: ${PORT}`);
});
|
Javascript
const express = require('express');
const router = express.Router();
const Item = require('../models/item.model');
router.post('/add', (req, res) => {
const { title, content, status } = req.body;
const newNote = new Item({
title,
content,
status: status || 'active',
});
newNote.save()
.then(() => res.json('Note added!'))
.catch(err => res.status(400).json(`Error: ${err}`));
});
router.get('/', (req, res) => {
Item.find()
.then(notes => res.json(notes))
.catch(err => res.status(400).json(`Error: ${err}`));
});
router.put('/update/:id', (req, res) => {
Item.findById(req.params.id)
.then(note => {
note.title = req.body.title;
note.content = req.body.content;
note.status = req.body.status || note.status;
note.save()
.then(() => res.json('Note updated!'))
.catch(err => res.status(400).json(`Error: ${err}`));
})
.catch(err => res.status(400).json(`Error: ${err}`));
});
router.delete('/:id', (req, res) => {
Item.findByIdAndDelete(req.params.id)
.then(() => res.json('Note deleted.'))
.catch(err => res.status(400).json(`Error: ${err}`));
});
module.exports = router;
|
Javascript
const mongoose = require('mongoose');
const Schema = mongoose.Schema;
const itemSchema = new Schema({
name: { type: String },
description: { type: String },
});
const Item = mongoose.model('Item', itemSchema);
module.exports = Item;
|
Step 7: To start the backend run the following command.
node server.js
Output:
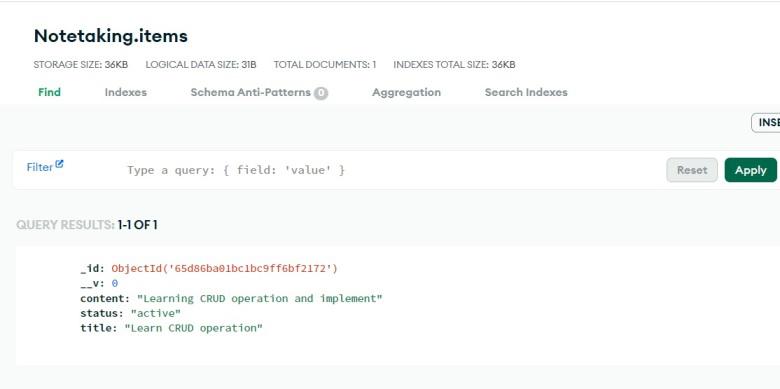
MongoDB

Share your thoughts in the comments
Please Login to comment...