CI is a software development practice where members of a team integrate their work frequently. They typically do this by merging their code changes into a shared main branch at least daily. Each integration is then verified by an automated build process, which runs tests to detect integration bugs as quickly as possible. Many teams use a CI server or cloud service to automate this testing and build process. The key goals of continuous Integration are as to:
- Detect bugs and issues with integration early on, rather than later down the line. This makes them easier and faster to fix.
- Ensure that all team members are working on up-to-date code rather than diverging copies.
- Avoid last minute scrambling when trying to stitch together features and fixes that different people have been working on separately.
Overview Of Azure Pipelines?
Microsoft’s Azure Pipelines hide powerful capabilities I’m excited to explain. Pipelines reference the flowing nature of code integration: commit code updates and improvements ripple out automatically. There are no more anxious late nights waiting for builds or dreaded migrations. The right syntax translates developer intentions into programs that test and deploy themselves.
Code testing and evolution is coordinated automatically now. It’s like magic spells cast by writing a few special lines. Programs emulate buildings that continuously renovate and improve themselves. Software magic has evolved in wondrous ways – let’s discover what possibilities Azure Pipelines unlock!
What Is Azure Pipeline And Its Integration With Continuous Integration?
As a software professional, setting up a robust Azure Pipeline is crucial for enabling continuous integration and delivery. The process may seem daunting initially, but can be broken down into a few key steps – connecting to your source code repository, configuring triggers, specifying agents, and defining variables.
- First, you’ll need to point your Azure Pipeline to your source code, hosted on either GitHub, Azure Repos, BitBucket, or other Git-compatible services. This integration allows the pipeline to monitor the code base and kick off automation whenever changes are detected. The ease of use in linking these services makes it simple to get started.
- Next, pipeline triggers act as the conductor, orchestrating builds and deployments. By configuring schedules, events, or source code updates as triggers, you take full control over the automation cadence. Carefully tuned triggers mean faster feedback on code changes.
- When it comes time to compile, test, and deploy the code, capable build agents do the heavy lifting. Azure Pipelines flexibly supports Windows, Linux, or Docker container agents to match your application stack. Quickly spinning up and tearing down these on-demand workers drives efficient execution.
- Lastly, parameterized variables enable separation of secrets like connection strings, credentials, and third party keys from the pipeline definitions. Storing this configuration abstractly minimizes security risks. Variables can then get injected safely at execution time.
Once connected to the code, triggered on relevant events, assigned capable agents, and parameterized appropriately, an Azure Pipeline forms an effective, secure, adaptable automation backbone. Modular abstractions help tame the initial complexity, making Azure Pipelines the bedrock of robust CI/CD.
Continuous Integration With Azure Pipelines: A Step By Step Guide
Continuous integration (CI) is a key DevOps practice that allows developers to frequently merge code changes into a shared repository. Automating builds, tests, and validations via a CI pipeline catches issues early and improves software quality. In this article, we will walk through creating a robust CI pipeline on Azure Pipelines.
Step 1: Connecting To Git Repository
- When setting up the pipeline, you will be prompted to authorize and connect to the Git provider hosting your application’s source code. Under the hood, this uses OAuth to establish trust and access without needing to hardcode credentials.
- Azure Pipelines relies on this Git integration for the following reasons:
- To access the application source code in order to build, test and deploy it through automation. The pipeline will fetch the latest commit each time it runs.
- To enable triggering pipeline executions on code commits and pull requests. Webhooks are registered so that notifications on Git events can queue new pipeline runs.
- To correlate commits with the corresponding pipeline executions. The logs allow tracing any issues to the specific version in source control.
- To implement CD by deploying successfully-tested commits directly to production environments. The commit details are stamped onto the build artifacts.
- The connection supports repositories hosted on GitHub, Azure DevOps, Bitbucket, and GitLab among others. The wizard streamlines authentication through OAuth. Repos can be public or private as the authorization protocols allow secure access.

- In the above screenshot, We select the Git Repository for the source code, from the platform that hosted your code.
Step 2: Configuring Trigger
- Triggers allow you to control precisely what events will automatically queue new pipeline execution runs.
- Instead of having to manually trigger builds, properly configured triggers enable true continuous integration and delivery in alignment with Agile and DevOps practices.
The following are some common triggers to consider while setting up:
- Code commits to designated branches – Whenever developers push changes to the main codebase or key integration branches, triggers execute tests to detect integration issues early.
- Pull requests – Running the pipeline on PRs lets you validate changes before merging to ensure quality. Reviews can leverage the automation logs to make decisions.
- Scheduled builds – In addition to code change driven triggers, scheduled triggers let you build, test and deploy on a fixed cadence such as nightly. This exercises the pipeline regularly.
- Triggers are defined through the pipeline editor under the configuration YAML file. You need to specify details like branch filters, batch frequencies etc per your deployment cadence needs.
- Advanced options exist as well – time windows, variable overrides, build timeouts etc. can be configured to tailor trigger automation as per your use cases.
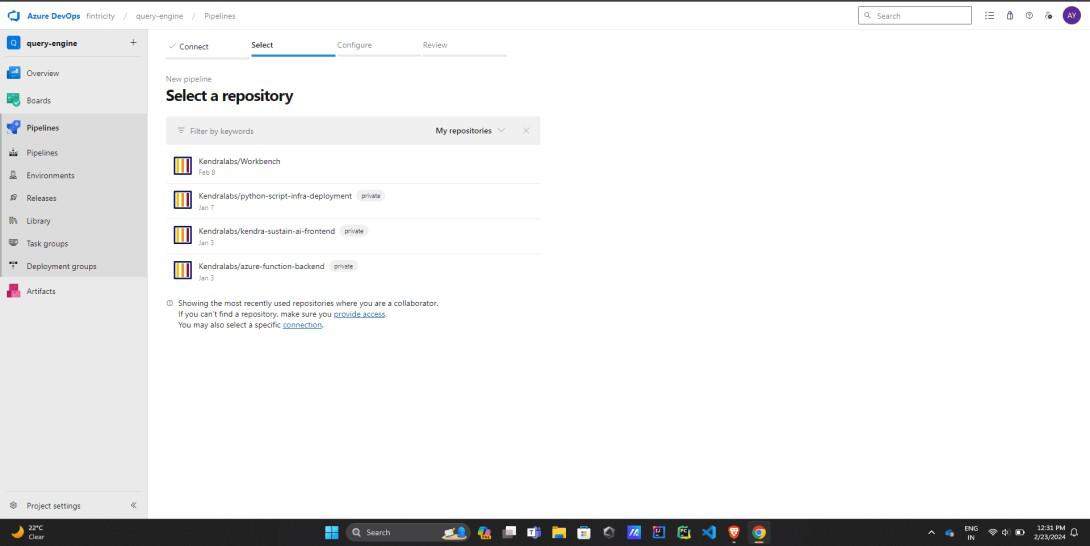
- In the above screenshot, we select the Repository that you want to enable the CI pipeline in azure pipeline, and build the code.
Step 3: Specifying Pipeline Steps
- The steps defined in your pipeline YAML represent the commands, scripts and actions that combine to build, test, analyze and deploy your applications. Steps are executed sequentially within the context of stages and jobs.
- Some common pipeline steps include as follows:
- Install dependencies: Steps to restore/download dependencies from package managers like npm, NuGet etc.
- Compile code: Invoking compilers like Maven, MSBuild, dotnet etc to build binaries from source code.
- Create artifacts: Bundling output into shareable packages that can be passed to downstream deployment jobs.
- Run security scans: Steps to integrate security tools like creds scanner, OWASP ZAP, snyk etc to uncover vulnerabilities.
- Execute testing suites: Components to implement unit, integration and functional automation test execution on endpoints and modules.
- Deploy to environment: Leverage deployment steps to release/configure infrastructure or provision cloud resources.
- The Azure Pipelines marketplace offers 3000+ pre-built tasks that can be incorporated through a graphical interface. You can also create custom scripts/commands using any language like PowerShell.
- The key is structuring steps tailored to your application architecture that serve as a robust CI/CD assembly line. Monitor step output to fix issues quickly.
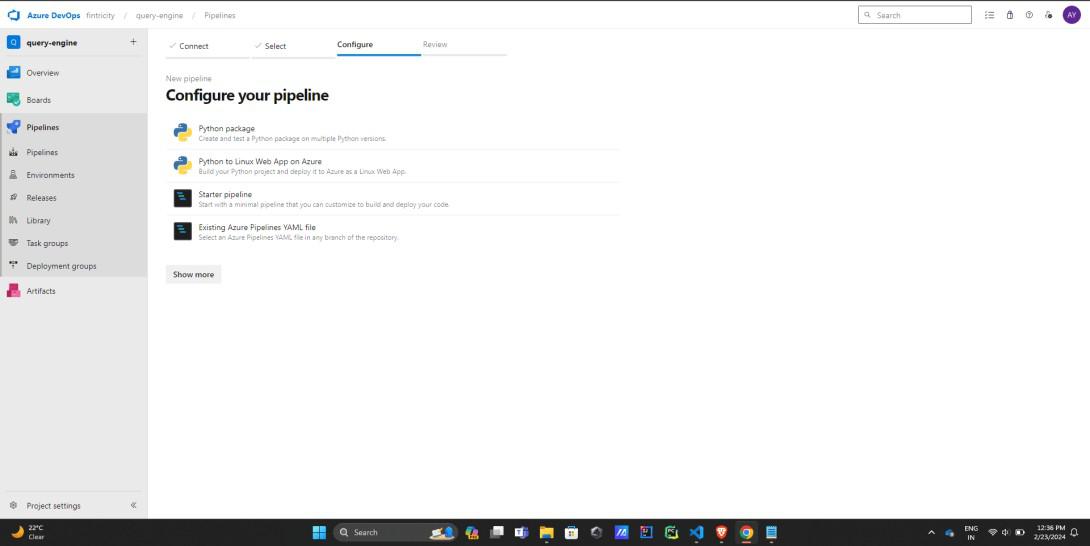 In the above screenshot we select the type of the app we have and the style in which we want to configure the further pipeline.
Step 4: Setting Up Test Automation
- Testing is a critical pipeline practice to prevent defects and technical debt from accumulating.
- Azure Pipelines has first-class support for incorporating automated testing frameworks into CI/CD flows. Some key aspects:
- Unit Testing: Lightweight tests exercised against classes and functions to validate stability. Popular frameworks used include MSTest, xUnit, Jasmine. Checks get packaged into pipeline steps.
- Integration Testing: Verify modules interact correctly by testing interfaces and data flow between components wired together.
- UI Testing: Leverage Selenium to emulate user journeys and interactions to catch front-end bugs. Headless browser automation runs quickly in pipelines.
- Load Testing: Stress test application capacity thresholds using Apache JMeter traffic generation. Help baseline for production usage spikes.
- Accessibility Testing: Scanner stages can analyze UI compliance with accessibility standards for special needs.
- Test outputs like code coverage measures, timing data and pass/fail statuses are published as pipeline artifacts.
- Management dashboards use this to track quality metrics over releases. Configure triggers to fail deployments in case critical test thresholds breach.

In the above screenshot, the sample pipeline is give which can be configured and changed according to the needs.
Step 5: Adding Deployment Gates
- Deployment gates act as quality gates before releasing changes into production environments.
- They provide governance and safety nets to balance the speed of continuous delivery. Some common deployment gates include:
- Manual Approvals: Requiring human sign-off through the Azure Pipelines UI or via Rest API call. Approvers can review test results and logs before granting deployment permission.
- Automated Gates: Setting pipeline conditions related to code coverage, security flaws, functional tests etc. Automated gates block deployments if thresholds are breached.
- Canary Testing: Incrementally routing a small percentage of traffic to new changes. Metrics are evaluated for any regressions before ramping up.
- Blue-Green: Releasing into a separate staging slot first, smoke testing it, then switching routing over. Rollbacks are easy by just flicking routing back.
- Time Gates: Setting deployment windows through pipeline schedules. Great for changes to production systems when minimal disruption is preferred.
The goal of these deployment gates is to reduce business risk, prevent outages, and facilitate rapid rollbacks if issues emerge in production. Audit trails track approvals and changes as well.

Monitoring And Reporting Of Pipelines
Continuous integration and delivery pipelines are crucial for accelerating software delivery, but transparent monitoring and insightful reporting transforms awareness into action. By tracking key pipeline metrics, leveraging smart integrations, analyzing CI/CD processes in depth and managing KPIs holistically, teams can unlock myriad benefits. Here’s a closer look at some best practices:
- Pipeline Dashboards: Azure Pipelines ships with pre-built dashboards covering job status, test reporting, deployments, build issues and other facets in real-time. Drilling down into specific runs reveals console logs, timing analytics and artifact repositories. Customizable team dashboards cater to particular scenarios as well.
- Notifications and Alerting: Integrating notification services like Slack, Microsoft Teams or SMTP within Azure Pipelines keeps stakeholders aware through configurable alerts on successes, failures, test results or other events. This fosters collaboration, surfaces pipeline issues rapidly for triage, and generally tightens feedback loops.
- CI/CD Reporting: Advanced reporting spans lead time metrics, deployment frequency and fail rate, pull request cycle time, and test coverage analytics. CI/CD data can integrate with PowerBI dashboards as well for broader sharing across the organization. The insights help balance velocity, stability and quality.
- Cross-pipeline KPI Management: To enable apples-to-apples comparisons, key benchmark definitions like deployment frequency, change failure rate and lead time for changes should remain consistent across pipelines. Shared instrumentation and visualization of these operational KPIs brings reliability and velocity in harmony.
In closing, purpose-built Azure Pipeline dashboards grant real-time visibility, notifications spread awareness, reporting reveals trends and patterns, while common KPIs align priorities holistically. Taken together, these capabilities transform pipeline health transparency from reactive to proactive. That’s the cornerstone for confident delivery at speed.
Tips For CI/CD Success In Azure Cloud
As a DevOps coach, I’m often asked – “What practices enable software teams to deliver value quickly but safely using CI/CD pipelines?” After helping numerous organizations transform, I’ve synthesized my learnings into six areas:
- Source Control Hygiene: Robust source control use is foundational to CI/CD success. Adopt lightweight, isolated commits with contextual messages. Embrace semantic versioning and changelogs. Enforce peer reviews through pull requests. These practices keep builds fast yet communication clear. Guard against monorepo bloat too!
- Treat Infrastructure As Code: If your EC2 instances, load balancers or databases are still provisioned manually, consider that technical debt. Infrastructure-as-code with tools like Terraform, on the same repos as application code unlocks optimization. Testing infra alongside apps shifts left, improving quality and reliability under automation.
- Automated Testing Mindset: Focusing largely on unit testing causes pipeline brittleness and escaped defects over time. Instead adopt layered test automation – units for foundations, integration tests to validate transactions, functional UI flows mirroring user interactions, security scanning, performance benchmarks and so on. Perfect test sufficiency and stability together.
- Shorten Feedback Loops: Days long integration and user testing cycles delay issue detection exponentially. The solution lies in expanding automation and pull request validations to maximize early warning coverage through software delivery lifecycle. Pipelines must provide feedback measured in minutes on proposed changes to accelerate innovation.
- Shift Quality Left: Through early static analysis we catch issues preemptively without running tests. Scan coding styles, dependencies, configurations – integrating tools like Sonarqube and Snyk. By shifting scanning left in SDLC and breaking builds on policy violations, we compound code integrity before regressions escape downstream.
Security And Compliance Readiness
Finally, integrate security scans, infrastructure tests and compliance gates proactively within pipeline lengths and frequencies matching your risk appetite. Shifting security left, nipping risks through automation, communicating transparently, verifies regulatory readiness continuously.
Those six pillars enable CI/CD transformation for maximal quality and speed – hope they provide helpful guidance on your automation journey!
Conclusion
In closing, mature CI/CD pipelines are pivotal for organizations to deliver high quality software quickly, securely and reliably. However, technical depth alone is not enough – aspects like source control discipline, test automation strategies, rapid feedback loops, proactive quality safeguards and continuous compliance pave this path to productive innovation. With vision and rigor around these pillars, teams reach unprecedented release velocities while upholding stability, security and governance standards simultaneously.
The CI/CD journey requires patience initially but pays compounding dividends when these foundational practices become second nature. Take stock of where your development lifecycle stands today across each dimension and tackle capability gaps incrementally. Internalize lessons from successes and missteps. Lead by example. Progress may seem slow at first but results ultimately catalyze rapidly. Before you know it, healthy engineering culture blossoms, closely aligned with business outcomes.
Continuous Integration With Azure Pipelines – FAQ’s
Does Azure Pipelines Support Connecting To All Major Git Providers Like GitHub And BitBucket?
Yes, Azure Pipelines has first-class integration with GitHub, BitBucket, Azure Repos and other popular Git providers to enable CI/CD.
What Types Of Triggers Can I Set Up To Initiate My Pipeline?
You can configure scheduled triggers, continuous integration triggers on commits/PRs to specific branches, and even triggers based on external events using webhooks.
Can I Incorporate Existing Scripts And Build Tools In My Pipeline?
Yes, you can call custom scripts and command line tools via pipeline tasks. Extensive tool ecosystem support is available.
How Quickly Can Azure Pipelines Give Feedback On My Code Changes?
Depending on your tests and validations, pipelines typically provide automated feedback in under 10-15 minutes allowing rapid iteration.
What Programming Languages And Frameworks Are Supported Out-Of-The-Box?
Azure Pipelines supports all major languages like .NET, JavaScript, Python, Java, Go etc. and test frameworks like MSTest and JUnit.
Can I View Historical Pipeline Execution Metrics And Logs?
Yes, Azure Pipelines comes with retention and auditing capabilities for pipeline logs, artifacts, execution times and test reporting.
Is It Completely Free To Use Azure Pipelines For Continuous Integration?
Yes, Azure Pipelines provides generous free tier for private repos supporting unlimited CI/CD needs for small teams.
Share your thoughts in the comments
Please Login to comment...