Constraints in Figma
Last Updated :
12 Mar, 2024
Responsiveness and flexibility are two crucial elements of any successful design, especially while designing the User Interface (UI) for any application or device as it creates good User Experience (UX), and constraints control those two parameters.
So, constraints guide Figma’s layers on how to respond (adjust their alignment) when a frame is resized. The layer to which the constraint is applied acts according to the predefined constrained manner.
Representation of Constraints in Figma
In Figma, a constraint is usually shown by two dashed lines going along in each direction (by default on the top and left).
The panel for adjusting the constraint in Figma is displayed on the upper right-hand side where alignment types are present.
There is a little square box (Constraint box) also. By controlling the axes selection in it, constraints could be applied in varied directions.

Figma UI showing Object and constraints box, lines, types
Types of Constraints
There are two major ways constraints are aligned in the space and these two are detrimental to the basic alignment. These are Horizontal (X) and Vertical (Y) alignments.
Horizontal Alignment
There are 5 options in the horizontal alignment, which make alignment horizontally dynamic and adjustable. These are:
- Left, which allows the object to be adjusted concerning the left side of the frame so if the frame is resized to the left side, then the object will flow leftward.
- Right, which allows the object to be adjusted concerning the right side of the frame so if the frame is resized to the right side, then the object will flow rightwards.
- Left and right, allow the object to be adjusted concerning both sides of the frame so if the frame is moved anyway along the x-axis, then to that side the object will grow in size.
- Centre, allows the object to be adjusted concerning the horizontal centre of the frame giving the option to have a stable object in the position it is first placed.
- Scale, which allows the object’s parameters (object and dimension) to be defined as a percentage of the frame’s dimensions so now the object will readjust its parameters according to how the frame will be adjusted.
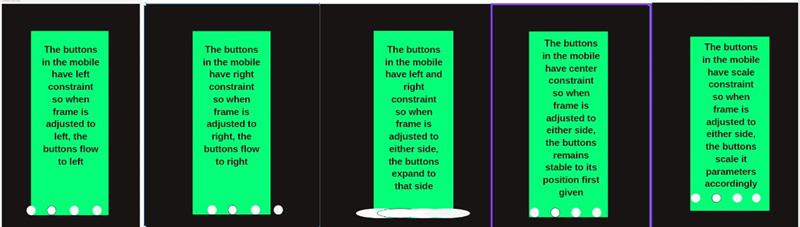
Figma UI showing different horizontal constraints
Vertical Alignment
There are 5 options in vertical alignment, which make the alignment vertically dynamic and adjustable. These are:
- Top, which allows the layer to be adjusted about the top of the frame so if the frame is resized to the top, then the object will flow upwards
- Bottom, which allows the layer to be adjusted about the bottom of the frame so if the frame is resized to the bottom, then the object will flow downwards.
- Top and Bottom maintain the layer’s parameters (size and position) about the top and bottom of the frame so if the frame is resized along the y-axis, then to that side, the object shows an increase in size.
- Centre, which allows the layer to be adjusted about the vertical centre of the frame so if the frame is adjusted to any side along the y-axis, the object remains stable in its determined position.
- Scale, which allows to layer’s parameters (size and position) to be defined as the percentage of the frame’s dimension so now the object will readjust its parameters according to how frame will be adjusted.

Figma UI showing different vertical constraints
Importance of Constraints
Constraints become crucial for designer especially while designing UI that needs to be utilized for multi-device channels and thus their importance could be understood with an example.
- A design needs to be prepared for a smartwatch, with a background, an image and a time-date stamp in it.
- Now, if the UI is adjusted such that the frame is resized, and the background needs to be resized accordingly, it should be set to scale horizontally and vertically.
- Now, there arises the condition that other elements get altered but the designer also needs to keep them to their real, so in that case, the elements need to have centre constraints.
- By applying the constraints, now the design is suited to need.

Figma UI design with and without constraints
Method to Apply Constraints
Some key points to remember before applying constraints:
- Constraints could be applied to any layer within a frame but not to any layer that is not attached to the frame (layers outside the frame) or if you have the auto-layout option enabled.
- Constraints could also be applied to frames nested within other frames but could not be applied to groups and if applied, then Figma applies constraints to the individual layers.
- Constraints only work for rows and columns that are set to stretch and not anything else.
How to apply Constraints to a layer?
A layer is built within the frame of the design and thus applying a constraints to a layer is similar to settings constraints.
- Select the layer given within the frame you intend to apply constraint to.
- Adjust the vertical and horizontal parameters appeared when once the layer is selected.
- Click on each tab of either vertical or horizontal constraint box and select the layer according to the need.
Limitations of constraints and overcoming them by ignoring constraints
Constraints are biding in nature so once applied they will be affected every time a frame is readjusted according to the need of the designer, however, this creates a limitation in design as some components need to be readjusted without constraints getting the design affected. To overcome this, Figma gives an option to ignore the constraints’ effect while readjusting the frame.
So, to ignore the constraints use of following modifier key can be utilized:
Command key when resizing for the mac
Ctrl key when resizing for the windows.
Conclusion
Constraints are crucial for scaling and resizing purposes, giving an advantageous curve to the designer by allowing to have a dynamic design for multi-device utility. Applied to horizontal and vertical directions, these give greater flexibility in the X-Y plane, however, constraints could also sometimes cause hindrance in designing and thus could be ignored by use of key modifiers.
Share your thoughts in the comments
Please Login to comment...