Bounding Box Prediction using PyTorch
Last Updated :
04 Jan, 2024
In the realm of computer vision, PyTorch has emerged as a powerful framework for developing sophisticated models. One fascinating application within this field is bounding box prediction, a crucial task for object detection. In this article, we delve into the world of bounding box prediction using PyTorch, providing a step-by-step guide and insights into the process. From understanding the basics to exploring a practical implementation, this article aims to demystify the complexities behind bounding box detection.
Bounding Box Prediction from Scratch using PyTorch
Building a bounding box prediction model from scratch using PyTorch involves creating a neural network that learns to localize objects within images. This task typically employs a convolutional neural network (CNN) architecture to capture spatial hierarchies. The model is trained on a dataset with annotated bounding boxes. During training, the network refines its parameters through backpropagation, minimizing the difference between predicted and ground truth bounding boxes. Key components include image preprocessing, defining the neural network architecture with regression outputs for box coordinates, and optimizing with a loss function. Implementing such models enhances computer vision applications, enabling accurate object localization and detection.
Introduction to PyTorch
PyTorch has become a cornerstone in the world of deep learning, renowned for its dynamic computational graph and user-friendly interface. Developed by Facebook, PyTorch has gained popularity among researchers and developers for its flexibility and ease of use. Before we embark on our journey into bounding box prediction, let’s briefly explore why PyTorch is a preferred choice for many in the machine learning community.
What is Bounding Box Detection?
Bounding box detection is a fundamental computer vision task that involves identifying and localizing objects within an image. Instead of merely classifying objects, as in image classification, bounding box detection provides a more detailed understanding of the spatial extent of each object. This information is crucial for various applications, from autonomous vehicles to video surveillance.
Implementation of Bounding Box Prediction from Scratch using PyTorch
Importing Libraries
- torch: PyTorch library for deep learning.
- torchvision: A PyTorch package that provides datasets, models, and transforms for computer vision tasks.
- transforms from torchvision: Functions for image transformations.
- cv2: OpenCV library for computer vision tasks.
Python3
import torch
import torchvision
from torchvision import transforms as T
import cv2
|
Loading the pretrained model
model = torchvision.models.detection.ssd300_vgg16(pretrained=True): Loads a pre-trained SSD model with a VGG16 backbone. The pretrained=True argument loads the weights trained on a large dataset.
Python3
model = torchvision.models.detection.ssd300_vgg16(pretrained = True)
model.eval()
|
This code snippet utilizes PyTorch and torchvision to load a pre-trained Single Shot Multibox Detector (SSD) model with a VGG16 backbone. The pretrained=True argument downloads and initializes the model with weights pre-trained on a large dataset. The model.eval() sets the model in evaluation mode, disabling features like dropout to ensure consistent behavior during inference. This pre-trained SSD300_VGG16 model is designed for object detection tasks and is ready for use in detecting objects within images.
Reading class names
Notepad file for classname: classes.txt
The script reads class names from a file named ‘classes.txt’ and stores them in the classnames list.
Python3
classnames = []
with open('/content/classes.txt','r') as f:
classnames = f.read().splitlines()
|
This code reads the contents of a text file named “classes.txt” located at the path “/content/” and stores each line as an element in the list classnames. The splitlines() method is then used to separate the lines from the file and populate the list with class names.
Reading and Preprocessing the Image
load_image(image_path) function:
- Takes a file path (image_path) as an argument.
- Uses OpenCV (cv2) to read the image from the specified path.
- Returns the loaded image.
transform_image(image) function:
- Takes an image as input.
- Uses torchvision’s ToTensor() transformation to convert the image to a PyTorch tensor.
- Returns the transformed image tensor.
Python3
def load_image(image_path):
image = cv2.imread(image_path)
return image
def transform_image(image):
img_transform = T.ToTensor()
image_tensor = img_transform(image)
return image_tensor
|
The load_image function reads an image from the specified path using OpenCV’s cv2.imread and returns the image. The transform_image function uses torchvision’s ToTensor transformation to convert the input image (in OpenCV format) into a PyTorch tensor.
Making Predictions
detect_objects(model, image_tensor, confidence_threshold=0.80) function:
- Takes an object detection model (model), an image tensor (image_tensor), and an optional confidence threshold (default is 0.80) as arguments.
- Uses the provided model to make predictions on the input image tensor.
- Filters the predicted bounding boxes, scores, and labels based on the specified confidence threshold.
- Returns filtered bounding boxes, scores, and labels.
Python3
def detect_objects(model, image_tensor, confidence_threshold=0.80):
with torch.no_grad():
y_pred = model([image_tensor])
bbox, scores, labels = y_pred[0]['boxes'], y_pred[0]['scores'], y_pred[0]['labels']
indices = torch.nonzero(scores > confidence_threshold).squeeze(1)
filtered_bbox = bbox[indices]
filtered_scores = scores[indices]
filtered_labels = labels[indices]
return filtered_bbox, filtered_scores, filtered_labels
|
This function detect_objects takes a pre-trained object detection model (model) and an input image tensor (image_tensor). It performs inference with the model, filters the predicted bounding boxes, scores, and labels based on a confidence threshold (default is 0.80), and returns the filtered results. The filtered results include bounding boxes (filtered_bbox), corresponding scores (filtered_scores), and class labels (filtered_labels). This allows for identifying objects in the image with confidence scores exceeding the specified threshold.
Drawing Bounding Boxes
draw_boxes_and_labels(image, bbox, labels, class_names) function:
- Takes an image, bounding boxes, labels, and class names as arguments.
- Creates a copy of the input image (img_copy) to avoid modifying the original image.
- Iterates over each bounding box in the provided list.
- Draws a rectangle around the object using OpenCV based on the bounding box coordinates.
- Retrieves the class index and corresponding class name from the provided lists.
- Adds text to the image indicating the detected class.
- Returns the modified image.
Python3
def draw_boxes_and_labels(image, bbox, labels, class_names):
img_copy = image.copy()
for i in range(len(bbox)):
x, y, w, h = bbox[i].numpy().astype('int')
cv2.rectangle(img_copy, (x, y), (w, h), (0, 0, 255), 5)
class_index = labels[i].numpy().astype('int')
class_detected = class_names[class_index - 1]
cv2.putText(img_copy, class_detected, (x, y + 100), cv2.FONT_HERSHEY_SIMPLEX, 2, (0, 255, 0), 2, cv2.LINE_AA)
return img_copy
|
The function draw_boxes_and_labels overlays bounding boxes and class labels on an image copy. It iterates through the provided bounding boxes (bbox), labels (labels), and class names (class_names). For each detected object, it draws a red bounding box and prints the corresponding class label in green on the image. The modified image copy is then returned.
Displaying the Result
- Specifies the path to the image file (image_path).
- Calls load_image to load the image from the specified path.
- Calls transform_image to convert the image to a PyTorch tensor.
- Calls detect_objects to obtain filtered bounding boxes, scores, and labels using the object detection model.
- Calls draw_boxes_and_labels to draw bounding boxes and labels on the original image.
- Displays the result using cv2_imshow.
Python3
from google.colab.patches import cv2_imshow
image_path = '/content/mandog.jpg'
img = load_image(image_path)
img_tensor = transform_image(img)
bbox, scores, labels = detect_objects(model, img_tensor)
result_img = draw_boxes_and_labels(img, bbox, labels, classnames)
cv2_imshow(result_img)
|
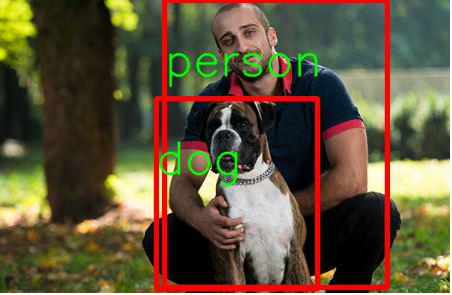
Output:
Applications of Bounding Box Detection
Bounding box detection finds applications across diverse domains, revolutionizing how machines perceive and interact with visual data. Here are some key areas where bounding box detection plays a pivotal role:
- Object Recognition in Autonomous Vehicles: Bounding box detection is crucial for identifying pedestrians, vehicles, and other obstacles in the environment, contributing to the safety and efficiency of autonomous vehicles.
- Security and Surveillance: In video surveillance systems, bounding box detection helps track and analyze the movement of objects or individuals, enhancing security measures.
- Retail Analytics: Bounding box detection is employed in retail settings for tracking and monitoring product movements, managing inventory, and improving the overall shopping experience.
- Medical Image Analysis: Within the field of medical imaging, bounding box detection aids in identifying and localizing abnormalities or specific structures within images, assisting in diagnoses.
Conclusion
Bounding box prediction with PyTorch opens doors to a wide array of applications, from enhancing safety on the roads to improving efficiency in retail environments. As we continue to explore the capabilities of deep learning frameworks like PyTorch, the potential for innovation in computer vision becomes increasingly apparent. Armed with the knowledge gained from this article, you are well-equipped to embark on your own ventures in bounding box detection and contribute to the exciting world of computer vision.
Share your thoughts in the comments
Please Login to comment...