Writing and Executing Queries in GraphQL
Last Updated :
23 Jan, 2024
GraphQL has developed into an effective API language that offers developers more effective and adaptable ways to work with data. By enabling clients to request only the data they require, GraphQL, in contrast with traditional REST APIs, removes over- and under-conditioning. In this article, we are going to go through the fundamentals of creating and executing queries in GraphQL.
Writing Queries in GraphQL
With GraphQL, developers may request just what data they require. You may customize queries to meet the needs of your application, in contrast to standard REST APIs where many endpoints provide fixed data formats.
In GraphQL, the query keyword and operation name are used to start creating a query. Nesting fields are possible and over-fetching is avoided because the structure is similar to the data you wish to obtain.
Following is the simple GraphQL query
query {
  user(id: 1) {
    name
    email
    posts {
      title
      body
    }
  }
}
here is the breakdown of the above query:
- query: This keyword marks the beginning of a GraphQL query operation. It indicates that you are fetching data from the server.
- user(id: 1): This is the root field of the query, and it’s named user. It takes an argument id with a value of 1. This implies that you want to retrieve information about the user with the ID of 1.
- name and email: These are fields requested under the user field. They specify that you want to retrieve the name and email attributes of the user with ID 1.
- posts: This is another field under the user field. It suggests that you want to retrieve information about the posts associated with the user with ID 1.
- title and body: These are fields requested under the posts field. They specify that you want to retrieve the title and body attributes of each post associated with the user.
Executing Queries in GraphQL
Are you familiar with GraphQL queries and their operation?
- When a client delivers a GraphQL query, the server verifies it against the schema to ensure that it follows the correct types and standards.
- Following that, the server starts processing using the root-level query resolver. The query resolver will return the raw data requested by the client.
- When a query resolver finds nested fields in a query, it calls an additional query resolvers to retrieve information about those fields.
- The query resolver organizes the request data into a hierarchical structure that matches the shape of the original query.
- After all query resolvers have completed, the server returns the requested data to the client in JSON format.
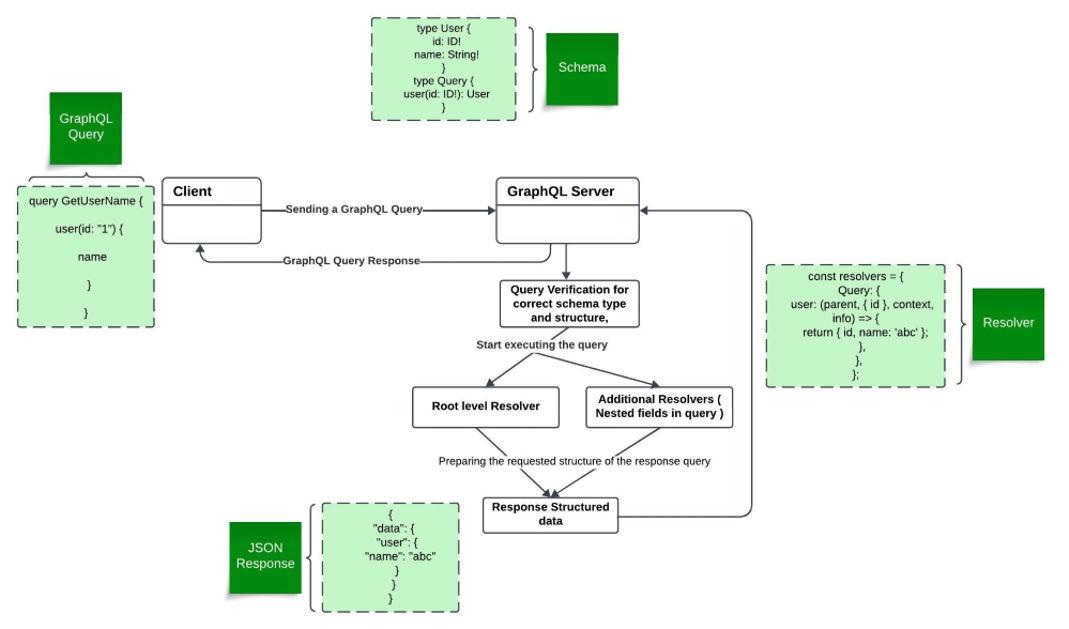
GraphQL flow diagram
The next stage after creating a GraphQL query is execution. GraphQL provides a single endpoint, typically /graphql, for all queries. Send a POST request to this endpoint with your query as the request payload. consider the following sample code.
const query = `
  query {
    user(id: 1) {
      name
      email
      posts {
        title
        body
      }
    }
  }
`;

fetch('/graphql', {
  method: 'POST',
  headers: {
    'Content-Type': 'application/json',
  },
  body: JSON.stringify({ query }),
})
  .then(response => response.json())
  .then(data => {
    console.log(data);
  })
  .catch(error => {
    console.error('Error:', error);
  });
Now, let’s break down the code:
- const query: variable to store GraphQL query as string.
- fetch: Send a POST request to the /graphql endpoint.
- headers: The request’s content type is JSON. This tells the server that the request payload is in JSON format.
- body: Convert the query string to JSON string and attach it with the body of the request.
- .then(response => response.json()): It converts the response to JSON format.
- .then(data => { console.log(data); }): print the response in the console.
- .catch(error => { console.error(‘Error:’, error); }): check for errors, if occured.
Let’s understand the GraphQL queries with the help of example.
Example of Writing and Executing Queries
In this example, we’ve created a GraphQL query to get geeksforgeeks course information from the GraphQL server. The server utilizes the resolver to retrieve and prepare the response. Following that, the server gave us a response. We have used the JavaScript fetch method to send a POST request with GraphQL query to server as client and to handle and display the response. The Node and Express server is used in the backend to execute the GraphQL query. It defines a GraphQL schema for courses, including title and price attributes. The server’s data source is an array of courses stored in memory. The GraphQL endpoint is set up at “/graphql”, and the server works on port 3000.
here is the step-by-step breakdown:
Step 1: We have created a HTML file that integrates the JavaScript (script.js) file. This HTML file contain a button to fetch the course details from the server.
<!DOCTYPE html>
<html lang="en">

<head>
    <meta charset="UTF-8">
    <meta name="viewport" content="width=device-width, initial-scale=1.0">
    <title>GraphQL Queries</title>
    <style>
        body {
            font-family: 'Tahoma', Geneva, Verdana, sans-serif;
            margin: 20px;
            background-color: #f4f4f4;
            text-align: center;
        }

        h1 {
            color: #4CAF50;
        }

        h2 {
            color: #333;
        }

        button {
            background-color: #4CAF50;
            color: white;
            padding: 10px 20px;
            font-size: 16px;
            border: none;
            cursor: pointer;
            margin-top: 20px;
            border-radius: 0.5rem;
            transition: background-color 0.3s;
        }

        button:hover {
            background-color: #45a049;
        }

        #result {
            margin-top: 20px;
        }

        ul {
            list-style: none;
            padding: 0;
        }

        li {
            background-color: #fff;
            border: 1px solid #ddd;
            margin: 5px auto;
            padding: 10px;
            border-radius: 5px;
            box-shadow: 0 2px 4px rgba(0, 0, 0, 0.1);
            width: 50%;
            box-sizing: border-box;
        }
    </style>
</head>

<body>
    <h1>GeeksforGeeks</h1>
    <h2>Courses</h2>
    <button onclick="fetchData()">Fetch Courses</button>
    <div id="result"></div>
    <script src="./script.js"></script>
</body>
</html>
Step 2: The script.js is our client, sending a POST request to GraphQL server or GraphQL endpoint, created using Node & Express with the defined GraphQL query.
// script.js
async function fetchData() {
  try {
    const response = await fetch('http://localhost:3000/graphql', {
      method: 'POST',
      headers: {
        'Content-Type': 'application/json',
      },
      body: JSON.stringify({
        query: `
          query {
            courses {
              title
              price
            }
          }
        `,
      }),
    });

    const data = await response.json();
    displayData(data.data.courses);
  } catch (error) {
    console.error('Error fetching data:', error.message);
  }
}

function displayData(courses) {
  const resultContainer = document.getElementById('result');
  resultContainer.innerHTML = '';

  if (courses.length === 0) {
    resultContainer.innerHTML = 'No courses found.';
    return;
  }

  const ul = document.createElement('ul');
  courses.forEach(course => {
    const li = document.createElement('li');
    li.textContent = `${course.title} by ${course.price}`;
    ul.appendChild(li);
  });

  resultContainer.appendChild(ul);
}
Step 3: The query is to find all the courses with their title and corresponding price. The server.js file is working as a server, that receives the client’s POST request along with the query as the payload. The root level query resolver fetches the hardcorded courses array and then it is converted into required response JSON format.
// server.js - Node & Express Server
const express = require('express');
const { graphqlHTTP } = require('express-graphql');
const { buildSchema } = require('graphql');
const cors = require('cors');

const coursesData = [
  { title: 'Master Java Programming - Complete Beginner to Advanced', price: '₹1999' },
  { title: 'Data Structures and Algorithms - Self Paced', price: '₹3999' },
];

// GraphQL schema
const schema = buildSchema(`
  type Course {
    title: String
    price: String
  }

  type Query {
    courses: [Course]
  }
`);

// GraphQL root level resolver
const root = {
  courses: () => coursesData,
};

// Express server
const app = express();

// Enable CORS
app.use(cors());

// GraphQL endpoint
app.use(
  '/graphql',
  graphqlHTTP({
    schema: schema,
    rootValue: root,
    graphiql: true,
  })
);

const PORT = 3000;
app.listen(PORT, () => {
  console.log(`Server is running at http://localhost:${PORT}/graphql`);
});
Step 4: This JSON response is sent to the client.

Course GrapQL query execution
Conclusion
One of the features that defines GraphQL as a developer-friendly tool is its ability to customize queries to the specific needs of your application while keeping an easy execution process. Accept its efficiency and versatility, and watch as your queries flow smoothly with your data.
Share your thoughts in the comments
Please Login to comment...