Working with Multiple Databases in Django
Last Updated :
02 Apr, 2024
Django stands out as a powerful and versatile framework for building dynamic and scalable applications. One of its notable features is its robust support for database management, offering developers flexibility in choosing and integrating various database systems into their projects. In this article, we will see how to use Multiple Databases with Django.
Using Multiple Databases with Django
Here, we will see step-by-step how to connect Using Multiple Databases with Django in Python:
Starting the Project Folder
To start the project use this command
django-admin startproject core
cd core
To start the app use this command
python manage.py startapp home
Now add this app to the ‘settings.py’
INSTALLED_APPS = [
    "django.contrib.admin",
    "django.contrib.auth",
    "django.contrib.contenttypes",
    "django.contrib.sessions",
    "django.contrib.messages",
    "django.contrib.staticfiles",
    "home",
    "rest_framework"
]
Install required packages
pip install djangorestframework
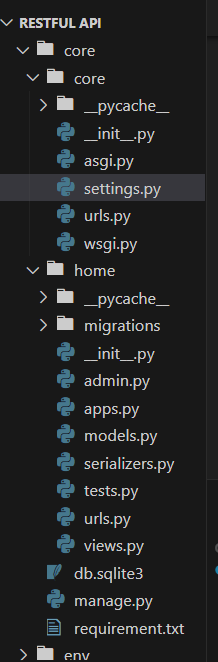
File Structure
Setting Necessary Files
models.py : Below, code defines a Django model called Paragraph with fields for a user reference, name, and description, using Django’s user model and settings for flexibility.
Python3
from django.contrib.auth.models import AbstractBaseUser, BaseUserManager, PermissionsMixin
from django.db import models
from django.utils import timezone
from django.conf import settings

class Paragraph(models.Model):
    user = models.ForeignKey(settings.AUTH_USER_MODEL,
                             on_delete=models.SET_NULL, null=True, blank=True)
    paragraph_name = models.CharField(max_length=100)
    paragraph_description = models.TextField()
views.py : This Python code uses Django REST Framework to create a viewset for the Paragraph model, enabling CRUD operations (Create, Retrieve, Update, Delete) through API endpoints. It includes filtering capabilities based on the paragraph name and description fields.
Python3
from rest_framework import viewsets, filters, permissions
from .models import Paragraph
from .serializers import ParagraphSerializer
from rest_framework.views import APIView
from rest_framework.response import Response
from rest_framework import status

class ParagraphViewSet(viewsets.ModelViewSet):
    queryset = Paragraph.objects.all()
    serializer_class = ParagraphSerializer
    filter_backends = [filters.SearchFilter]
    search_fields = ['paragraph_name', 'paragraph_description']
serializers.py: This Python code creates a serializer for the Paragraph model, using Django REST Framework, to handle conversion to and from JSON format for all fields of the model.
Python3
from rest_framework import serializers
from .models import Paragraph

class ParagraphSerializer(serializers.ModelSerializer):
    class Meta:
        model = Paragraph
        fields = '__all__'
home/urls.py: This Django code sets up URL patterns for the ParagraphViewSet, utilizing Django REST Framework’s DefaultRouter to enable CRUD operations on the ‘Paragraph’ model via ‘/recipes/’.
Python3
from django.urls import path, include
from rest_framework.routers import DefaultRouter
from .views import ParagraphViewSet

router = DefaultRouter()
router.register(r'recipes', ParagraphViewSet)

urlpatterns = [
    path('', include(router.urls)),

]
core/urls.py: This Django code defines URL patterns, routing requests to the admin interface at ‘/admin/’ and including URLs from the ‘home’ app at the root path.
Python3
from django.contrib import admin
from django.urls import path, include

urlpatterns = [
    path('admin/', admin.site.urls),
    path('', include('home.urls')),
]
admin.py Here we are registering our models.
Python3
from django.contrib import admin
from .models import *
from django.db.models import Sum

admin.site.register(Paragraph)
Configure Django settings for PostgreSQL update below code in settings.py file
Python3
DATABASES = {
    'default': {
        'ENGINE': 'django.db.backends.sqlite3',
        'NAME': BASE_DIR / 'db.sqlite3',
    },
    'postgresql': {
        # replace below information with your information
        'ENGINE': 'django.db.backends.postgresql',
        'NAME': 'postgres1',
        'USER': 'postgres',
        'PASSWORD': '1234',
        'HOST': 'localhost',
        'PORT': '5436',
    }
}
Configure Django settings for MySQL update below code in settings.py file
Python3
DATABASES = {
    'default': {
        'ENGINE': 'django.db.backends.sqlite3',
        'NAME': BASE_DIR / 'db.sqlite3',
    },
    'mysql': {
        # replace below information with your information
        'ENGINE': 'django.db.backends.mysql',
        'NAME': 'my_db',
        'USER': 'root',
        'PASSWORD': 'admin',
        'HOST': 'localhost',
        'PORT': '3306',
    }
}
Deployment of the Project
Run these commands to apply the migrations:
python3 manage.py makemigrations
python3 manage.py migrate
For create the superuser use the below command :
python3 manage.py createsuperuser
Run the server with the help of following command:
python3 manage.py runserver
for flush the databse use the below command
python3.manage.py flush
Output
Share your thoughts in the comments
Please Login to comment...