What’s the typical flow of data like in a React with Redux app ?
Last Updated :
10 Nov, 2023
Redux is an open-source state management JavaScript library for managing the application state. It is popularly used in ReactJS, but is not limited to it, and can also be used with other JavaScript libraries such as Angular. In a conventional React-Redux application, there is a single store along with a single root reducer. As the application grows more complex, the root reducer is split into smaller reducers that operate on the different parts of the state tree.
Prerequisites:
For large-scale production-level applications, it turns out to be a complex task to reproduce issues and add new features if the application’s state is not managed efficiently and has no control over it. Redux reduces the complexity of the code by making the state-updating process easier.
Data Flow in a React-Redux Application
There are four fundamental concepts that govern the flow of data in React-Redux applications.
- Redux store: The Redux store, simply put, is an object that holds the application state. A redux store can consist of small state objects which are combined into one large object. Any component in the application can easily access this state (store) by hooking up to it through the connect method.
- Action creators: Action creators, as the name suggests, are functions that return actions (objects). Action creators are invoked when the user interacts with the application through its UI (button click, form submission, etc) or at certain points in a component’s lifecycle (component mounts, component un-mounts, etc).
- Actions: Actions are simple objects which conventionally have two properties- type and payload. The type property is usually a string that specifies identifies the action, and the payload is an optional property that contains some data that is required to perform any particular task. The main function of action is to send data from the application to the Redux store.
- Reducers: Reducers are pure functions that update the state of the application in response to actions. Reducers take a previous state and an action as the input and return a modified version of the state. Since the state is immutable, a reducer always returns a new state, which is an updated version of the previous state.
React-Redux Application Flow
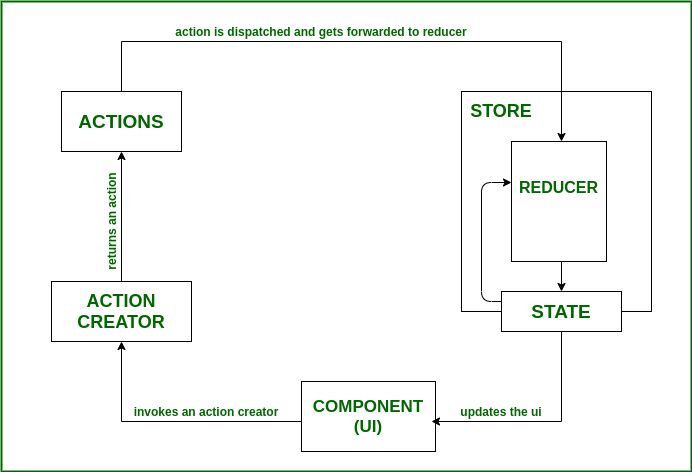
- The flow of data in a React-Redux application begins at the component level when the user interacts with the application UI. This interaction leads to the action creators dispatching an action.
- When an action is dispatched, it is received by the root reducer of the application and is passed on to all the reducers. Thus, it becomes the reducer’s task to determine if it needs to update the state based on the dispatched action.
- This is checked by using a simple switch statement to filter out the required actions. Each (smaller) reducer in the application accepts the dispatched action and if the type of the dispatched action matches, it returns a newly updated state.
- It is essential to note here that the state never actually changes in redux. Instead, the reducer always generates a new state which is a copy of the old state, but with some modifications.
- The store then informs the component about the new state which in turn retrieves the updated state and re-renders the component.
- Another important observation here is that flow of data in a React-Redux application is unidirectional, i.e., it only goes in one direction.
Steps to Create React Application:
Step 1: Create a React application using the following command:
npx create-react-app react-with-redux
Step 2: After creating your project folder i.e. react-with-redux, move to it using the following command:
cd react-with-redux
Step 3: Install the required dependencies using this command in the terminal
npm i redux react-redux
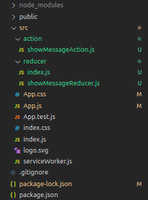
Project Structure:
The updated dependencies in package.json file will look like.
"dependencies": {
        "@testing-library/jest-dom": "^5.17.0",
        "@testing-library/react": "^13.4.0",
        "@testing-library/user-event": "^13.5.0",
        "react": "^18.2.0",
        "react-dom": "^18.2.0",
        "react-qr-code": "^2.0.12",
        "react-redux": "^8.1.3",
        "react-scripts": "5.0.1",
        "redux": "^4.2.1",
        "web-vitals": "^2.1.4"
}
Example: This example uses Redux to show the data flow and state management in React Redux.
Javascript
import React, { Component } from "react";
import "./App.css";
import { GetMessage } from "./action/showMessageAction";
import { connect } from "react-redux";
class App extends Component {
showMessage = () => {
console.log("CALLING ACTION");
this.props.getMessage();
};
render() {
return (
<div className="App">
<header className="App-header">
<h3>
Flow of data in a React-Redux app
</h3>
<button onClick={this.showMessage}>
Click me to trigger an action!{" "}
</button>
<h5>
The updated state will be displayed
here:
{this.props.message}
</h5>{" "}
</header>
</div>
);
}
}
const mapActionsToProps = {
getMessage: GetMessage,
};
const mapStateToProps = (state) => {
return { message: state.data.message };
};
export default connect(
mapStateToProps,
mapActionsToProps
)(App);
|
Javascript
import { combineReducers } from "redux";
import showMessageReducer from "./showMessageReducer";
const combinedReducers = combineReducers({
data: showMessageReducer,
});
export default combinedReducers;
|
Javascript
export const SHOW_MESSAGE = "SHOW_MESSAGE";
export const GetMessage = () => {
console.log("DISPATCHING ACTION");
return {
type: SHOW_MESSAGE,
payload: { message: "Hello from GeeksforGeeks!" },
};
};
|
Javascript
import { SHOW_MESSAGE } from "../action/showMessageAction";
const showMessageReducer = (
state = { message: "No message" },
{ type, payload }
) => {
switch (type) {
case SHOW_MESSAGE:
console.log("STATE UPDATION");
return payload;
default:
return state;
}
};
export default showMessageReducer;
|
Step to Run Application: Run the application using the following command from the root directory of the project:
npm start
Output: This output will be visible on the http://localhost:3000/ on the browser window.

Share your thoughts in the comments
Please Login to comment...