The whole machine-learning process, from the preparation of the data through the model deployment, is automated using the AutoML technique. For users with various degrees of expertise and resources, it aims to make machine learning simpler and more efficient. Using diverse methods, such as AutoML or custom code training, and a variety of data types, such as photos, texts, or tables, you may develop and compare models using AutoML. AutoML may also assist you in tracking and explaining the behaviour and performance of your models.
What is AutoML?
AutoML, short for Automated Machine Learning, refers to the process of automating various tasks and processes involved in designing, building, and deploying machine learning models. AutoML aims to make machine learning more accessible to individuals and organizations by reducing the need for extensive manual intervention and expertise in machine learning.
Pros and Cons of AutoML
Pros:
- Saves time and resources by automating tedious and repetitive tasks
- Reduces human errors and biases by using data-driven and objective methods
- Improves performance and quality by exploring a large and diverse search space
- Increases accessibility and scalability by lowering the barriers and costs of machine learning
Cons:
- Lacks transparency and interpretability by hiding the details and logic of the models
- Loses control and customization by relying on predefined and black-box models
- Depends on data quality and availability by requiring sufficient and relevant data
- Raises ethical and social implications by affecting human roles and responsibilities
What is Vertex AI?
Vertex AI is a platform that unifies the finest features of AI Platform and AutoML into a single client library, API, and user experience. Vertex AI makes it simple to compare and train models using custom code or AutoML. Additionally, you can manage and deploy your models using live or batch predictions, keep an eye on their effectiveness, and utilize explainability tools to learn more about how they get to their conclusions. Vertex AI supports a variety of tasks, including classification, object identification, entity extraction, forecasting, and more, as well as a variety of data formats, including tabular data, photos, videos, texts, and more.
Vertex AI for AutoML users
A Google Cloud service called Vertex AI enables you to create, use, and manage machine learning models. Vertex AI’s AutoML function automatically builds and fine-tunes models for a variety of tasks and types of data, including picture classification, text sentiment analysis, and tabular regression. This post will explain how to utilize Vertex AI for AutoML and what the key differences and advantages are if you are already familiar with historical AutoML products like AutoML Vision or AutoML Natural Language.
What are the benefits of Vertex AI for AutoML users?
Vertex AI offers several benefits for AutoML users compared to legacy AutoML products. Some of the main benefits are:
- You can use the same interface and API for both AutoML and custom training. This makes it easier to switch between different training methods and compare the results.
- You can use the same dataset for multiple objectives and annotation sets. This gives you more flexibility and reusability for your data.
- You can use custom containers to train and deploy your models. This allows you to use any ML framework and customize your model’s behavior.
- You can use managed notebooks to explore your data and models. This provides you with an interactive environment to run code and visualize results.
- You can use Vertex Vizier to optimize your model’s hyperparameters. This helps you improve your model’s performance and efficiency.
- You can use the Vertex Feature Store to manage and share your features. This simplifies your feature engineering process and reduces data duplication.
How to use Vertex AI for AutoML?
Get your data ready: Make sure your data is prepared and labeled appropriately for the job and data type you intend to utilize. To add inline data or reference data to Cloud Storage or BigQuery, utilize CSV or JSON files. The Data Labeling Service also allows you to obtain human annotations for your data.
Now after the preparation of data, you need to follow the below steps to train and deploy your model with Vertex AI using AutoML
Create a dataset
To start training and deployment of an AutoML model in vertexAI, first, we need to create a dataset, as example, we will discuss tabular dataset and classification autonomy model deployment in GCP(VertexAI):
Step 1 – Dashboard
Tabular data consists of many rows of information. In every row, the columns or qualities are the same. Every feature has a unique source data type that varies depending on the data source (BigQuery or a CSV file in Cloud Storage). When you use the data to train a model, Vertex AI examines the source data type and feature values to determine how the feature will be used. This refers to the modification of that trait. If necessary, a specific supported transformation can be defined for every feature.
For example, here I am using a sample dataset named “bank-marketing.csv” available online at:
gs://cloud-ml-tables-data/bank-marketing.csv
- In the Google Cloud Console, scroll through the left navigation panel and then click on Vertex AI, then choose Dashboard.
.jpg)
Fig 1: Navigating Console
Step 2 – Create a Dataset Instance
- On the navigation menu on the left, scroll down a bit and click on Datasets.
- with the Dataset panel open, click on Create.
.jpg)
Fig 2: Creating a dataset instance.
Step 3 – Create a Tabular form for the Dataset
- Enter the necessary details like name. I am using Structured_AutoML_Tutorial for the dataset name.
- Select the Tabular tab.
- Select the Regression/Classification objective.
- Click Create to create the dataset.
.jpg)
Fig 3: Creating a Tabular Dataset.
Step 4 – Import the dataset from Cloud Storage
- Click Select CSV files from Cloud Storage to choose a data source, or you may select any option where your training dataset is stored.
Since I had uploaded my prepared data to cloud storage in GCP using a bucket as we mentioned in the very first step, I am utilizing a CSV file from cloud storage in this example. after that Enter your data path (for me, it is cloud-ml-tables-data/bank-marketing.csv) in the Import file path field, then click Continue.
Vertex AI determines how it will use a feature in model training by looking at the source data type and feature values. You should check the data type of each column to ensure that it has been understood appropriately. Any feature can have a distinct supported transformation specified if necessary. Find out more about changes.
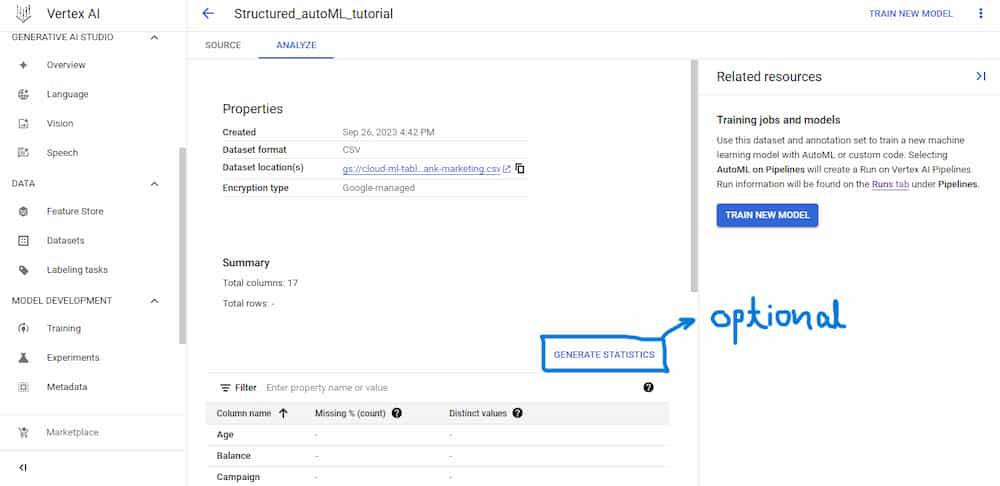
Analyze the dataset (Optional)
You may access more dataset details, such as missing or NULL values, under the analyze section. This part is unnecessary because the dataset is set up properly for this article.
Step 5 – Generating Statistics for the Dataset
- You can view the number of missing values in the dataset by clicking on Generate Statistics to view . The whole process would take roughly 10 minutes.
- To view the result and learn more about the data values of a feature, click on the feature columns.
Train an AutoML classification model
Now our dataset is ready and we can move to the next step to training an AutoML model.
Step 6 – Training the AutoML classification
- Click Train new model > Other.

train new model
Step 7 – Creating the Training method
- Make sure that you have selected the created dataset in your training method pane.
- For the Objective field, select Classification, you can choose anyone you want as per your requirement.
- Then Select AutoML method and Click Continue.
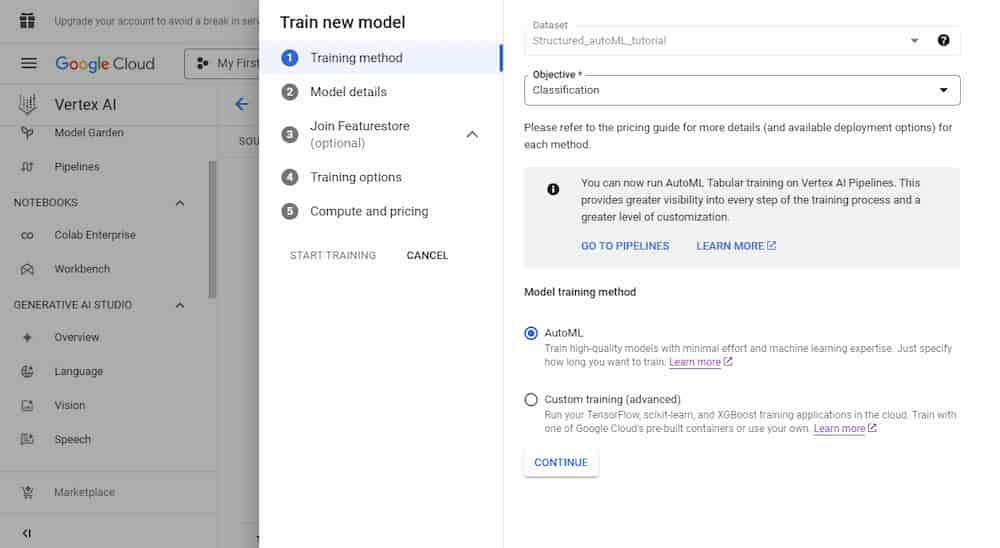
Training method
Step 8 – Adding more Model details
- Choose the target column in the Model details box; in this case, I’ve chosen Deposit; then click Continue.
- You train the model to predict values in the target column. The Deposit column in the bank-marketing.csv file specifies whether the client bought a term deposit (2 = yes, 1 = no).
You have the ability to add features and modify column data in the Training settings window. By default, all non-target columns will be utilized as training features if no columns are chosen. There is no need to change this dataset because it is ready to use.
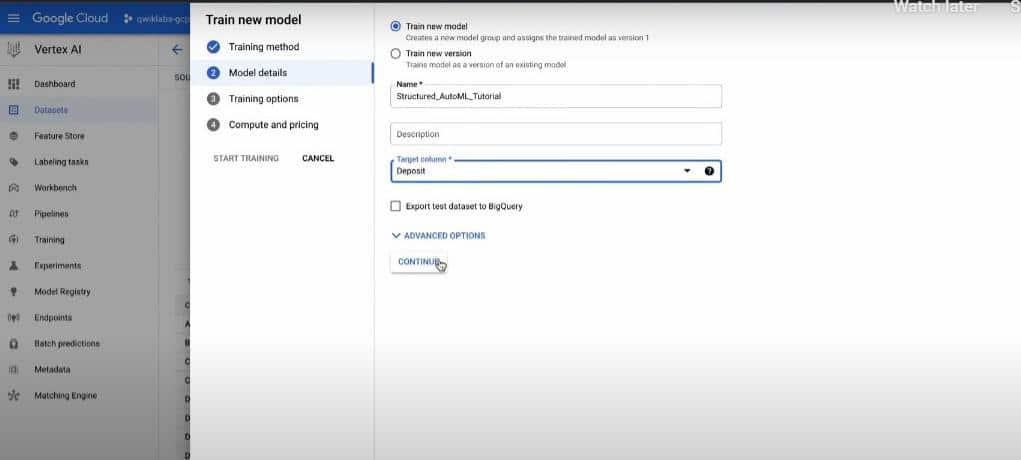
Fig 5: Model Training
Step 9 – Checking the Compute and Pricing for Model
- Navigate to the Compute and Pricing block and enter “1” as the training budget.
The amount of time allotted for training is determined by the training budget, but because other tasks must be completed as well, the total time may exceed one hour. When the model has finished training, a live link with a green checkmark status icon appears on the model tab.
Wait for some time, and your model is now being trained, For me, it takes roughly two hours to complete.
Request a prediction from a hosted model
You may ask the model for predictions by sending them to an endpoint inside your project, which will submit the request to the hosted model and return the results. You may use this as practice by sending a prediction to the AutoML Proxy, which is quite similar to how you would interact with the model you just generated.
Step10 – Creating AutoML proxy endpoint
Get the name of the AutoML proxy endpoint
- In the Google Cloud Console, navigate to the left panel, locate and click Cloud Run.
- Click automl-proxy.
.jpg)
Fig 6: AutoML endpoint
Step 11: – Using AutoML proxy URL for prediction
- Copy the URL to the endpoint. It should look something like: https://automl-proxy-xfpm6c62ta-uc.a.run.app.
.jpg)
Fig 7: AutoML proxy url
This endpoint is essential for making prediction request later on.
Create a prediction request
You may use the Google Cloud interface, the Vertex AI API, or the Vertex SDK for Python to obtain real-time or batch predictions from your endpoint. Here, I’ll demonstrate how to use the GCP console to obtain forecasts.
Step 12 – Making Prediction
- Open a new Cloud Shell window.
- After its open, navigate to Cloud Shell toolbar and click on editor.
- Click File > New File.
- In the new file, paste the below mentioned helper code:
{
“instances”: [
{ “Age”: “39.0”, “Job”: “blue-collar”, “MaritalStatus”: “married”, “Education”: “secondary”, “Default”: “no”, “Balance”: “455”, “Housing”: “yes”, “Loan”: “no”, “Contact”: “cellular”, “Day”: “16.0”, “Month”: “May”, “Duration”: “180.0”, “Campaign”: “2.0”, “PDays”: “-1.0”, “Previous”: “0.0”, “POutcome”: “unknown”}
]
}
- Save the file and name it payload.json. It is the query that we used for prediction and to get results from our model.
(Note: In case you are unable to save the file, take help of Nano or similar editors to create the file.)
Step 13 – initializing environment variables
- Next, set the following environment variables. Your AUTOML_PROXY should look something like:
"https://automl-proxy-xfpm6c62ta-uc.a.run.app/v1"
AUTOML_PROXY=<automl-proxy url>/v1
INPUT_DATA_FILE=payload.json
(Note: Adding /v1 at the end of your proxy URL is essential to avoid any future issues. Make sure that you have done this before continuing.)
Step 14 – API request for prediction
- Next step is to perform an API request to the AutoML Proxy endpoint. That API request will assign another request for prediction from the hosted model:
curl -X POST -H “Content-Type: application/json” $AUTOML_PROXY -d “@${INPUT_DATA_FILE}”
If you run a successful prediction, your output should resemble the following:
.jpg)
Fig 8: Kernel Output
A forecast result of 1 indicates a failure in this model—a bank deposit is not made. A deposit is made at the bank when the forecast result is 2, which is a favorable outcome.
You can see from the forecast that it gave that it would anticipate a negative result (1) with 99% accuracy and a positive outcome (2) with 0.01% accuracy based on the tabular data it was provided.
Modify the JSON file you produced’s values. Consider raising the time to a much higher amount, such as 1000.0, and observe how the model forecast changes. Rerun the command for the prediction request.
Your output might resemble the following:
{“predictions”:[{“scores”:[0.3821603059768677,0.6178396940231323],”classes”:[“1″,”2″]}],”deployedModelId”:”8716862214310461440″,”model”:”projects/1030115194620/locations/us-central1/models/3627073355753979904″,”modelDisplayName”:”Structured_AutoML_Tutorial”}
You can make changes to your model by playing around with the data and then notice how differently the features are weighted within the model.
Conclusion
This article explained how to utilize Vertex AI for AutoML and highlighted its key advantages over earlier AutoML offerings. Additionally, we studied the ideas of various data kinds, jobs, goals, annotation sets, models, endpoints, and forecasts. You may use diverse data sources and tasks to train and deploy AutoML models at scale with Vertex AI while utilizing the infrastructure and services of Google Cloud.
Share your thoughts in the comments
Please Login to comment...