SQLite is an embedded database that doesn’t use a database like Oracle in the background to operate. It is written in C language and is used by developers who embed a lightweight database over the existing application, browser, or embedded systems. SQLite works on various platforms like Windows, Mac, Linux, iOS and Android. This makes popular choice for developers to develop applications for several platforms or Operating Systems.
In this article, we will see various ways to describe an SQLite Table along with the syntax, practical implementations, and so on.
Describing a Table Using SQLite
Sometimes developers want to see the structure or schema of the already created tables. SQLite provides different approaches to achieving it. Sometimes describing a table becomes very necessary when the developer didn’t create the table or is unknown to the schema of it, so before inserting any values it is always recommended to check the schema of the table or the description of the table. Describing a table is also helpful when the developers or users who didn’t create than table want to know whether any peripherals such as INDEX or VIEWS are associated with the Table or not.
The description of the Table also includes the details and data type of each column, such as which are NOT NULL, which is a PRIMARY KEY, which is a FOREIGN KEY, etc. This information will be helpful to the developers who are new to the table and want to manipulate it.
Ways to Describe Table in SQLite
To understand the Describe Table in SQLite we will use an already created table called Employees which consists of empID, DeptID, FirstName, LastName, Salary, and Location as Columns.If you don’t know How to create a Table in SQLite then refer to this.
1. Using .Schema Command
SQLite offers a dot-command schema that can display the structure/schema of the table as well as the commands used to create that table. It also displays if there are any peripherals like INDEX or anything associated with the Table or not.
Syntax:
.schema <table_name>
In the schema dot command, we have to simply write .schema, consists, and then after a space we need to pass the table name whose structure or description we want to get.
To get the description of our Employees table using schema command.
Query:
.schema Employees
Output:

As we can see in the output, the column name alongside their data type and other features like NOT NULL, PRIMARY KEY etc. with the details of Indexes associated with the Table has been given as output.
2. Using PRAGMA Command
We can also use PRAGMA command with the table_info() function to get the details and description of a table. But it is necessary to execute another command before the PRAGMA command to make the output understandable and clear.
The command is a dot-command which is used to set the mode as Columns, which will display the entire table with the column name and space separated, which is much more human readable. Query:
.mode columns
After executing this command, now we can use the pragma command to get more detailed and structured result.
The generic syntax of table_info() function is given below:
pragma table_info(<table_info>);
To get the description of the Employees table using the PRAGMA table_info() command.
Query:
pragma table_info(Employees);
Output:

Explanation: As we can see in the output, the description of all the columns, alongside their data type has been listed in a columned manner which is very much understandable and readable. Here there are also three columns named notnull, dflt_value and pk, the description of those columns are given below –
- notnull: This column signifies whether the column has been created as a NOT NULL column or not, means that no NULL values can be present in that column. The value 1 signifies True and that column has been created as a NOT NULL column, the value 0 signifies False and that column has not been created as a NOT NULL column, that column can hold NULL values.
- dflt_values: It is the acronym of Default Values, if any Default values were passed during the creation of the table, it would have been reflected here. If not, then this column will be left as blank.
- pk:This is the acronym of Primary Key, just like the NOT NULL column, this column also deals with the value 0 or 1. The value 1 signifies that a particular column is being used as a Primary Key, 0 signifies it is not.
3. Getting the Structure of a Table Using the SQL Statement
We can also get the structure or the description of the table using the sql_schema table using the SELECT, FROM and WHERE statement. sql_schema is a table which holds the structure of all the tables created in that particular database.
Syntax:
select sql from sqlite_schema where name = '<table_name>';
To get the structure of the Employees table,
Query:
select sql from sqlite_schema where name = 'Employees';
Output:

4. Save the Result of a Query Into a File
SQLite provides various ways using which we can save the result of a Query into a file. There are two dot-commands which are used to achieve this. We will discuss both of them one by one.
.once Command
.once SQLite command allows the user to store the result of the immediately run query just after the execution of the once command. Means that the result of only one query ran after the execution of the once command will be stored in the desired file.
Syntax:
.once <full_path_of_the_desired_file>
If the desired file resides in the same folder as SQLite Database, then only the name and the extension of that file will suffice.
To use the .once command with the Employees Table.
Query:
.once C:\Users\user\Downloads\SQLite\once_results.txt
Now we will use the SELECT command to return all the values whose Salary is greater than 25000.
Query:
select * from employees where salary > 25000;
Contents of the once_results file:

.output Command
Another command is the output command, which is used to store the result of a query into a file. The difference of output with the .once command is that, .output will store the results of every query executed after it has been executed, unlike the once command.
Syntax:
.output <full_path_of_the_desired_file>
If the desired file resides in the same folder as SQLite Database, then only the name and the extension of that file will suffice.
To use the .output command with the Employees Table.
Query:
.output C:\Users\user\Downloads\SQLite\output_results.txt
Now, we will execute two commands –
- First one will fetch all the details where the salary is greater than 30,000.
- Second one will fetch all the details where the Location is ‘KY’.
The output of both the commands will be stored in the provided file:
Query:
select * from employees where salary > 30000;
select * from employees where location = 'KY';
Contents of the output_results File:

Explanation: As we can see that both the outputs of the commands have been stored in the provided file.
5. Execute SQL statements from a file
In this section, we will see how we can execute SQLite statements from an .SQL file. There is a dot-command read using which we can execute a SQL file, this command is used to read the contents of an SQL file and execute the commands mentioned in it.
Syntax:
.read <full_path_of_the_file>
We are creating a file named Freshers which will hold a CREATE TABLE command which will be used to create a table called Freshers.
Query:
.read C:\Users\user\Downloads\SQLite\freshers.sql
After executing this command, if the contents of the SQL file are correct, then we will not see any kind of output on screen. As this file contained a command to create a new table, we can use the tables dot-command to see if the table has been created or not. We can also check it’s schema using the .schema dot command.
Using .tables command
Using the .tables command to see if the table has been created successfully or not.
.tables
Output:

Explanation: As we can see, the FRESHERS table has been created successfully.
Using .schema command
Using the schema command we will now see the description of the table.
Query:
.schema freshers
Output:
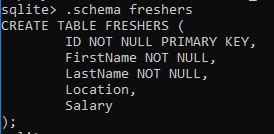
Explanation: As we can see in the output that the description of the Freshers table has been displayed.
Conclusion
We saw in this article how we can describe a SQLite table using various methods. Learning about the structure of the table becomes important when the developer wants to learn about the structure or schema of a table created by someone else, so that it becomes easy to understand the data types of the columns, which column will accept NULL values, is there any peripherals like INDEX associated with the table or not etc.
SQLite provides various methods and all of the methods are unique in their own place, they all are used to get the same results but the structure and the informations mentioned or returned are somewhat different. It is always recommened to get the description or learn about the structure of the table before trying to manipulate it, to avoid any kind of circumstances which might affect in the database or the table severely.
Share your thoughts in the comments
Please Login to comment...