Spring Security – UserDetailsService and UserDetails with Example
Last Updated :
01 Aug, 2023
Spring Security is a framework that allows a programmer to use JEE components to set security limitations on Spring-framework-based Web applications. In a nutshell, it’s a library that can be utilized and customized to suit the demands of the programmer. Read more on Spring Security and its Features in this article Introduction to Spring Security and its Features. UserDetails and UserDetailsService are two major concepts to learn in Spring Security. So we will learn these two concepts with proper examples.
UserDetailsService and UserDetails
In Spring Security, the UserDetailsService interface is a core component used for loading user-specific data. It is responsible for retrieving user information from a backend data source, such as a database or an external service, and returning an instance of the UserDetails interface.
The UserDetailsService interface has a single method called loadUserByUsername(), which takes a username as a parameter and returns a fully populated UserDetails object. The UserDetails object represents the authenticated user in the Spring Security framework and contains details such as the user’s username, password, authorities (roles), and additional attributes.
In this article, we are going to use
- InMemoryUserDetailsManager class, which is an implementation of the UserDetailsService interface that stores user details in memory. It is commonly used for testing and development purposes when you want to define user accounts directly in your code without the need for a persistent data store, and
- User class, which is a convenient builder class provided by the framework for creating instances of UserDetails. It is used to represent user account details, such as the username, password, and authorities (roles) associated with a user. The User class provides a fluent API for constructing UserDetails objects with various attributes. It offers methods to set the username, password, and roles for a user, among other properties.
So we are going to create the user with the help of both InMemoryUserDetailsManager and User class. A sample code is given below
@Override
protected void configure(AuthenticationManagerBuilder auth) throws Exception {

        InMemoryUserDetailsManager userDetailsManager = new InMemoryUserDetailsManager();

        // Method 1 - Creating username, password, and role
        ArrayList<GrantedAuthority> roles = new ArrayList<GrantedAuthority>();

        SimpleGrantedAuthority role1 = new SimpleGrantedAuthority("USER");
        SimpleGrantedAuthority role2 = new SimpleGrantedAuthority("ADMIN");

        roles.add(role1);
        roles.add(role2);

        User anshulUser = new User("anshul", "123", roles);

        // Method 2 - Creating username, password, and role
        // UserDetails anshulUser = User.withUsername("Anshul").password("123").roles("USER", "ADMIN").build();

        userDetailsManager.createUser(anshulUser);
        auth.userDetailsService(userDetailsManager);

}
Example Project
We’re going to build on top of the simple Spring MVC example.
Step 1: Create Your Project and Configure Apache Tomcat Server
Note: We are going to use Spring Tool Suite 4 IDE for this project. Please refer to this article to install STS in your local machine How to Download and Install Spring Tool Suite (Spring Tools 4 for Eclipse) IDE.
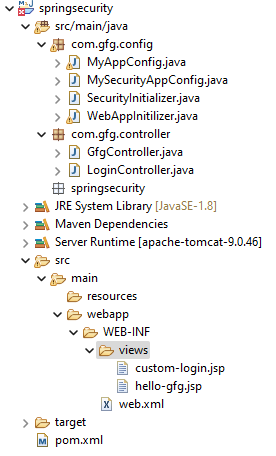
Step 2: Folder Structure
Before moving to the project let’s have a look at the complete project structure for our Spring MVC application.
Step 3: Add Dependencies to pom.xml File
Add the following dependencies to your pom.xml file
- Spring Web MVC
- Java Servlet API
- Spring Security Config
- Spring Security Web
XML
<dependencies>
<dependency>
<groupId>org.springframework</groupId>
<artifactId>spring-webmvc</artifactId>
<version>5.3.24</version>
</dependency>
<dependency>
<groupId>javax.servlet</groupId>
<artifactId>javax.servlet-api</artifactId>
<version>4.0.1</version>
<scope>provided</scope>
</dependency>
<dependency>
<groupId>org.springframework.security</groupId>
<artifactId>spring-security-config</artifactId>
<version>5.7.3</version>
</dependency>
<dependency>
<groupId>org.springframework.security</groupId>
<artifactId>spring-security-web</artifactId>
<version>5.7.3</version>
</dependency>
</dependencies>
|
Below is the complete pom.xml file. Please cross-verify if you have missed some dependencies.
XML
<?xml version="1.0" encoding="UTF-8"?>
<modelVersion>4.0.0</modelVersion>
<groupId>com.gfg.springsecurity</groupId>
<artifactId>springsecurity</artifactId>
<version>0.0.1-SNAPSHOT</version>
<packaging>war</packaging>
<name>springsecurity Maven Webapp</name>
<properties>
<project.build.sourceEncoding>UTF-8</project.build.sourceEncoding>
<maven.compiler.source>1.7</maven.compiler.source>
<maven.compiler.target>1.7</maven.compiler.target>
</properties>
<dependencies>
<dependency>
<groupId>org.springframework</groupId>
<artifactId>spring-webmvc</artifactId>
<version>5.3.24</version>
</dependency>
<dependency>
<groupId>javax.servlet</groupId>
<artifactId>javax.servlet-api</artifactId>
<version>4.0.1</version>
<scope>provided</scope>
</dependency>
<dependency>
<groupId>org.springframework.security</groupId>
<artifactId>spring-security-config</artifactId>
<version>5.7.3</version>
</dependency>
<dependency>
<groupId>org.springframework.security</groupId>
<artifactId>spring-security-web</artifactId>
<version>5.7.3</version>
</dependency>
</dependencies>
<build>
<finalName>springsecurity</finalName>
<pluginManagement>
<plugins>
<plugin>
<artifactId>maven-clean-plugin</artifactId>
<version>3.1.0</version>
</plugin>
<plugin>
<artifactId>maven-resources-plugin</artifactId>
<version>3.0.2</version>
</plugin>
<plugin>
<artifactId>maven-compiler-plugin</artifactId>
<version>3.8.0</version>
</plugin>
<plugin>
<artifactId>maven-surefire-plugin</artifactId>
<version>2.22.1</version>
</plugin>
<plugin>
<artifactId>maven-war-plugin</artifactId>
<version>3.2.2</version>
</plugin>
<plugin>
<artifactId>maven-install-plugin</artifactId>
<version>2.5.2</version>
</plugin>
<plugin>
<artifactId>maven-deploy-plugin</artifactId>
<version>2.8.2</version>
</plugin>
</plugins>
</pluginManagement>
</build>
</project>
|
Step 4: Configuring Dispatcher Servlet
Please refer to this article What is Dispatcher Servlet in Spring? and read more about Dispatcher Servlet which is a very very important concept to understand. Now we are going to configure Dispatcher Servlet with our Spring MVC application. Go to the src > main > java and create a class WebAppInitilizer. Below is the code for the WebAppInitilizer.java file.
File: WebAppInitilizer.java
Java
package com.gfg.config;
import org.springframework.web.servlet.support.AbstractAnnotationConfigDispatcherServletInitializer;
public class WebAppInitilizer extends
AbstractAnnotationConfigDispatcherServletInitializer {
@Override
protected Class<?>[] getRootConfigClasses() {
return null;
}
@Override
protected Class<?>[] getServletConfigClasses() {
Class[] configFiles = {MyAppConfig.class};
return configFiles;
}
@Override
protected String[] getServletMappings() {
String[] mappings = {"/"};
return mappings;
}
}
|
Create another class in the same location (src > main > java) and name it MyAppConfig. Below is the code for the MyAppConfig.java file.
File: MyAppConfig.java
Java
package com.gfg.config;
import org.springframework.context.annotation.Bean;
import org.springframework.context.annotation.ComponentScan;
import org.springframework.context.annotation.Configuration;
import org.springframework.web.servlet.config.annotation.EnableWebMvc;
import org.springframework.web.servlet.view.InternalResourceViewResolver;
@Configuration
@EnableWebMvc
@ComponentScan("com")
public class MyAppConfig {
}
|
Reference article: Spring – Configure Dispatcher Servlet in Three Different Ways
Step 5: Create Your Spring MVC Controller
Go to the src > main > java and create a class GfgController. Below is the code for the GfgController.java file.
File: GfgController.java
Java
package com.gfg.controller;
import java.security.Principal;
import java.util.Collection;
import org.springframework.security.core.Authentication;
import org.springframework.security.core.GrantedAuthority;
import org.springframework.stereotype.Controller;
import org.springframework.ui.Model;
import org.springframework.web.bind.annotation.GetMapping;
@Controller
public class GfgController {
@GetMapping("/")
public String helloGfg(Principal principal, Authentication auth, Model model) {
String userName = principal.getName();
System.out.println("Current Logged in User is: " + userName);
Collection<? extends GrantedAuthority> authorities = auth.getAuthorities();
System.out.println("Current Logged in User Roles are: " + authorities);
model.addAttribute("username", userName);
model.addAttribute("roles", authorities);
return "hello-gfg";
}
}
|
Go to the src > main > java and create a class LoginController. Below is the code for the LoginController.java file.
File: LoginController.java
Java
package com.gfg.controller;
import org.springframework.stereotype.Controller;
import org.springframework.web.bind.annotation.GetMapping;
@Controller
public class LoginController {
@GetMapping("/customLogin")
public String customLogin() {
return "custom-login";
}
}
|
Reference article: Create and Run Your First Spring MVC Controller in Eclipse/Spring Tool Suite
Step 6: Create Your Spring MVC Views
Go to the src > main > webapp > WEB-INF > right-click > New > Folder and name the folder as views. Then views > right-click > New > JSP File and name your first view. Here we have named it as hello-gfg.jsp file. Below is the code for the hello-gfg.jsp file. We have created a simple web page inside that file.
File: hello-gfg.jsp
HTML
<%@ page language="java" contentType="text/html; charset=UTF-8" pageEncoding="UTF-8" isELIgnored = "false" %>
<!DOCTYPE html>
<html>
<body bgcolor="green">
<h1>Hi ${username} !!</h1>
<form:form action="logout" method="POST">
<input type="submit" value="Logout">
</form:form>
</body>
</html>
|
Also, create another view named custom-login.jsp file. Below is the code for the custom-login.jsp file. We have created a simple login form inside that file.
File: custom-login.jsp
HTML
<!DOCTYPE html>
<html>
<title>GFG Login Page</title>
<body bgcolor="green">
<h1>Custom Login Page</h1>
<form:form action="process-login" method="POST">
Username : <input type="text" name="username">
<br/>
Password : <input type="password" name="password">
<br/>
<input type="submit" value="Login">
</form:form>
</body>
</html>
|
Reference article:
Step 7: Setting Up ViewResolver in Spring MVC
Go to the src > main > java > MyAppConfig and set your ViewResolver like this
File: MyAppConfig.java
Java
package com.gfg.config;
import org.springframework.context.annotation.Bean;
import org.springframework.context.annotation.ComponentScan;
import org.springframework.context.annotation.Configuration;
import org.springframework.web.servlet.config.annotation.EnableWebMvc;
import org.springframework.web.servlet.view.InternalResourceViewResolver;
@Configuration
@EnableWebMvc
@ComponentScan("com")
public class MyAppConfig {
@Bean
InternalResourceViewResolver viewResolver() {
InternalResourceViewResolver viewResolver = new InternalResourceViewResolver();
viewResolver.setPrefix("/WEB-INF/views/");
viewResolver.setSuffix(".jsp");
return viewResolver;
}
}
|
Reference article: ViewResolver in Spring MVC
Step 8: Setting Up Spring Security Filter Chain
Go to the src > main > java and create a class MySecurityAppConfig and annotate the class with @EnableWebSecurity annotation. This class will help to create the spring security filter chain. Below is the code for the MySecurityAppConfig.java file.
File: MySecurityAppConfig.java
Java
package com.gfg.config;
import org.springframework.security.config.annotation.web.configuration.EnableWebSecurity;
@EnableWebSecurity
public class MySecurityAppConfig extends WebSecurityConfigurerAdapter {
}
|
Step 9: Create Spring Security Initilizer
Go to the src > main > java and create a class SecurityInitializer. This class will help to register the spring security filter chain with our application. Below is the code for the SecurityInitializer.java file.
File: SecurityInitializer.java
Java
package com.gfg.config;
import org.springframework.security.web.context.AbstractSecurityWebApplicationInitializer;
public class SecurityInitializer extends AbstractSecurityWebApplicationInitializer {
}
|
Now we are done with setting up our Spring Security Filter Chain.
Step 10: Create Users and Password Encoder
Modify the MyAppConfig file. Here we are going to create the PasswordEncoder Bean.
File: MyAppConfig.java
Java
package com.gfg.config;
import org.springframework.context.annotation.Bean;
import org.springframework.context.annotation.ComponentScan;
import org.springframework.context.annotation.Configuration;
import org.springframework.security.crypto.bcrypt.BCryptPasswordEncoder;
import org.springframework.security.crypto.password.PasswordEncoder;
import org.springframework.web.servlet.config.annotation.EnableWebMvc;
import org.springframework.web.servlet.view.InternalResourceViewResolver;
@Configuration
@EnableWebMvc
@ComponentScan("com")
public class MyAppConfig {
@Bean
InternalResourceViewResolver viewResolver() {
InternalResourceViewResolver viewResolver = new InternalResourceViewResolver();
viewResolver.setPrefix("/WEB-INF/views/");
viewResolver.setSuffix(".jsp");
return viewResolver;
}
@Bean
PasswordEncoder getPasswordEncoder() {
return NoOpPasswordEncoder.getInstance();
}
}
|
Modify the MySecurityAppConfig file. Here we are going to create the User, and we are going to provide the password. And we are also going to provide the roles to the user. But this time use the InMemoryUserDetailsManager and User class.
File: MySecurityAppConfig.java
Java
package com.gfg.config;
import java.util.ArrayList;
import javax.sql.DataSource;
import org.springframework.beans.factory.annotation.Autowired;
import org.springframework.security.config.annotation.authentication.builders.AuthenticationManagerBuilder;
import org.springframework.security.config.annotation.web.builders.HttpSecurity;
import org.springframework.security.config.annotation.web.configuration.EnableWebSecurity;
import org.springframework.security.config.annotation.web.configuration.WebSecurityConfigurerAdapter;
import org.springframework.security.core.GrantedAuthority;
import org.springframework.security.core.authority.SimpleGrantedAuthority;
import org.springframework.security.core.userdetails.User;
import org.springframework.security.core.userdetails.UserDetails;
import org.springframework.security.crypto.password.PasswordEncoder;
import org.springframework.security.provisioning.InMemoryUserDetailsManager;
@SuppressWarnings("deprecation")
@EnableWebSecurity
public class MySecurityAppConfig extends WebSecurityConfigurerAdapter {
@Override
protected void configure(AuthenticationManagerBuilder auth) throws Exception {
InMemoryUserDetailsManager userDetailsManager = new InMemoryUserDetailsManager();
ArrayList<GrantedAuthority> roles = new ArrayList<GrantedAuthority>();
SimpleGrantedAuthority role1 = new SimpleGrantedAuthority("USER");
SimpleGrantedAuthority role2 = new SimpleGrantedAuthority("ADMIN");
roles.add(role1);
roles.add(role2);
User anshulUser = new User("anshul", "123", roles);
userDetailsManager.createUser(anshulUser);
auth.userDetailsService(userDetailsManager);
}
@Override
protected void configure(HttpSecurity http) throws Exception {
http
.authorizeHttpRequests()
.anyRequest()
.authenticated()
.and()
.formLogin().loginPage("/customLogin").loginProcessingUrl("/process-login").permitAll()
.and()
.httpBasic()
.and().logout().permitAll();
}
}
|
Now, let’s run the application and test it out.
Step 11: Run Your Spring MVC Application
To run our Spring MVC Application right-click on your project > Run As > Run on Server. After that use the following URL to run your controller.
http://localhost:8080/springsecurity/customLogin
And it will ask for authentication to use the endpoint and a pop-up screen will be shown like this.

Now sign in with your database credentials
- Username: anshul
- Password: 123
And now you can access your homepage and you can see we get the Current Logged in User Name and display it in a view.

Share your thoughts in the comments
Please Login to comment...