Spring Boot with Multiple SQL Import Files
Last Updated :
24 Mar, 2024
In Spring Boot, when we have multiple SQL import files then it can typically refer to the scenario where we need to initialize the database with the schema definitions and sample data or perform the other setup tasks This is most commonly done during the application startup using the spring boot support for the execution of the scripts.
In this article we will learn to Import Multiple SQL Files with Spring Boot.
Key Terminologies:
- SQL Import Files: These can be the SQL scripts containing the SQL statement like the DDL (Data Definition Language), or DML (Data Manipulation Language) necessary to create the database schema and insert the initial data or perform any other database-related tasks.
- Database Initialization: It can provide support for the database initialization during the application startup, and it can automatically execute the SQL scripts located in the specific directories of the project.
- Multiple SQL import Files: It can refer to having multiple SQL script files and it can each serve a specific purpose like the schema creation and data creation, data insertion, and the schema updates of the project.
- Resource Locations: In the spring project the SQL import files in the predefined resource’s locations and by the default of the looks in the classpath:/schema.sql and classpath:/data.sql.
- Spring JDBC: In SQL execution the mechanism in the spring boot is the spring JDBC and it can simplify the database access and the error handling, and it can provide a higher-level abstraction over the JDBC.
Implementation of Spring Boot with Multiple SQL File Import
We can develop the simple spring project with the multiple SQL import files of the project.
Step 1: Create the Spring project using the spring initializr on creating the project including the below dependencies into the project.
Dependencies:
- Spring Web
- MySQL Drivers
- Spring Data JPA
- Lombok
- Spring Dev Tools
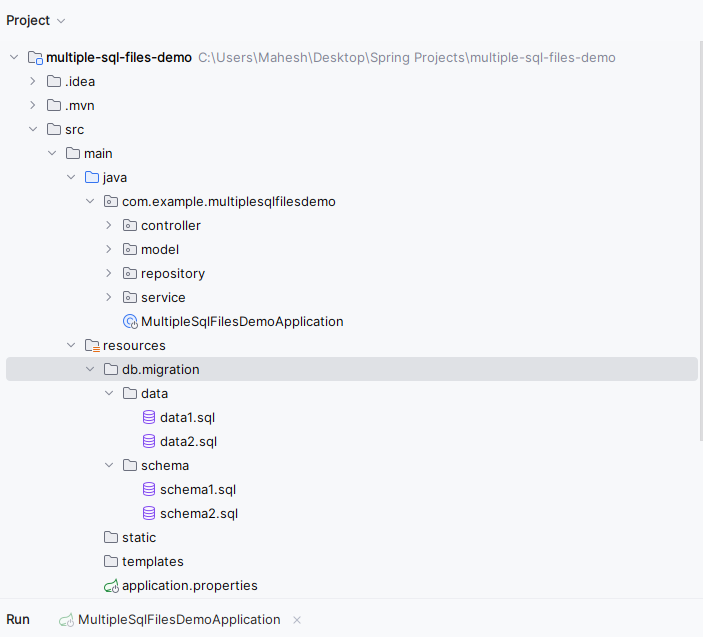
Once create the spring project then the file structure looks like the below image.
Step 2: Open the application.properties file and put the below code for the mysql database configuration of the spring project.
spring.application.name=multiple-sql-files-demo

spring.datasource.url=jdbc:mysql://localhost:3306/example
spring.datasource.username=root
spring.datasource.password=
spring.datasource.driver-class-name=com.mysql.cj.jdbc.Driver
spring.jpa.hibernate.ddl-auto=none
Step 3: Create the table schema and it named as schema1.sql and it can be used for the table creation of the users.
-- Table creation for schema 1
CREATE TABLE IF NOT EXISTS users (
     id INT AUTO_INCREMENT PRIMARY KEY,
     username VARCHAR(50) NOT NULL,
    email VARCHAR(100) NOT NULL,
    password VARCHAR(100) NOT NULL
    );
Step 4: Create another table schema and it named as schema2.sql and it can be used for the table creation of the products.
-- Table creation for schema 2
CREATE TABLE IF NOT EXISTS products (
    id INT AUTO_INCREMENT PRIMARY KEY,
    name VARCHAR(100) NOT NULL,
    price DECIMAL(10, 2) NOT NULL,
    description VARCHAR(255)
    );
Step 5: Create another sql file and it named as data1.sql for the inserting the data into the users table.
INSERT INTO users (username, email, password) VALUES
('user1', 'maheshkadamnala@example.com', 'Mahesh@123'),
('user2', 'bethaeswar@example.com', 'Eswar@123'),
('user3', 'rajkumar@example.com', 'Raju@123'),
('user4', 'jaganamalla@example.com', 'Jagana@123');
Step 6: Create another sql file and it named as data2.sql for the inserting the data into the users products.
INSERT INTO products (name, price, description) VALUES
('Product 1', 19.99, 'Description for product 1'),
('Product 2', 49.99, 'Description for product 1'),
('Product 3', 59.99, 'Description for product 1'),
('Product 4', 29.99, 'Description for product 2');
Step 7: Create the new java package and it named as model in that package create the new Java class named as SampleModel.
Go to src > main > java > multiplesqlfilesdemo > model > SampleModel and put the below code.
Java
package com.example.multiplesqlfilesdemo.model;

import javax.persistence.Entity;
import javax.persistence.GeneratedValue;
import javax.persistence.GenerationType;
import javax.persistence.Id;

import lombok.AllArgsConstructor;
import lombok.Data;
import lombok.NoArgsConstructor;

// Entity class representing a database table
@Entity
// Lombok annotations to generate boilerplate code
@AllArgsConstructor
@NoArgsConstructor
@Data
public class SampleModel {

    // Primary key field
    @Id
    // Auto-generated value for the primary key
    @GeneratedValue(strategy = GenerationType.IDENTITY)
    private Long id;

    // Name field
    private String name;
}
Step 8: Create the new Java package and it named as repository in that package create the new java class named as UserRepository.
Go to src > main > java > multiplesqlfilesdemo > repository > UserRepository and put the below code.
Java
package com.example.multiplesqlfilesdemo.repository;

import com.example.multiplesqlfilesdemo.model.SampleModel;
import org.springframework.data.jpa.repository.JpaRepository;
import org.springframework.stereotype.Repository;

// Repository interface for accessing SampleModel entities in the database
@Repository
public interface UserRepository extends JpaRepository<SampleModel, Long> {
}
Step 9: Create the new Java package and it named as service in that package create the new Java class named as DatabaseInitializationService.
Go to src > main > java > multiplesqlfilesdemo > service > DatabaseInitializationService and put the below code.
Java
package com.example.multiplesqlfilesdemo.service;

import jakarta.annotation.PostConstruct;
import org.springframework.beans.factory.annotation.Value;
import org.springframework.core.io.Resource;
import org.springframework.jdbc.core.JdbcTemplate;
import org.springframework.stereotype.Service;

import java.io.BufferedReader;
import java.io.IOException;
import java.io.InputStreamReader;
import java.util.Arrays;

// Service class for initializing the database using SQL scripts
@Service
public class DatabaseInitializationService {

    private final JdbcTemplate jdbcTemplate;

    @Value("classpath:db/migration/schema/*.sql")
    private Resource[] schemaScripts;

    @Value("classpath:db/migration/data/*.sql")
    private Resource[] dataScripts;

    // Constructor injection for JdbcTemplate
    public DatabaseInitializationService(JdbcTemplate jdbcTemplate) {
        this.jdbcTemplate = jdbcTemplate;
    }

    // Method to initialize the database by executing schema and data scripts
    @PostConstruct
    public void initializeDatabase() {
        executeScripts(schemaScripts);
        executeScripts(dataScripts);
    }

    // Method to execute SQL scripts
    private void executeScripts(Resource[] scripts) {
        Arrays.stream(scripts)
                .forEach(script -> {
                    try (BufferedReader reader = new BufferedReader(new InputStreamReader(script.getInputStream()))) {
                        jdbcTemplate.execute(reader.lines().reduce((line1, line2) -> line1 + "\n" + line2).orElse(""));
                    } catch (IOException e) {
                        e.printStackTrace();
                    }
                });
    }
}
Step 10: Create the new Java package and it named as controller in that package create the new Java class named as SampleController.
Go to src > main > java > multiplesqlfilesdemo > controller > SampleController and put the below code.
Java
package com.example.multiplesqlfilesdemo.controller;

import com.example.multiplesqlfilesdemo.model.SampleModel;
import com.example.multiplesqlfilesdemo.repository.UserRepository;
import org.springframework.beans.factory.annotation.Autowired;
import org.springframework.web.bind.annotation.GetMapping;
import org.springframework.web.bind.annotation.RequestMapping;
import org.springframework.web.bind.annotation.RestController;

import java.util.List;

// Controller class for handling sample model requests
@RestController
@RequestMapping("/api")
public class SampleController {

    @Autowired
    private UserRepository sampleRepository;

    // Handler method to get all samples
    @GetMapping("/samples")
    public List<SampleModel> getAllSamples() {
        return sampleRepository.findAll();
    }
}
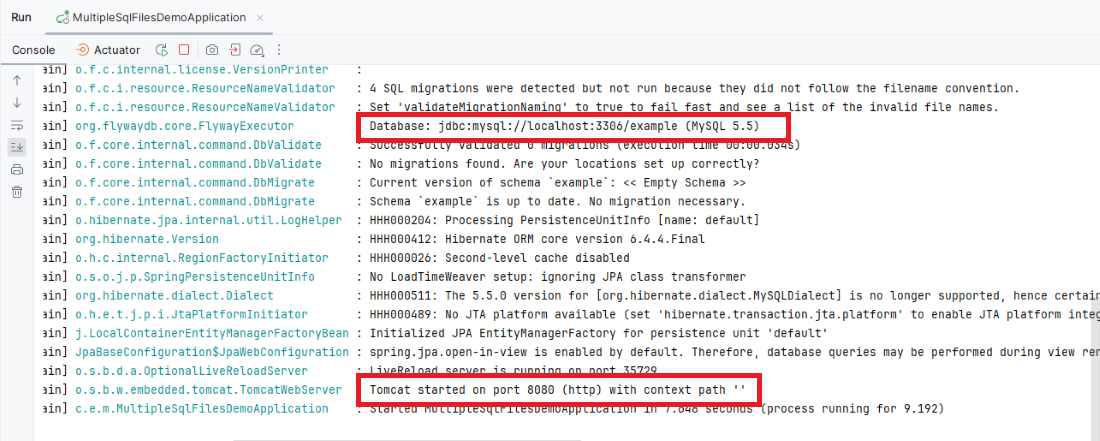
Step 11: Once the project completed, run it as spring application and it will run at port 8080. Refer the below image for the better understanding.
Output:
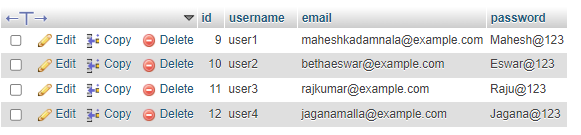
Users Table data into the mysql database:
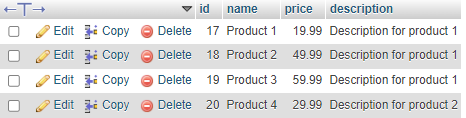
Products Table data into the mysql database:
If we are following the above steps, then we can develop the Spring project with Mutiple SQL files into the project.
Share your thoughts in the comments
Please Login to comment...