Serialization is one of the most important concepts in RESTful Webservices. It facilitates the conversion of complex data (such as model instances) to native Python data types that can be rendered using JSON, XML, or other content types. In Django REST Framework, we have different types of serializers to serialize object instances, and the serializers have different serializer relations to represent model relationships. In this section, we will discuss the different serializer relations provided by Django REST Framework Serializers.
Table of Contents
Getting Started
Before working on Django REST Framework serializers, you should make sure that you already installed Django and Django REST Framework in your virtual environment. You can check the below tutorials:
Next, you can create a project named emt (employee management tool) and an app named employees. Refer to the following articles to check how to create a project and an app in Django.
In this section, we will be using PostgreSQL. You have to create a database named emt in PostgreSQL. You can check the below link for installation.
Install PostgreSQL on Windows
Note: if you need to work with SQLite, you can continue using the default database.
To make use of PostgreSQL, we need to install a Python-PostgreSQL Database Adapter (psycopg2). This package helps Django to interact with a PostgreSQL database. You can use the below command to install the psycopg2 package. Make sure the PostgreSQL bin folder is included in the PATH environmental variables, and the virtual environment is activated before executing the command.
pip install psycopg2
Now, you need to configure the PostgreSQL database in your Django project. By default, the database configuration has an SQLite database engine and database file name. You can check the setting.py Python file and replace the default database configuration with the PostgreSQL database configuration.
DATABASES = {
   'default': {
       'ENGINE': 'django.db.backends.postgresql',
       'NAME': 'emt',
       'USER': 'username',
       'PASSWORD': 'password',
       'HOST': '127.0.0.1',
       'PORT': '5432',
   }
}
Here, the name refers to the database name, the user and the password refers to the Postgres username and password.
At last, we need to install the httpie package in our virtual environment. We will be composing HTTPie commands for CRUD operation. You can activate the virtual environment and run the below command
pip install –upgrade httpie
Creating Django Models and Views
Creating Django Models
In Django, Models are classes that deal with databases in an object-oriented way. Each model class refers to a database table and each attribute in the model class refers to a database column. Here, we will create an Employee model and EmployeeTask model in Django. The EmployeeTask model holds a ManyToOne relationship with the Employee model We require the following attributes for our Employee entity:
- emp_id
- name
- gender
- designation
The attributes for our EmployeeTask model as follows:
- task_name
- employee (foreign key – Employee)
- task_desc
- created_date
- deadline
Let’s get into the implementation of the Employee model in Django. You can replace the models.py Python file with the below code:
Python3
GENDER_CHOICES = (('M','Male'),
('F','Female'),)
class Employee(models.Model):
emp_id = models.IntegerField()
name = models.CharField(max_length=150)
gender = models.CharField(max_length=1,
choices=GENDER_CHOICES,
default='M')
designation = models.CharField(max_length=150)
class Meta:
ordering=('emp_id',)
def __str__(self):
return self.name
|
The Employee model is a subclass of the django.db.models.Model class and defines the attributes and a Meta inner class. It has an ordering attribute that orders the result in an ascending order based on employee id.
Next, let get into the implementation of EmployeeTask Model. You can add the below code to the models.py file.
Python3
class EmployeeTask(models.Model):
task_name = models.CharField(max_length=150)
employee = models.ForeignKey(Employee,
                                  related_name='tasks',
                                  on_delete=models.CASCADE)
task_desc = models.CharField(max_length=350)
created_date = models.DateTimeField(auto_now_add=True)
deadline = models.DateTimeField()
class Meta:
ordering = ('task_name',)
def __str__(self):
return self.task_name
|
The EmployeeTask model is a subclass of the django.db.models.Model class and defines the attributes and a Meta inner class. It has an ordering attribute that orders the result in an ascending order based on task_name. It has an employee field that holds a many-to-one relationship with the Employee model.
employee = models.ForeignKey(Employee,
                                  related_name='tasks',
                                  on_delete=models.CASCADE)
The related_name helps in a reverse relationship. Reverse relationship means referring from Employee to EmployeeTask. The employee field represents the Employee model in the EmployeeTaks. Likewise, the related_name represents the EmployeeTask in the Employee model.
Reverse relations are not automatically included by the serializer class. We must explicitly add it to the field list. If you set an appropriate related_name argument on the relationship, then you can use it as a field name (You will be able to understand reverse relation while serializing the Models).
Let’s make the initial migrations using the below command.
python manage.py makemigrations
If the migration is a success then apply all generated migrations using the below command:
python manage.py migrate
If successful you can check your database entries. Now, let’s create the Django views.
Creating Views
Django views facilitate processing the HTTP requests and providing HTTP responses. On receiving an HTTP request, Django creates an HttpRequest instance and it is passed as the first argument to the view function. The view function checks the value and executes the code based on the HTTP verb. Here the code uses @csrf_exempt decorator to set a CSRF (Cross-Site Request Forgery) cookie. This makes it possible to POST to this view from clients that won’t have a CSRF token.
You can add the below code to your view.py file.
Python3
from django.shortcuts import render
from django.http import HttpResponse, JsonResponse
from django.views.decorators.csrf import csrf_exempt
from rest_framework.renderers import JSONRenderer
from rest_framework.parsers import JSONParser
from employees.models import Employee, EmployeeTask
from employees.serializers import EmployeeSerializer, EmployeeTaskSerializer
@csrf_exempt
def employee_list(request):
if request.method == 'GET':
emp = Employee.objects.all()
emp_serializer = EmployeeSerializer(emp, many=True)
return JsonResponse(emp_serializer.data, safe=False)
elif request.method == 'POST':
emp_data = JSONParser().parse(request)
emp_serializer = EmployeeSerializer(data=emp_data)
if emp_serializer.is_valid():
emp_serializer.save()
return JsonResponse(emp_serializer.data,
status=201)
return JsonResponse(emp_serializer.errors,
status=400)
@csrf_exempt
def employee_detail(request, pk):
try:
emp = Employee.objects.get(pk=pk)
except Employee.DoesNotExist:
return HttpResponse(status=404)
if request.method == 'GET':
emp_serializer = EmployeeSerializer(emp)
return JsonResponse(emp_serializer.data)
elif request.method == 'DELETE':
emp.delete()
return HttpResponse(status=204)
@csrf_exempt
def employeetask_list(request):
if request.method == 'GET':
emptask = EmployeeTask.objects.all()
emptask_serializer = EmployeeTaskSerializer(emptask, many=True)
return JsonResponse(emptask_serializer.data, safe=False)
elif request.method == 'POST':
emptask_data = JSONParser().parse(request)
emptask_serializer = EmployeeTaskSerializer(data=emptask_data)
if emptask_serializer.is_valid():
emptask_serializer.save()
return JsonResponse(emptask_serializer.data,
status=201)
return JsonResponse(emptask_serializer.errors,
status=400)
@csrf_exempt
def employeetask_detail(request, pk):
try:
emptask = EmployeeTask.objects.get(pk=pk)
except EmployeeTask.DoesNotExist:
return HTTPResponse(status=404)
if request.method == 'GET':
emptask_serializer = EmployeeTaskSerializer(emptask)
return JsonResponse(emptask_serializer.data)
elif request.method == 'DELETE':
emptask.delete()
return HttpResponse(status=204)
|
Here, we have different functions to process requests related to the Employee model and EmployeeTask model — employee_list, employeetask_list, and employee_detail and employeetask_detail. The employee_list and employeetask_list functions are capable of processing requests to retrieve all employees and employee’s tasks or to create a new employee and create a new employee task. The employee_detail and employeetask_detail functions are capable of processing requests such as retrieve a particular entry and delete an entry.
Setting URL Configuration
Now, it’s necessary to route URLs to view. You need to create a new Python file name urls.py in the app (employees) folder and add the below code.
Python3
from django.urls import path
from employees import views
urlpatterns = [
path('employees/',
views.employee_list,
name = 'employee-list'),
path('employees/<int:pk>/',
views.employee_detail,
name='employee-detail'),
path('task/',
views.employeetask_list,
name = 'employeetask-list'),
path('task/<int:pk>/',
views.employeetask_detail,
name='employeetask-detail'),
|
Based on the matching path the URLs are routed to corresponding views. Next, we have to replace the code in the urls.py file in the root folder (emt\emt\urls.py). At present, it has the root URL configurations. Update the urls.py file with the below code.
Python3
from django.urls import path, include
urlpatterns = [
path('', include('employees.urls')),
]
|
PrimaryKeyRelatedField represents the target of the relation using the primary key (pk). It can be achieved by generating the relationship using the rest_framework.serializers.PrimaryKeyRelatedField() field. By default, this field is read-write, but you can make it read-only by setting the read_only attribute to True. The PrimaryKeyRelatedField has the following arguments:
- queryset – It used for model instance lookups when validating the field input. Relationships must either set a queryset explicitly (serializers.PrimaryKeyRelatedField(queryset=Employee.objects.all(),many=False) ), or set read_only=True.
- many – Set this argument to True to serialize more than one relationship
- allow_null – If set to True, the field will accept values of None or the empty string for nullable relationships. Defaults to False.
- pk_field – Set to a field to control serialization/deserialization of the primary key’s value. For example, pk_field=UUIDField(format=’hex’) would serialize a UUID primary key into its compact hex representation.
Now let’s get to our serializer code. Here we have two serializer classes — EmployeeSerializer and EmployeeTaskSerializer. The EmployeeSerializer class serializes the Employee model and the EmployeeTaskSerializer serializes the EmployeeTask model. The EmployeeTask Model holds a ManyToOne relationship with the Employee Model.
employee = models.ForeignKey(Employee,
related_name='tasks',
on_delete=models.CASCADE)
The same task will not be assigned to more than one employee, but one employee can have multiple tasks. Hence, the EmployeeTaskSerializer class should serialize only a single employee instance, whereas, EmployeeSerializer class should serialize one or more EmployeeTask instances (more than one task can be assigned to an employee).
The relationship generator process in EmployeeTaskSerializer as follows:
employee = serializers.PrimaryKeyRelatedField(queryset=Employee.objects.all(),
                                                  many=False)
By default, the PrimaryKeyRelatedField field has read-write permission. The queryset=Employee.objects.all() argument checks for the particular model instance in the Employee table. The many=False argument is set because there is only a single relationship to serialize.
The relationship generator process in EmployeeSerializer class as follows:
tasks = serializers.PrimaryKeyRelatedField(many=True, read_only=True)
The tasks attribute is the related_name specified (ForeignKey relationship) in the EmployeeTask model. Since each employee can have more than one task we set many=True. The read_only=True only allows permission to retrieve the EmployeeTask.
You can add the below code to the serializers.py file. (if you don’t have the file, you can create a file named serializers.py file in your app [employees] folder).
Python3
from rest_framework import serializers
from employees.models import Employee, EmployeeTask
class EmployeeSerializer(serializers.ModelSerializer):
tasks = serializers.PrimaryKeyRelatedField(many=True, read_only=True)
class Meta:
model = Employee
fields = (
'pk',
'emp_id',
'name',
'gender',
'designation',
'tasks')
class EmployeeTaskSerializer(serializers.ModelSerializer):
employee = serializers.PrimaryKeyRelatedField(queryset=Employee.objects.all(),
many=False)
class Meta:
model = EmployeeTask
fields = (
'pk',
'task_name',
'employee',
'task_desc',
'created_date',
'deadline')
|
Let’s populate the employee table. You can execute the below HTTPie command.
http POST :8000/employees/ emp_id=128 name=”Mathew A” gender=”M” designation=”Software Engineer”
Output
HTTP/1.1 201 Created
Content-Length: 140
Content-Type: application/json
Date: Thu, 21 Jan 2021 09:16:50 GMT
Referrer-Policy: same-origin
Server: WSGIServer/0.2 CPython/3.7.5
X-Content-Type-Options: nosniff
X-Frame-Options: DENY

{
    "designation": "Software Engineer",
    "emp_id": 128,
    "gender": "M",
    "name": "Mathew A",
    "pk": 8,
    "tasks": []
}
You can notice the pk value of the employee. Now, let’s create an employee task and map it to the employee using PrimaryKeyRelatedField. Here the primary key value of the employee named Mathew A is 8. You have to pass it to the field name employee. Execute the below HTTPie command.
http :8000/task/ task_name=”Interchange first and last elements in a list” employee=8 task_desc=”Write a Python program to interchange first and last element in a list” deadline=”2021-01-25 00:00:00.000000+00:00″
Output
HTTP/1.1 201 Created
Content-Length: 285
Content-Type: application/json
Date: Thu, 21 Jan 2021 09:42:39 GMT
Referrer-Policy: same-origin
Server: WSGIServer/0.2 CPython/3.7.5
X-Content-Type-Options: nosniff
X-Frame-Options: DENY

{
    "created_date": "2021-01-21T09:42:39.792788Z",
    "deadline": "2021-01-25T00:00:00Z",
    "employee": 8,
    "task_desc": "Write a Python program to interchange first and last element in a list",
    "task_name": "Interchange first and last elements in a list"
}
You can create one more task and assign it to the same employee and process the request to retrieve the employee details. The HTTPie command is
http :8000/employees/
Output
HTTP/1.1 200 OK
Content-Length: 219
Content-Type: application/json
Date: Fri, 22 Jan 2021 03:58:01 GMT
Referrer-Policy: same-origin
Server: WSGIServer/0.2 CPython/3.7.5
X-Content-Type-Options: nosniff
X-Frame-Options: DENY

[
    {
        "designation": "Software Engineer",
        "emp_id": 128,
        "gender": "M",
        "name": "Mathew A",
        "pk": 8,
        "tasks": [
            2,
            1
        ]
    },
    {
        "designation": "Test Engineer",
        "emp_id": 129,
        "gender": "F",
        "name": "Jeena R",
        "pk": 9,
        "tasks": []
    }
]
Sharing the command prompt screenshot for your reference
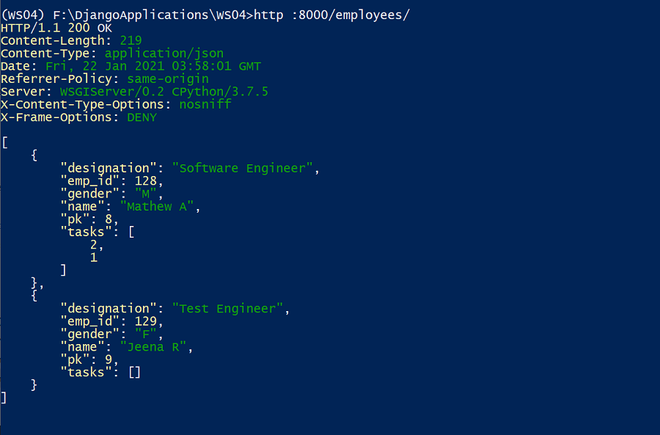
You can notice the tasks field for the employee named Mathew A. It displays the pk of the task model and the many=True argument serialized multiple task instance id.
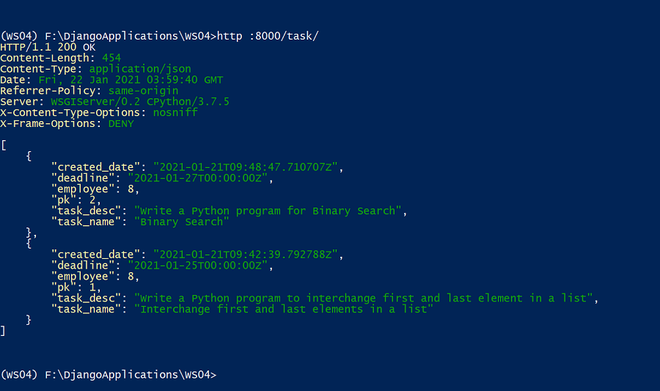
Let’s retrieve the task details using the below HTTPie command
http :8000/task/
Output
HTTP/1.1 200 OK
Content-Length: 454
Content-Type: application/json
Date: Fri, 22 Jan 2021 03:59:40 GMT
Referrer-Policy: same-origin
Server: WSGIServer/0.2 CPython/3.7.5
X-Content-Type-Options: nosniff
X-Frame-Options: DENY

[
    {
        "created_date": "2021-01-21T09:48:47.710707Z",
        "deadline": "2021-01-27T00:00:00Z",
        "employee": 8,
        "pk": 2,
        "task_desc": "Write a Python program for Binary Search",
        "task_name": "Binary Search"
    },
    {
        "created_date": "2021-01-21T09:42:39.792788Z",
        "deadline": "2021-01-25T00:00:00Z",
        "employee": 8,
        "pk": 1,
        "task_desc": "Write a Python program to interchange first and last element in a list",
        "task_name": "Interchange first and last elements in a list"
    }
]
Sharing the command prompt screenshot for your reference
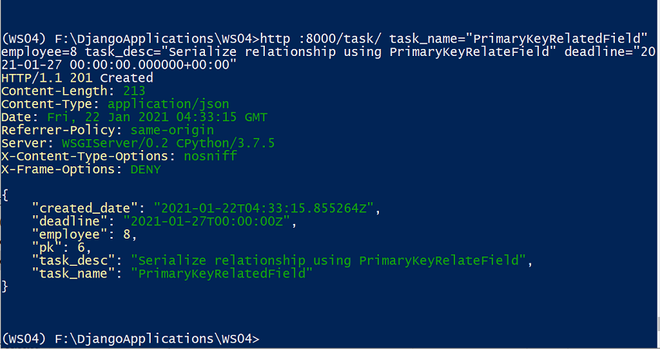
Let’s look at the HTTPie command to create a new task.
http :8000/task/ task_name=”PrimaryKeyRelatedField” employee=8 task_desc=”Serialize relationship using PrimaryKeyRelateField” deadline=”2021-01-27 00:00:00.000000+00:00″
Output
HTTP/1.1 201 Created
Content-Length: 213
Content-Type: application/json
Date: Fri, 22 Jan 2021 04:33:15 GMT
Referrer-Policy: same-origin
Server: WSGIServer/0.2 CPython/3.7.5
X-Content-Type-Options: nosniff
X-Frame-Options: DENY

{
    "created_date": "2021-01-22T04:33:15.855264Z",
    "deadline": "2021-01-27T00:00:00Z",
    "employee": 8,
    "pk": 6,
    "task_desc": "Serialize relationship using PrimaryKeyRelateField",
    "task_name": "PrimaryKeyRelatedField"
}
Sharing the command prompt screenshot for your reference:
Now let’s explore how StringRelatedField represents a relationship.
The StringRelatedField represents the target of the relationship using its __str__ method. This field is read-only and set the ‘many’ argument to true If more than one instance to serialize. Let’s make use of StringRelatedField for tasks filed in EmployeeSerializer class. The relationship generator process as follows:
tasks = serializers.StringRelatedField(many=True)
The EmployeeSerializer class as follows:
Python3
class EmployeeSerializer(serializers.ModelSerializer):
tasks = serializers.StringRelatedField(many=True)
class Meta:
model = Employee
fields = (
'pk',
'emp_id',
'name',
'gender',
'designation',
'tasks')
|
Let’s retrieve the employee details to understand how the StringRelatedField displays the relationship field values. The HTTPie command to retrieve the employee values is:
http :8000/employees/
Output
HTTP/1.1 200 OK
Content-Length: 279
Content-Type: application/json
Date: Fri, 22 Jan 2021 04:04:08 GMT
Referrer-Policy: same-origin
Server: WSGIServer/0.2 CPython/3.7.5
X-Content-Type-Options: nosniff
X-Frame-Options: DENY

[
    {
        "designation": "Software Engineer",
        "emp_id": 128,
        "gender": "M",
        "name": "Mathew A",
        "pk": 8,
        "tasks": [
            "Binary Search",
            "Interchange first and last elements in a list"
        ]
    },
    {
        "designation": "Test Engineer",
        "emp_id": 129,
        "gender": "F",
        "name": "Jeena R",
        "pk": 9,
        "tasks": []
    }
]
Sharing the command prompt screenshot for your reference
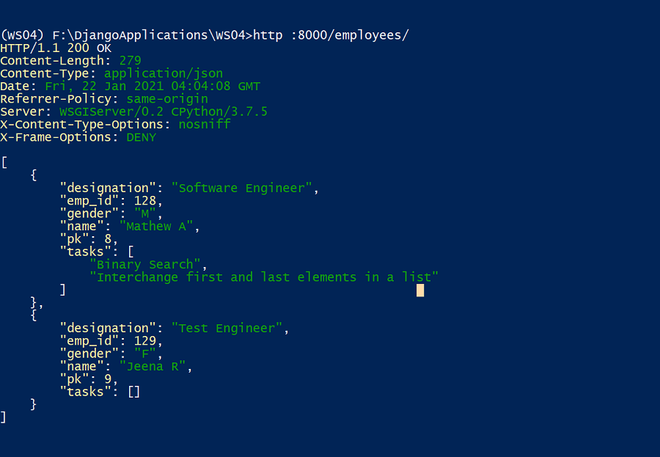
Here you can notice that the tasks field displays the string value from the function def __str__(self): in the EmployeeTask model.
    def __str__(self):
        return self.task_name
The SlugRelatedField represents the target of the relationship using a field on the target. By default, the field permits read-write operation. For write operations, the slug field that represents a model field should be unique. The SlugRelatedField has the following arguments:
- slug_field – A field on the target and it should uniquely identify any given instance.
- queryset – It facilitates model instance lookups when validating the field input. Relationships must either set a queryset explicitly, or set read_only=True.
- many – Set this argument to True to serialize more than one relationship
- allow_null – If set to True, the field will accept values of None or the empty string for nullable relationships. Defaults to False.
In the EmployeeTaskSerializer class, you can replace the employee field representation with the below code:
employee = serializers.SlugRelatedField(
        queryset=Employee.objects.all(),
        slug_field='name')
The EmployeeTaskSerializer code as follows:
Python3
class EmployeeTaskSerializer(serializers.ModelSerializer):
employee = serializers.SlugRelatedField(
queryset=Employee.objects.all(),
slug_field='name')
class Meta:
model = EmployeeTask
fields = (
'pk',
'task_name',
'employee',
'task_desc',
'created_date',
'deadline')
|
The HTTPie command to create a new employee task is
http :8000/task/ task_name=”SlugRelatedField” employee=”Mathew A” task_desc=”Serialize relationship using SlugRelateField” deadline=”2021-01-27 00:00:00.000000+00:00″
Output
HTTP/1.1 201 Created
Content-Length: 210
Content-Type: application/json
Date: Fri, 22 Jan 2021 04:41:12 GMT
Referrer-Policy: same-origin
Server: WSGIServer/0.2 CPython/3.7.5
X-Content-Type-Options: nosniff
X-Frame-Options: DENY

{
    "created_date": "2021-01-22T04:41:12.424001Z",
    "deadline": "2021-01-27T00:00:00Z",
    "employee": "Mathew A",
    "pk": 7,
    "task_desc": "Serialize relationship using SlugRelateField",
    "task_name": "SlugRelatedField"
}
Sharing the command prompt screenshot for your reference
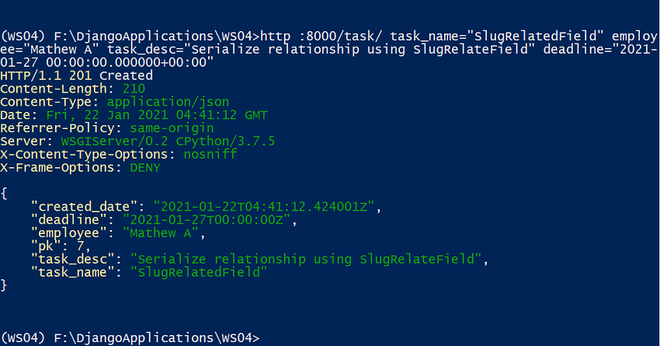
Here, while creating a new task, we have given the employee name in the employee field rather than the primary key. You can also mention employee id while representing SlugRelatedField. You should make sure that it satisfies the unique constraint.
HyperlinkedIndetityField
For Hyperlinking the API, the serializer class should extend HyperlinkedModelSerializer. The HyperlinkedModelSerializer class makes use of hyperlinks to represent relationships, instead of primary keys. By default, the serializer class that is inherited from HyperlinkedModelSerializer class will include a url field instead of a primary key field. The url field will be represented using a HyperlinkedIdentityField serializer field. It can also be used for an attribute on the object.
The HyperlinkedIdentityField is always read-only. The arguments of HyperlinkedIdentitField are:
- view_name – The view name is used as the target of the relationship. In standard router classes, this will be a string with the format <model_name>-detail.
- lookup_field – The field on the target, which is used for the lookup. It corresponds to a URL keyword argument on the referenced view. Default is ‘pk’.
- lookup_url_kwarg – The name of the keyword argument defined in the URL conf that corresponds to the lookup field. Defaults to using the same value as lookup_field.
- format – If using format suffixes, hyperlinked fields will use the same format suffix for the target unless overridden by using the format argument.
In the EmployeeTaskSerializer class, you can use represent the url field as shown below:
url = serializers.HyperlinkedIdentityField(
        view_name='employeetask-detail',
        lookup_field='pk'
    )
Note: By default, the serializer class that is inherited from HyperlinkedModelSerializer class will include a url field, and the view name will be a string with the format <model_name>-detail.
The EmployeeTaskSerializer class as follows:
Python3
class EmployeeTaskSerializer(serializers.HyperlinkedModelSerializer):
url = serializers.HyperlinkedIdentityField(
view_name='employeetask-detail',
lookup_field='pk'
)
employee = serializers.SlugRelatedField(
queryset=Employee.objects.all(), slug_field='name')
class Meta:
model = EmployeeTask
fields = '__all__'
|
When instantiating a HyperlinkedModelSerializer, it is a must to include the current request in the serializer context. You need to pass context={‘request’:request} as an argument when instantiating your EmployeeTaskSerializer. For example:
emp_serializer = EmployeeSerializer(emp,
                                    many=True,
                                    context={'request':request})
Make sure you edit your employee_list and employee_detail function in the views.py file with the above code. You should add context={‘request’:request} argument while instantiating EmployeeTaskSerializer (GET, POST, PUT and PATCH).
Note: Note: This context along with the lookup_field is used for generating a fully qualified url by HyperlinkedIdentityField
Let’s retrieve the EmployeeTask values to understand how the values are displayed. The HTTPie command is
http GET :8000/task/1/
Output
HTTP/1.1 200 OK
Content-Length: 296
Content-Type: application/json
Date: Fri, 22 Jan 2021 16:16:42 GMT
Referrer-Policy: same-origin
Server: WSGIServer/0.2 CPython/3.7.5
X-Content-Type-Options: nosniff
X-Frame-Options: DENY

{
    "created_date": "2021-01-21T09:42:39.792788Z",
    "deadline": "2021-01-25T00:00:00Z",
    "employee": "Mathew A",
    "task_desc": "Write a Python program to interchange first and last element in a list",
    "task_name": "Interchange first and last elements in a list",
    "url": "http://localhost:8000/task/1/"
}
Sharing the command prompt screenshot for your reference
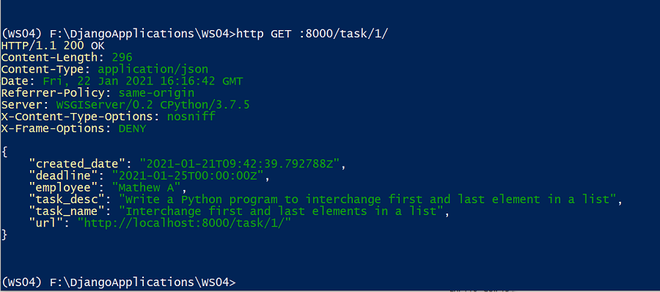
If we analyze the output, we can notice that instead of the primary key it displays url field.
"url": "http://localhost:8000/task/1/"
HyperlinkedRelatedField is used to represent the target of the relationship using a Hyperlink. By default, this field is a read-write, but we can make it read-only by setting the read-only flag True. The arguments of HyperlinkedRelatedField are as follows:
- view_name – The view name is used as the target of the relationship. For standard router classes, this will be a string with the format <modelname>-detail.
- queryset – It facilitates model instance lookups when validating the field input. Relationships must either set a queryset explicitly or set read_only=True.
- many – To serialize more than one relation, you should set this argument to True.
- allow_null – If set to True, the field will accept None values or the empty string for nullable relationships. Defaults to False.
- lookup_field – The field on the target is used for the lookup. It corresponds to a URL keyword argument on the referenced view. Default is ‘pk’.
- lookup_url_kwarg – The name of the keyword argument defined in the URL conf that corresponds to the lookup field. By default, it uses the same value as lookup_field.
- format – If using format suffixes, hyperlinked fields will use the same format suffix for the target unless overridden by using the format argument.
In our reverse relationship (Employee to EmployeeTask) we have seen that by default the serializer (EmployeeSerializer) uses the primary key to represent the target of a relationship (to include a reverse relationship, you must explicitly add it to the field list). We have also explored other representations such as StringRelatedField and SlugRelatedField. Here, we will make use of HyperlinkedRelatedField.
In the EmployeeSerializer class, you can use represent the tasks field as shown below:
tasks = serializers.HyperlinkedRelatedField(many=True,
                                            read_only=True,
                                            view_name='employeetask-detail')
You can replace the existing EmployeeSerializer class with the below one:
Python3
class EmployeeSerializer(serializers.HyperlinkedModelSerializer):
url = serializers.HyperlinkedIdentityField(
view_name='employee-detail',
lookup_field='pk'
)
tasks = serializers.HyperlinkedRelatedField(many=True,
read_only=True,
view_name='employeetask-detail')
class Meta:
model = Employee
fields = (
'url',
'pk',
'emp_id',
'name',
'gender',
'designation',
'tasks')
|
The HTTPie command is:
http GET :8000/employees/8/
Output
HTTP/1.1 200 OK
Content-Length: 283
Content-Type: application/json
Date: Fri, 22 Jan 2021 16:18:59 GMT
Referrer-Policy: same-origin
Server: WSGIServer/0.2 CPython/3.7.5
X-Content-Type-Options: nosniff
X-Frame-Options: DENY

{
    "designation": "Software Engineer",
    "emp_id": 128,
    "gender": "M",
    "name": "Mathew A",
    "pk": 8,
    "tasks": [
        "http://localhost:8000/task/2/",
        "http://localhost:8000/task/1/",
        "http://localhost:8000/task/6/",
        "http://localhost:8000/task/7/"
    ],
    "url": "http://localhost:8000/employees/8/"
}
Sharing the command prompt screenshot for your reference
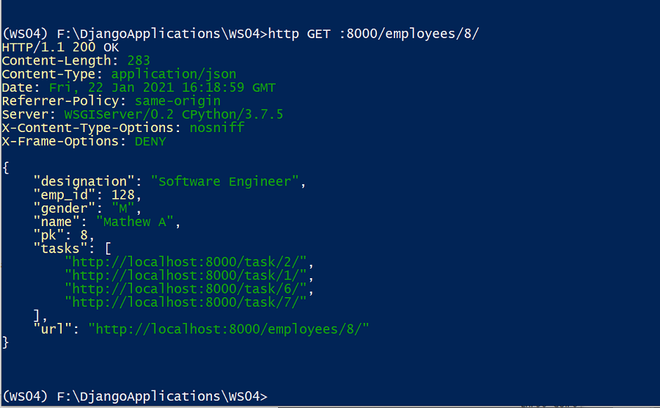
If we analyze the output, we can notice that the tasks field displays a set, or hyperlinks.
"tasks": [
        "http://localhost:8000/task/2/",
        "http://localhost:8000/task/1/",
        "http://localhost:8000/task/6/",
        "http://localhost:8000/task/7/"
    ]
Next, let’s understand how the nested relationship can be expressed by using serializers as fields.
Nested Relationship
A nested relationship makes it possible to embed the referred entity. If we look at the case of EmployeeTask, it refers to the Employee. Let’s serialize the EmployeeTask using a nested relationship.
You can use the below code to refer to the employee field in the EmployeeTaskSerializer:
employee = EmployeeSerializer(read_only=True)
You can replace the EmployeeTaskSerializer with the below code:
Python3
class EmployeeTaskSerializer(serializers.HyperlinkedModelSerializer):
url = serializers.HyperlinkedIdentityField(
view_name='employeetask-detail',
lookup_field='pk'
)
employee = EmployeeSerializer(read_only=True)
class Meta:
model = EmployeeTask
fields = '__all__'
|
Let’s retrieve an EmployeeTask entry. The HTTPie command is
http GET :8000/task/1/
Output
HTTP/1.1 200 OK
Content-Length: 569
Content-Type: application/json
Date: Fri, 22 Jan 2021 16:33:51 GMT
Referrer-Policy: same-origin
Server: WSGIServer/0.2 CPython/3.7.5
X-Content-Type-Options: nosniff
X-Frame-Options: DENY

{
    "created_date": "2021-01-21T09:42:39.792788Z",
    "deadline": "2021-01-25T00:00:00Z",
    "employee": {
        "designation": "Software Engineer",
        "emp_id": 128,
        "gender": "M",
        "name": "Mathew A",
        "pk": 8,
        "tasks": [
            "http://localhost:8000/task/2/",
            "http://localhost:8000/task/1/",
            "http://localhost:8000/task/6/",
            "http://localhost:8000/task/7/"
        ],
        "url": "http://localhost:8000/employees/8/"
    },
    "task_desc": "Write a Python program to interchange first and last element in a list",
    "task_name": "Interchange first and last elements in a list",
    "url": "http://localhost:8000/task/1/"
}
Sharing the command prompt screenshot for your reference
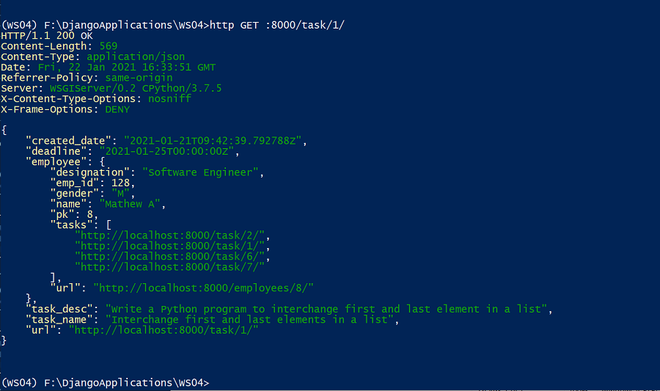
You can notice that the employee field displays the complete employee details rather than just the primary key or slug.
"employee": {
        "designation": "Software Engineer",
        "emp_id": 128,
        "gender": "M",
        "name": "Mathew A",
        "pk": 8,
        "tasks": [
            "http://localhost:8000/task/2/",
            "http://localhost:8000/task/1/",
            "http://localhost:8000/task/6/",
            "http://localhost:8000/task/7/"
        ],
        "url": "http://localhost:8000/employees/8/"
    },
In this section, we explored various types of relational fields provided by DRF serializer relations. We understood how each relational fields represent the relationship with the target. The PrimaryKeyRelatedField represents the target of the relationship using its primary key whereas, the StringRelatedField uses the __str__ method of the target. In the case of SlugRelatedField, it represents the target of the relationship using a target field. Finally, the HyperlinkedIdentityField is used as an identity relationship, and the HyperlinkedRealtedField represents the target of the relationship using a hyperlink.
Share your thoughts in the comments
Please Login to comment...