Real-time Updates with WebSockets and React Hooks
Last Updated :
11 Mar, 2024
The WebSocket protocol provides continuous, real-time, full-duplex communication between a client and server over a single TCP socket connection. The WebSocket protocol has only two plans: opening a handshake and facilitating data transfer. After the server receives the handshake request sent by the client and initiates a WebSocket connection, it can send data to each other with as many headers as desired. In this article, we will discuss the real-time updates with WebSockets and React Hooks.
Approach to Implement Real-time Updates with WebSockets & React Hooks:
For Backend:
- Importing the WebSocket library: We rely on the `ws` module as the helper for WebSocket instance in Node.js.
- Creating a WebSocket server: The port 8080 is bound for the WebSocket server to receive connections.
- Handling connections: The event `’connection’` is also triggered, when a user tries to connect to the server.
- Handling incoming messages from clients: When a `’message’`, event occurs it is associated with a client, it triggers a `’message‘` event.
- Parsing and processing the message: Received message decomposing is the next step, which is usually sent in JSON format, and what follows is to process or log the data accordingly.
- Broadcasting messages to all clients: Yet the processing is commenced, and the message is sent to all the other connected clients.
- Handling client disconnections: Through the connection’s `”close“` event, if a client disconnects from the server this will also be logged.
For Frontend:
- We import
React, useState, and useEffect from react. Declare a functional component RealTimeUpdates using an arrow function. Initialize state variables (messages, ws, message, clientId) using useState.
- Setup WebSocket connection in
useEffect, connecting to ‘ws://127.0.0.1:8080‘ and registering event listeners (onopen, onmessage, onclose). Handle incoming messages by updating messages state with setMessages.
- Close WebSocket connection on component unmount with
useEffect cleanup function. Send messages to server with sendMessage() function, sending message state in JSON format including client ID.
- Handle input change with
handleInputChange function to update message state. Render UI with header displaying clientId, list of messages, message input field, and send button.
- Export
RealTimeUpdates component as default export from the module.
Steps to Create a NodeJS App and Installing module:
Step 1: Initialize a new NodeJS project by running the following command:
npm init -y
Step 2: Install the necessary package in your project using the following command:
npm install ws
Step 3: Create a new JavaScript file (e.g., server.js) in your project directory and write the following code to create your WebSocket server in server.js:
Project Structure:
The dependencies in package.json file of backend will look like this:
"dependencies": {
    "ws": "^8.16.0"
}
Example: Below is an example of creating a server for the real-time updates applicaiton.
Javascript
const WebSocket = require('ws');
const wss = new WebSocket.Server({ port: 8080 });
wss.on('connection', ws => {
console.log('Client connected');
ws.on('message', message => {
const data = JSON.parse(message);
console.log(`Received: ${data.payload}
from client ${data.clientId}`);
wss.clients.forEach(client => {
if (client.readyState === WebSocket.OPEN) {
client.send(`Client ${data.clientId}
sent -> ${data.payload}`);
}
});
});
ws.on('close', () => {
console.log('Client disconnected');
});
});
|
Step 4: Start your WebSocket server by running:
node server.js
Now your WebSocket server is running and listening for connections on port 8080
Steps to Create Implement Real-time update in Frontend:
Step 1: Create a react project folder, open the terminal, and write the following command.
npx create-react-app foldername
Step 2: Navigate to the root directory of your project using the following command.
cd foldername
Project Structure(Frontend):
The dependencies in package.json(front end) will look like this:
"dependencies": {
    "react": "^18.2.0",
    "react-dom": "^18.2.0",
    "react-scripts": "5.0.1",
    "web-vitals": "^2.1.4"
}
Example: Below is an example of creating a frontend of real-time updates application.
Javascript
import React, {
useState,
useEffect
} from 'react';
const RealTimeUpdates = () => {
const [messages, setMessages] = useState([]);
const [ws, setWs] = useState(null);
const [message, setMessage] = useState('');
const [clientId, setClientId] = useState('');
useEffect(() => {
websocket.onopen = () => {
console.log('WebSocket is connected');
const id = Math.floor(Math.random() * 1000);
setClientId(id);
};
websocket.onmessage = (evt) => {
const message = (evt.data);
setMessages((prevMessages) =>
[...prevMessages, message]);
};
websocket.onclose = () => {
console.log('WebSocket is closed');
};
setWs(websocket);
return () => {
websocket.close();
};
}, []);
const sendMessage = () => {
if (ws) {
ws.send(JSON.stringify({
type: 'message',
payload: message,
clientId: clientId
}));
setMessage('');
}
};
const handleInputChange = (event) => {
setMessage(event.target.value);
};
return (
<div>
<h1>
Real-time Updates with WebSockets
and React Hooks - Client {clientId}
</h1>
{messages.map((message, index) =>
<p key={index}>{message}</p>)}
<input type="text" value={message}
onChange={handleInputChange} />
<button onClick={sendMessage}>
Send Message
</button>
</div>
);
};
export default RealTimeUpdates;
|
Start your application using the following command.
npm start
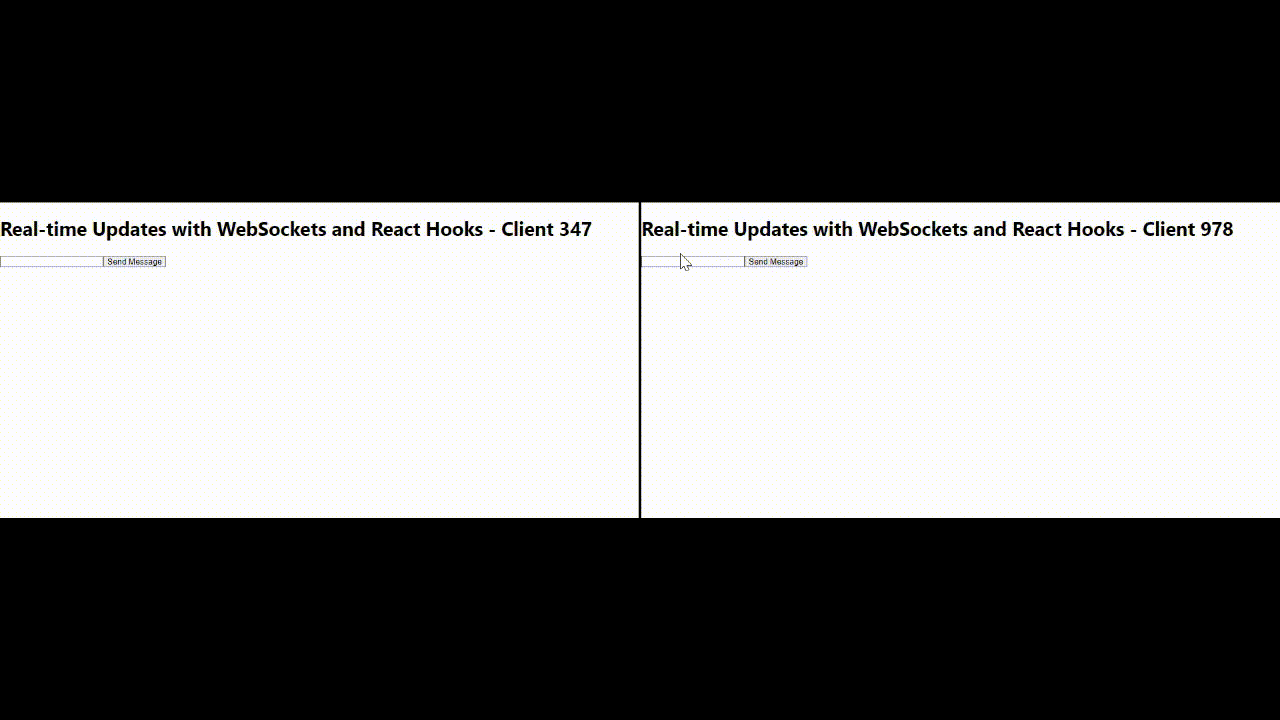
Output:
Conclusion:
WebSocket enables bidirectional, full-duplex communication between client and server with a single TCP connection, facilitating real-time data transfer for applications like chat and gaming. Setting up WebSocket communication in React involves creating a custom React Hook to manage WebSocket events, data reading/writing, and UI rendering, enhancing user experience, interactivity, and responsiveness. This technology supports real-time updates, communication, and data synchronization, exemplified in applications like live chat for enhanced user engagement.
Share your thoughts in the comments
Please Login to comment...