Microsoft Azure – Create App Services in Azure Portal
Last Updated :
30 Mar, 2023
In this article, we will learn about the new and improved experience for creating App Services. Azure App Service lets you create apps faster with a one-of-a-kind cloud service to quickly and easily create enterprise-ready web and mobile apps for any platform or device and deploy them on a scalable and reliable cloud infrastructure.
Implementation:
Follow the below steps to create an App Service in the Azure portal:
Step 1: On the new Azure landing page, you can see Azure has App Service right on top.
Step 2: If you click in, you can see all of your App Service apps that you have created, and you can create a new one either by clicking on add or going to the global create.
- And here, you will also find Web Apps immediately. And this is where find the new experience.
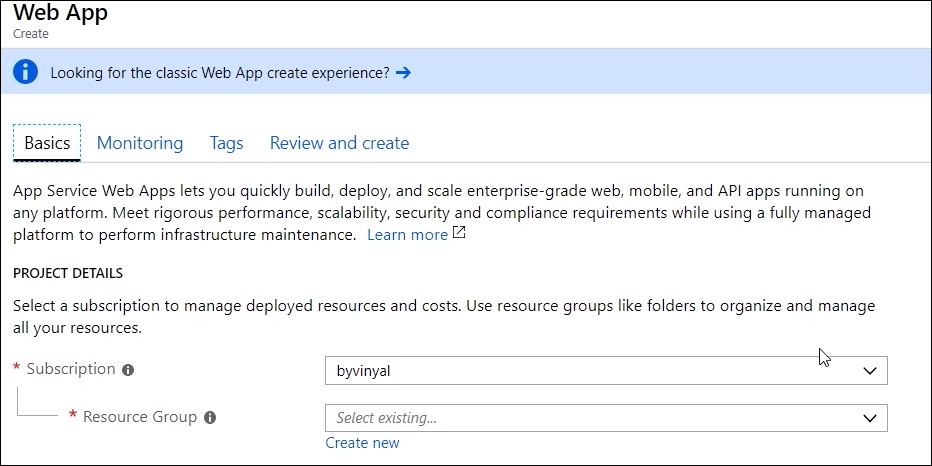
- There are a couple of things that are common across all of the resources that are adopting this view. One of them is the first selection that you are going to have is the subscription and the resource group. The resource group is like a virtual folder where Azure puts all of your resources inside and then you can use that to share access to somebody else. For example, if you wanted to give someone access to your new web app that you wanted to create, you would do it at the resource group level.
Step 3: Look into the specifics of the web app that you are creating. You may give it a name. This is going to validate that this is unique. And then there are some of the changes that Azure did to create to start to come in. First of all, you are going to be able to choose whether you want to push your own code or you want to push a Docker container. As App Service supports both modes. For this article, let’s just say that you are moving with code.
Step 4: And then this is another change that Azure made, where you are going to make an upfront select of what runtime stack you are going to use. So, if you can see that Azure has .NET Core 2.2, And at that point, you see that Azure supports both Linux and Windows. But in this case, Azure recommends Windows for this particular selection. If you wanted to run something on Wubi for one of your weekend projects, for example, you would see that Azure is supported on Linux. And for example, if you wanted to go with THP 7.2, you see that Azure is supported both Windows and Linux. And in this case, Azure usually recommends running it on Linux. Here, let’s just go with NET. And then the next thing is the location dropdown. So, this is where you choose where your app is going to live.
- App Service is a Ring 1 Service, so whenever a data center is open to the public, App Service has to be there. And this is the newest, latest region that is now available.
Step 5: Then let’s just try to switch over and run it on Linux. For Linux instances, Azure didn’t use to have a free offer. And now, Azure has a perpetual free offer if you are running web apps on Linux.
The way this works is you are going to be hosted in a shared environment. There are limits on the amount of memory that you can consume, the amount of bandwidth, and the amount of CPU. But it’s a perfect environment for you to do like your testing out the waters, figuring out how this works, how is Linux different than Windows for hosting apps, all of that. So, go ahead and select your free instance. And you are going to jump over to the next tab.
Step 6: This is where Azure has integration with Application Insights. It’s not available for all stacks but for the ones that are available, here’s where you would configure it.
Step 7: Then you go into tags. This is a global Azure feature. People use it to tag their resources with, for example, a cost center. Because these tags get populated all the way down to your bill. So if you want to know what project is costing you what money, this is a good way to do it.
Step 8: And finally, jump over to review and create, where you are going to get a summary of what are the resources that are going to be created. In this case, you can see there are details for the app and the App Service plan. And here’s also where Azure takes a second to do the validation. So, this is where Azure makes sure that whatever input you provided is going to complete with a successful creation of your app.
Step 8: You are going to have a web app running in the cloud and ready to scale.
So if you look over where that creation is happening, you will see that for App Service resources, Azure has web apps. Azure has App Service plans. They look exactly the same. If you switch over to the App Service Environment, they look exactly the same. And even for things that are not App Service-specific, you can create a VM, SQL database, Azure storage—they are all using this same pattern that your team is providing.
Basically, the idea is that customers can learn on a small set of partners and then apply them across the board, so it makes it easier to accomplish these tasks. As if you know how to create a web app, now you know how to create any other resource
Share your thoughts in the comments
Please Login to comment...