Implementing User Authentication with Next JS and Firebase
Last Updated :
27 Feb, 2024
In this article, we are going to learn how we can use Firebase with Next JS to implement user authentication. So, that user can log in using their credentials or Google account. For this project, sound knowledge of Next JS and FIrebase is required. If you are new then, don’t worry every step in this tutorial will be user-friendly. Get ready with your preferred IDE and log in to Firebase as it is free and advantageous for this project.
Output Preview: Let us have a look at how the final output will look like.
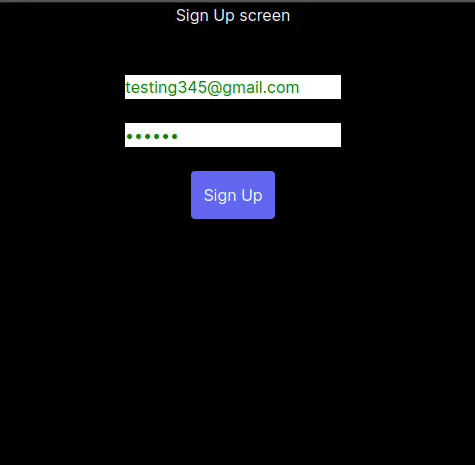
Sign up page
Prerequisites:
Approach to Implement User Authentication with NextJS and Firebase:
We are initially going to set up Firebase so that we can use it in our NextJS web application, then we will create a NextJS web application and connect Firebase with our web application. Firebase will be responsible for storing user’s information and their credentials. Users can register themselves and later log in using their correct credentials.
Setting Up Firebase:
Let’s start building our project and initially, we have to set up our Firebase.
Step 1: Create a new project: Go to the Firebase website and then log in with your Google account. After successful login, click on “Create a project”.
Step 2: Name Your Project: On this page, you have to name your project it may be anything, your project your choice. After naming your project, click on continue and it will ask for Google Analytics you may turn it on if you want. Just choose your preferred setting and your project will be created successfully.
Step 3: Setting up Web Application: After reaching the main dashboard of Firebase, we have to create a web application so that, our application can authenticate users using their Gmail account.
For that, click on “web” on the dashboard, for adding firebase to our web application.
Step 4: Add Firebase to the Web App: Now, on this page, you have to give a name to your app and then we can use Firebase in our Web Application. After entering a name, click on “Register app“.
After successfully registering our app, it will show SDK to use Firebase in our web application. The page will look like this and remember to use your credentials.
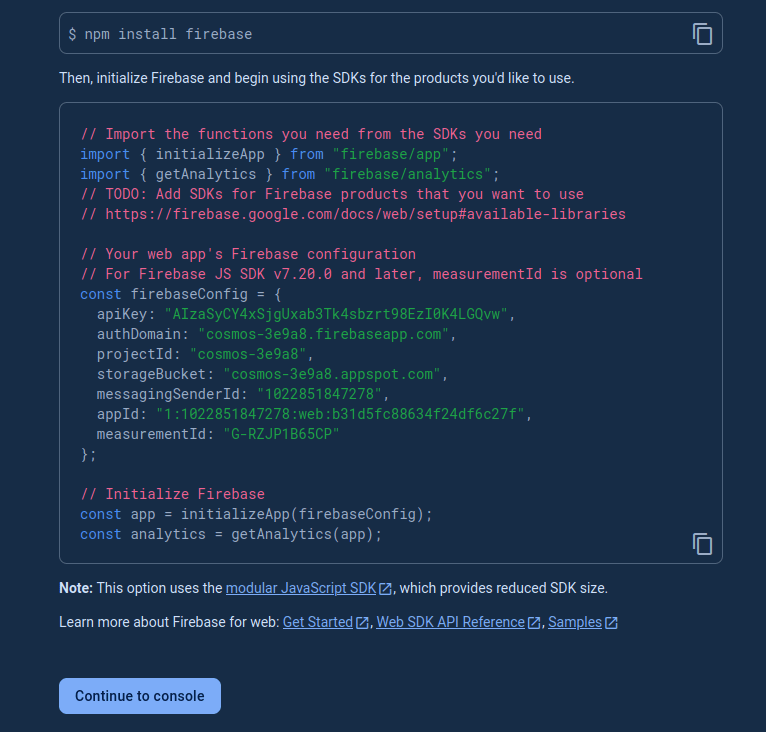
SDK
Step 5: Choosing Authentication Type: Now we have to choose the authentication type so that our users can register themselves and authenticate. Here we are going to use “Email/password” because it will allow the user to enter their email and password. You can try other methods too but in this tutorial, we are going to use “email/password” authentication. Follow the below steps:-
- 1. Click on “Authentication“
- 2. Click on “Get Started“
- 3. Click on the “Email/Password” option from the options menu.
- 4. Click on “Enable” and then click on “Save“
- 5. Now to reaccess your SDK, Click on “project settings” -> “General” And scroll down you will see your all SDK information.
- Now we have set up our Firebase, it’s time to create our web application using NextJS. We will use our SDK information in our web application to connect Firebase. So remember this crucial point.
Step to Create a Next JS Applcation:
Step 1: Setting up NextJS : First, create any directory in which we are going to install all our packages and components. Use vscode or any other IDE to install packages. Enter the below commands in the Vscode terminal to create a NextJS app.
npx create-next-app .
Then choose the following options as “yes” .
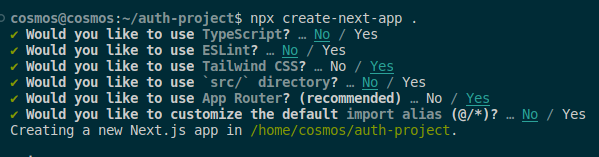
Creating NextJs application
Step 2: Install the necessary package in your application using the following command.
npm install firebase
Project Structure:
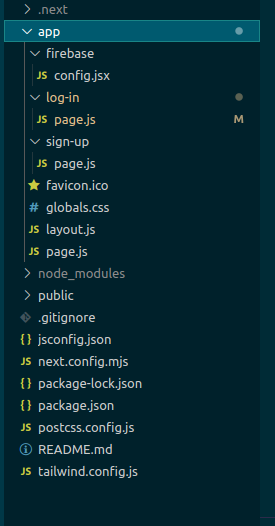
Project Structure
The updated dependencies in package.json file will look like:
"dependencies": {
    "firebase": "^10.8.0",
    "next": "14.1.0",
    "react": "^18",
    "react-dom": "^18"
}
Example: Write the following code in respective files
Javascript
import { initializeApp } from "firebase/app";
import { getAnalytics } from "firebase/analytics";
import { getAuth } from 'firebase/auth'
const firebaseConfig = {
apiKey: "AIzaSyDLakJA2913lao5-coYdNsgYOmhUdmqqUQ",
authDomain: "cosmos-bc240.firebaseapp.com",
projectId: "cosmos-bc240",
storageBucket: "cosmos-bc240.appspot.com",
messagingSenderId: "419815671214",
appId: "1:419815671214:web:6f412f8affff60aaa6b43f",
measurementId: "G-8H6FHT4ZME"
};
const app = initializeApp(firebaseConfig);
const analytics = getAnalytics(app);
export const auth = getAuth(app);
export default function () { (<>Dummy function</>) }
|
Javascript
'use client'
import React from "react";
import { useRef } from "react"
import { auth } from '@/app/firebase/config';
import {
signInWithEmailAndPassword
} from "firebase/auth";
const login = () => {
const logemailRef = useRef();
const logpasswordRef = useRef();
const login = (e) => {
e.preventDefault();
const email = logemailRef.current.value;
const password = logpasswordRef.current.value;
signInWithEmailAndPassword(auth, email, password)
.then((userCredential) => {
const user = userCredential.user;
console.log(user)
alert(`Welcome ${user.email}
redirecting to GeeksForGeeks`)
window.location.href =
})
.catch((error) => {
const errorCode = error.code;
const errorMessage = error.message;
alert(errorMessage)
});
}
return (
<div>
<center>
<h1>Log in screen</h1><br /><br />
<form onSubmit={login}>
<input type="email"
placeholder="Enter your email"
ref={logemailRef}
style={{ color: 'green' }} /><br />
<br></br>
<input type="password"
placeholder="Enter your password"
ref={logpasswordRef}
style={{ color: 'green' }} /><br />
<br /><button type="submit"
className="w-200 p-3 bg-indigo-600
rounded text-white hover:bg-indigo-500">
Log In
</button>
</form>
</center>
</div>
)
}
export default login
|
Javascript
'use client'
import React from "react";
import { useRef } from 'react'
import {
createUserWithEmailAndPassword
} from "firebase/auth";
import { auth
} from '@/app/firebase/config';
import {
redirect
} from "next/dist/server/api-utils";
const signup = () => {
const emailRef = useRef();
const passwordRef = useRef();
const signup = (e) => {
e.preventDefault();
const email = emailRef.current.value;
const password = passwordRef.current.value;
createUserWithEmailAndPassword(auth, email, password)
.then((userCredential) => {
const user = userCredential.user;
alert(`Successfully signup
redirecting to Log in page`);
window.location.href = './log-in/';
})
.catch((error) => {
const errorCode = error.code;
const errorMessage = error.message;
alert(errorMessage);
});
}
return (
<div>
<center>
<h1>Sign Up screen</h1><br /><br />
<form onSubmit={signup}>
<input type="email"
placeholder="Enter your email"
ref={emailRef}
style={{ color: 'green' }} />
<br /><br></br>
<input type="password"
placeholder="Enter your password"
ref={passwordRef}
style={{ color: 'green' }} /><br />
<br />
<button type="submit"
className="w-200 p-3 bg-indigo-600
rounded text-white hover:bg-indigo-500">
Sign Up
</button>
</form>
</center>
</div>
)
}
export default signup
|
Start your application using the following command.
npm run dev
Output: Now go to http://localhost:3000 and our web application is live and kicking.
Sign up page
Explanation of Output:
- we defined ‘use client‘ because are using a client-side component, and we don’t use this Nextjs won’t run and throw errors at us.
- We imported some libraries and functions so that our web application could communicate efficiently.
- After successfully signing up, the user will be redirected to the login page.
- If some error occurs it will show the errors. Like password should be of length 6 or more.
- Again make sure to copy your own SDK and then paste it in the “firebaseConfig()”.
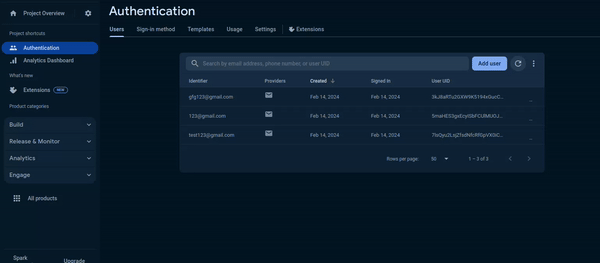
Registered users on our web app
Conclusion
Working with NextJS is quite complicated because of its naming conventions, we have to make sure that we use correct and rule-based names in our web application or it will later, throw an error at us. Authentication with Firebase is pretty easy and requires some sound knowledge of NextJS and Tailwind to design our web application.
Share your thoughts in the comments
Please Login to comment...