ChatGPT is a very powerful chatbot by OpenAI which uses Natural Language Processing to interact like humans. It has become very popular among developers and is being widely used for some of its state-of-the-art features like understanding and interpreting code and even generating code based on textual requirements. OpenAI has not only provided its functionality as a chatbot on the website but has also provided an API to help integrate ChatGPT into our applications and projects using which we can make an HTTP request and utilize the response appropriately.
In this article, we will have a look at the step-by-step procedure to integrate ChatGPT API in the Node.js project.
Using ChatGPT in Node.js Application
Adding ChatGPT functionalities to our large-scale NodeJS Application will make that more efficient for the users. So in this article, we will see step by step implementation of where to retrieve the API key, and how to create a NodeJS application that uses OpenAI API, that will work similarly to ChatGPT, and you can make conversation with ChatGPT using that application. Here are the complete steps for using ChatGPT in NodeJS Application.
1. Creating a Node.js Application
First of all, we will create a directory for the project say, chatgpt-api-nodejs, either using GUI or by pasting the below command in the terminal at the desired location in our machine:
mkdir chatgpt-api-nodejs
Now, change the directory to the newly created folder:
cd chatgpt-api-nodejs
To initialize the node.js project, run the below command which creates a package.json file to keep track of project details
npm init -y
2. Retrieving the OPENAI API Key
To use the API, we need to generate the API keys.
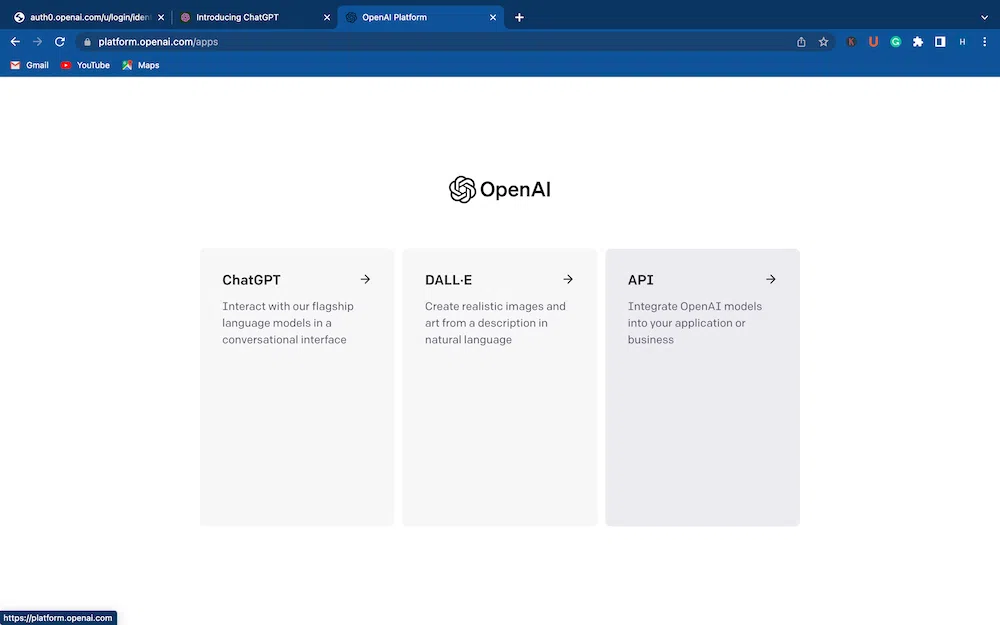
A. For that, go to OpenAI and either sign up or login (if you already have an account).

B. Then click on the API option
C. On the top right corner, click on the logo representing the logged-in user and select ‘View API keys’

D. Click on the ‘Create new secret key’ button. It will open up a dialog box asking for the name of the key which is optional. After you are done, click ‘Create secret key’.

E. A dialog box will appear displaying your secret key/API key. Copy it and ‘done’. Save the key safely and do not share it with anyone.

After obtaining the API key, let’s now get back to the main thing.
Install the openai library which provides easy access to OpenAI API in NodeJS projects and the readline-sync library to read user input from the command line.
npm i openai readline-sync
We will add the dotenv package to the project. It helps us create the environment variable which we will use to store our API key. There are multiple benefits of storing sensitive information like an API key in environment variables. In case of changes in the configuration of the project e.g. change in the API key in our case, we need not redeploy the entire application rather we can simply update the variable value. Another benefit is that dotenv package stores the environment variables in the .env file which could be added to .gitignore to prevent the key from being pushed to GitHub where it is publicly available to everyone.
npm i dotenv
Create a new file to create an environment variable for storing the API key
touch .env
In the file, create a variable OPENAI_SECRET_KEY and replace "YOUR OPEN AI API KEY" with your API key (keeping the quotes)
OPENAI_SECRET_KEY="YOUR OPEN AI API KEY"
3. Implementing NodeJS Application
Create a javascript file say, index.js, and paste the below code inside it.
Javascript
const { Configuration, OpenAIApi } = require("openai");
const readlineSync = require("readline-sync");
require("dotenv").config();
let APIcall = async () => {
const newConfig = new Configuration({
apiKey: process.env.OPENAI_SECRET_KEY
});
const openai = new OpenAIApi(newConfig);
const chatHistory = [];
do {
const user_input = readlineSync.question("Enter your input: ");
const messageList = chatHistory.map(([input_text, completion_text]) => ({
role: "user" === input_text ? "ChatGPT" : "user",
content: input_text
}));
messageList.push({ role: "user", content: user_input });
try {
const GPTOutput = await openai.createChatCompletion({
model: "gpt-3.5-turbo",
messages: messageList,
});
const output_text = GPTOutput.data.choices[0].message.content;
console.log(output_text);
chatHistory.push([user_input, output_text]);
} catch (err) {
if (err.response) {
console.log(err.response.status);
console.log(err.response.data);
} else {
console.log(err.message);
}
}
} while (readlineSync.question("\nYou Want more Results? (Y/N)").toUpperCase() === "Y");
};
APIcall();
|
4. Run the Application
To run the app, run the below command in terminal
node index.js
The above code takes the input prompt through the command line and prints the response generated by the ChatGPT model. Then it asks if we want to continue the conversation. Typing “Y” allows us to enter the prompt again while “N” terminates the program.
Output

Steps to Use ChatGPT API in Node.js
Step 1: Importing necessary dependencies
const { Configuration, OpenAIApi } = require("openai");
const readlineSync = require("readline-sync");
require("dotenv").config();
In the above code, the first line imports the Configuration and OpenAIApi classes from the openai package to connect to the OpenAI API
The readline-sync package is used to get user input through the command prompt.
The dotenv package is used to load environment variables from a .env file.
Step 2: Creating an Asynchronous Function
let APIcall = async () => {
      //code here
};
Creating an asynchronous arrow function using the async keyword, which will use await inside it.
Step 3: Configuration and API setup
const newConfig = new Configuration({
    apiKey: process.env.OPENAI_SECRET_KEY
});
const openai = new OpenAIApi(newConfig);
process.env.OPENAI_SECRET_KEY retrieves the API key from the environment variable inside the .env file
openai is an object of OpenAIApi class and takes the configuration object which contains the API key. Using this we can make the request to OpenAI API using our API key.
Step 4: History of Chats
const chatHistory = [];
An empty array is created to store the history of chats, which will help the AI model in generating responses
Step 5: Chat Loop
do{
   //code
}while (readlineSync.question("\nYou Want more Results? (Y/N)").toUpperCase() === "Y");
A do-while loop is created to continuously take input from the user and generate its response until wants to end it. Every time the loop completes one iteration, it will ask the users, whether they want the conversation to continue or not
Step 6: Input from the User
const user_input = readlineSync.question("Enter your input: ");
The above line prompts the user and stores the user prompt in user_input
Step 7: Chat History for Context
the
const messageList = chatHistory.map(([input_text, completion_text]) => ({
      role: "user" === input_text ? "ChatGPT" : "user",
      content: input_text
    }));
    messageList.push({ role: "user", content: user_input });
Create a list of messages in the expected format of OpenAI ChatGPT API using the map() method. And in the end, the current input of the user is added to the last in the array.
Step 8: AI Model
const GPTOutput = await openai.createChatCompletion({
        model: "gpt-3.5-turbo",
        messages: messageList,
});
openai.createChatCompletion() generates a response from the OpenAI API
model and specifies the ChatGPT model to be used for generating the response.
Step 9: AI Model Response
const output_text = GPTOutput.data.choices[0].message.content;
console.log(output_text);
The response generated by the object will be extracted and stored in a variable and will print the response on the console.
Step 10: Updating Chat History
chatHistory.push([user_input, output_text]);
We will store the user input and the response generated by the model in the array.
Step 11: Error Handling
catch (err) {
      if (err.response) {
        console.log(err.response.status);
        console.log(err.response.data);
      } else {
        console.log(err.message);
      }
    }
catch block is executed, whenever an error has occurred, and prints the message on the console if the response is not present in it.
Step 12: Call the Asynchronous function
APIcall();
Next, we will call the above API call function.
Conclusion
OpenAI has provided users with a complete package of not just a powerful chatbot but also an API for the same to be integrated into our applications. API is also easy to use and does not require much configuration or boilerplate code. The API also remembers the historical context of the chat to answer the questions more like humans. The API can also be used for commercial purposes for building scalable applications.
FAQs
1. Is ChatGPT API free?
Yes, but it has some limitations after that we have to Pay for use of API. To use the API, one needs to create an account on OpenAI which can be created for free.
2. What are the rate limits for ChatGPT API?
As per the official OpenAI documentation, the number of requests per minute is limited to 3 RPM (for the free tier) and tokens per minute to 40,000 TPM.
3. Can ChatGPT API be brought to commercial use?
Yes, ChatGPT API can be integrated into the projects for commercial use. For that, one might need to purchase the pay-as-you-go plan to get an increased rate limit for API calls. ChatGPT API is well designed keeping in mind the scalability as the application grows.
Share your thoughts in the comments
Please Login to comment...