The Remix IDE is an open-source development environment for building, testing, and deploying smart contracts on the Ethereum blockchain. One of the most notable features of Remix IDE is its integration with the Solidity programming language. Solidity is a contract-oriented language that is specifically designed for building smart contracts on Ethereum. The Remix IDE provides an intuitive interface for writing, testing, and debugging Solidity code.
What is a Smart Contract?
A smart contract is a self-executing program that runs on a blockchain network. It is essentially a digital contract that enforces the terms and conditions of an agreement between two or more parties, without the need for intermediaries like banks. Smart contracts are designed to be transparent, secure, and tamper-proof.
- Smart contracts are typically written in a programming language such as Solidity, which is specifically designed for the Ethereum blockchain.
- Once a smart contract is deployed on the blockchain, it becomes immutable and cannot be altered, deleted, or tampered with.
- This means that the terms of the contract are enforced automatically, and all parties involved can trust that the contract will be executed exactly as written.
Prerequisites
- A Solidity compiler: Remix uses the Solidity compiler to compile your smart contract code into bytecode that can be executed on the Ethereum Virtual Machine (EVM). Fortunately, Remix also has the option to run our smart contract using its online IDE.
- Knowledge of Solidity and Ethereum: To test your smart contract, you should have a basic understanding of Solidity and Ethereum. You should be familiar with the syntax and structure of Solidity contracts, as well as the basics of how Ethereum works.
Approach
Below are the steps to be followed to test a smart contract in Remix:
- Go to the Remix online IDE.
- Write the smart contract code.
- Compile the code.
- Deploy the contract.
- Test the contract.
Testing Smart Contract
This section involves testing the smart contract using 5 different approaches:
- Simple test example.
- Testing a method involving msg.sender.
- Testing method execution.
- Testing a method involving msg.value.
- Testing method involving msg.sender and msg.value.
- Testing of previously made smart contract having its own old hash
1. Simple Test Example
First, we are going through a simple test example to test our smart contract. Note that the same steps will be followed no matter what kind of testing you do.
Step 1: First head to the Remix website where we are going to use the online Remix IDE. The remix workspace will open up and it will appear like in the image shown below.
.png)
Remix IDE
Step 2: Make a solidity file: Click on the new file and enter the smart contract in the new box that appears on the left panel. Enter the smart contract name you want to make. Here, we chose “HelloWorld.sol“.
Note:
.sol is the extension for the solidity language in which our smart contract is being written.
Step 3: Write the smart contract: We are going to write a simple Hello World smart contract in solidity in the provided workspace.
Solidity
pragma solidity ^0.8.0;
contract HelloWorld {
string private message;
constructor()
{
message = "Hello World!";
}
function getMessage() public view returns (string memory)
{
return message;
}
function setMessage(string memory newMessage) public
{
message = newMessage;
}
}
|
Step 4: Compile the code: Head to the solidity compiler icon by clicking on it. Click the “Compile” button to make sure the code compiles without errors. This will generate the bytecode that can be deployed to the Ethereum network. You can skip this step if your auto-compile button is already switched on.
Step 5: Deploy the contract: Head to the Deploy and run transactions section. The provided account is just a test id with test gas and is not real and is only meant for testing purposes. Click the “Deploy” button. You can use the Remix interface to specify the network, account, and gas settings. But you can also leave them to default.
Step 6: Deploy the Contract: Scroll down and you will see a deployed contract section. Click on getMessage. The following string prints as:
0: string: Hello World!
Step 7: Test your smart Contract: You can verify that our smart contract has been deployed correctly by seeing the transaction status at the bottom of the screen. If the operation is successful, a checkmark will be displayed next to it. You can access more detailed information by opening the transaction details. It shows details like status, transaction hash, and the amount of gas spent.
Hence, we have successfully tested our smart contract on Remix IDE.
2. Testing a Method involving msg.sender
To test a method that involves the msg.sender variable, you need to specify the sender address when calling the function. For example, if you have a function that sets a value for the sender, you can test it as follows:
Solidity
pragma solidity ^0.8.0;
contract SenderValueContract {
mapping(address => uint) public senderValues;
function setSenderValue(uint value) public {
senderValues[msg.sender] = value;
}
}
|
In the Remix IDE, specify the address of the sender by clicking on the “value” field under the “Deployed Contracts” section.
3. Testing Method Execution
To test the execution of a method, you need to check its return value or its effect on the state variables of the contract. For example, if you have a function that adds two integers, you can test it as follows:
Solidity
pragma solidity ^0.8.0;
contract AdditionContract {
function add(uint a, uint b) public pure returns (uint) {
return a + b;
}
}
|
In the Remix IDE, call the function with some arguments and check its return value.
Input the values of a and b:
Output after clicking “call”:
4. Testing a method involving msg.value
To test a method that involves the msg.value variable, you need to specify the value of the transaction when calling the function. For example, if you have a function that accepts Ether, you can test it as follows:
Solidity
pragma solidity ^0.8.0;
contract DepositContract {
mapping(address => uint) public balances;
function deposit() payable public {
balances[msg.sender] += msg.value;
}
}
|
5. Testing method involving msg.sender and msg.value:
To test a method that involves both msg.sender and msg.value, we need to create a new function that sends some ether to the contract and checks if the sender is correctly set.
Let’s modify our previous HelloWorld contract to include a new function called payAndSayHello(), which will require the sender to send some ether to the contract and set a new message:
Solidity
pragma solidity ^0.8.0;
contract HelloWorld {
string private message;
constructor() {
message = "Hello World!";
}
function getMessage() public view returns (string memory) {
return message;
}
function setMessage(string memory newMessage) public {
message = newMessage;
}
function payAndSayHello() public payable {
require(msg.value > 0, "You need to send some ether");
require(msg.sender == tx.origin, "Only externally owned accounts are allowed to call this function");
message = "Hello from the sender!";
}
}
|
Now, let’s test this new function by following these steps:
Step 1: Deploy the updated HelloWorld contract as described in the previous sections. In the Deploy & Run transactions section, select the payAndSayHello function from the dropdown menu and click the “transact” button.
Step 2: Verify that the transaction was successful by checking the transaction status at the bottom of the screen.
Step 3: Call the getMessage function to verify that the message has been set to “Hello Geeks”.
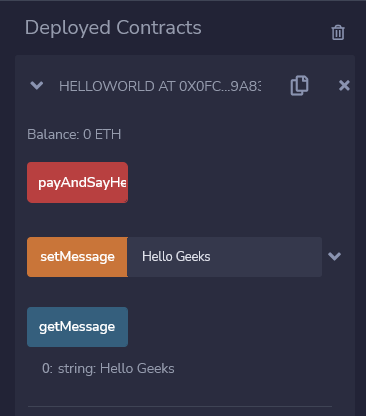
Step 4: Try to call the payAndSayHello function again, but this time with a value of 0. Verify that the function reverts with the error message “You need to send some ether”.

By following these steps, we have successfully tested a method involving both msg.sender and msg.value in our smart contract.
6. Testing of previously made smart contract having its own old hash
We can also test the smart contract whose hash address is known .
Step 1: Always copy the address of the smart contract when deployed in a secure location
Step 2: Copy it from the Transactions Recorded Section

Deployed Contracts Section in Remix IDE
Step 3: Paste it in the section of At Address and click on “At Address” button.

Load from given address
There is no need to, again and again, deploy Smart Contract by this method.
Also, Smart Contract can be tested through Metamask accounts or default accounts :
Step 1 : Click on the Environment and select the respective wallet as Injected Provider – Metamask.
Step 2 : Select the account of Metamask

for Environment
Share your thoughts in the comments
Please Login to comment...