How To Setup Up Jenkins Webhooks For Automated Builds?
Last Updated :
26 Feb, 2024
Jenkins is a broadly utilized open-source automation server that assists with automating the building, testing, and deployment of software applications. One of the main elements of Jenkins is its ability to coordinate with different tools and services. In this article, we will zero in on setting up the Jenkins GitHub webhook integration.
Let’s first understand what a webhook is before we get into the specifics. A webhook is a way for an application to send continuous data to another application. A webhook is a way that GitHub notifies Jenkins of changes to a repository in the context of Jenkins and GitHub. In response to the webhook notification, Jenkins can then build and test the code automatically. When a new commit is pushed to a GitHub repository, Jenkins uses the webhook to start a build.
Key features of Jenkins Github Webhook Integration
- Streamlined Development Workflow: With the integration of Jenkins and GitHub, developers can push their code changes to GitHub and have Jenkins consequently construct and test their code. Because developers do not have to manually trigger builds or tests, this simplified workflow saves time and reduces the likelihood of errors.
- Faster Feedback Loops: Developers get feedback on their changes faster when Jenkins automates the build and test process. This permits them to repeat their code all the more rapidly and recognize and fix mistakes sooner, bringing about a more steady and solid codebase.
- Continuous Integration: Jenkins GitHub webhook coordination empowers constant incorporation, which is the act of regularly combining code changes into a common vault and naturally building and testing the code. This assists with catching blunders and clashes right off the bat in the development cycle and ensures that the codebase is consistently in a releasable state.
- Enhanced Collaboration: With Jenkins and GitHub reconciliation, groups can team up more successfully. Engineers can see the form and test results for each commit, making it simpler to distinguish issues and work cooperatively to determine them. Moreover, engineers can get warnings of assembly and test disappointments, permitting them to rapidly resolve any issues that arise.
Overall, the Jenkins GitHub webhook joining assists with further developing the advancement interaction, lessening mistakes, and improving coordination among team members.
Setting up Webhooks in Jenkins (step-by-step process)
- To get started with Jenkins Webhooks, we first need to set up an AWS account.
- Go to AWS Management Console
- Click Create a new AWS account or sign in with your credentials if already have one.
- Now launch an EC2 instance along with port 8080 in security groups, Because Jenkins port number is 8080, it works on the 8080 port

EC2 Instance
After launching an instance now it connect to gitbash terminal by using SSH client by

Gitbash terminal
Now we need to install required packages, they Docker, Java, Git and jenkins run time is java so we need to install java package also, following commands were we used to install this packages
Sudo yum -y install docker
Sudo yum -y install git
Sudo yum -y install jenkins
sudo yum -y install java-17*, here * (star) indicates that  all modules in java
After completion of installation of jenkins and docker, we need to start and enable docker and jenkins by using following commands:
sudo systemctl start jenkins
sudo systemctl enable jenkins
We can check whether our docker and jenkins were running or not by using following commands
sudo systemctl status jenkins
sudo systemctl status docker
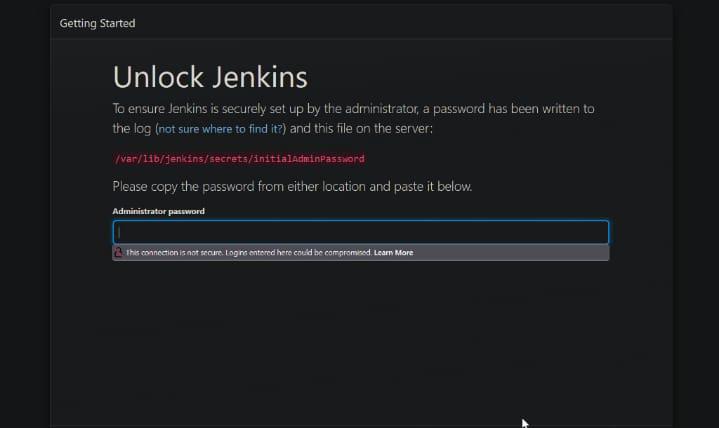
To launch an jenkins page we need to administration password, this administration password was appear when we run an command sudo systemctl status jenkins. It shows in below figure

Highlighted is the administration password
Now copy your instance public IP Address and browse it along with port 8080, example is
44.193.197.70:8080
Jenkins page
Now paste administration password click on continue fill the user data and credentials.

Official page of jenkins
- Now Install Plugins
- Jenkin is an open-source and there are numbers of plugins that have been published by the Jenkins community. We need to install the webhook plugin for our application.
- Go to Manage Jenkins → Manage Plugins → Available tab and search for webhook plugin and buildpipeline plugin
- Install the plugin (Plugin will automatically install all its dependencies)
Create The FreeStyle Job
Creating a Freestyle job is easy in Jenkin, Explore to Jenkin landing page and snap on the New Thing from the left route segment. Design a form name and pick Free-form Task and hit an alright button (Allude to the picture beneath). A build and a link to the configuration page were created by Jenkin.

Freestyle project
Now appears like as shown in below
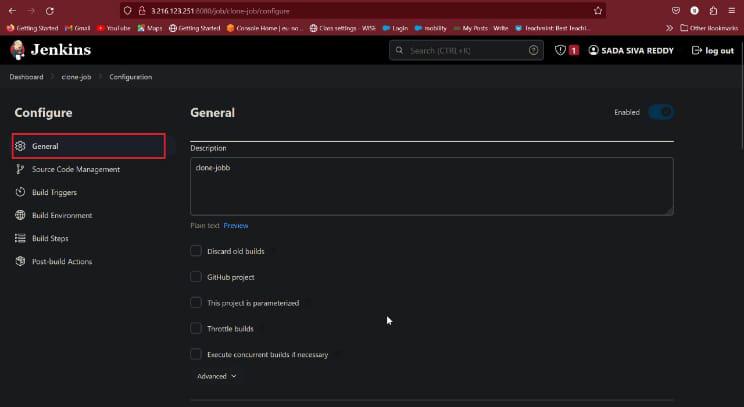
General
In this give about your job description
Configure GIT source code Management
Now go to source code management tab and select GIT options. Configure git repository URL and click on checked GitHub hook trigger for GIT scm polling option and click on save. As shown in below figure
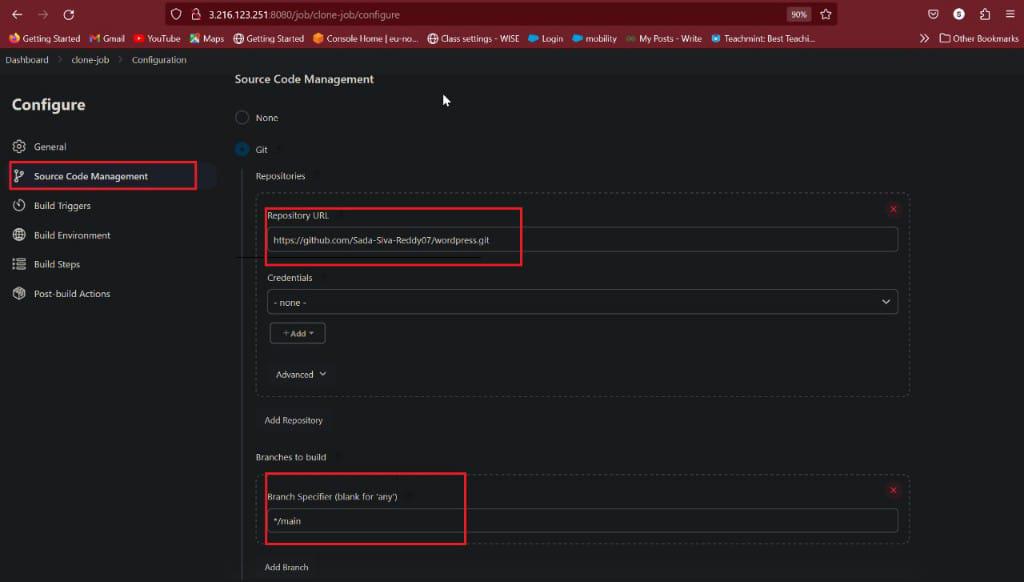
Source code management
Build Triggers and Build step
In build step we are providing some script because we are deploying wordpress application we need see output of this when webhook was trigger

Build Triggers
Here we are creating another job that is called by build-job, because i am shown this in pipeline view so that purpose i am creating another job as shown in below figure

Build job
Now in Build Triggers select Build after other projects are built in that mention clone-job because this project was watch in pipeline view and click on save button. Follow as shown in below figure

Build triggers
- Now setup GITHUB webhook configure
- Git Hub Webhook allows external services to be notified when certain events happen. When the specified event happened, Git Hub sends a POST request to the configured URL.
- Go to the Settings page in your GitHub repository, select Webhooks and click on Add webhook button.

webhook setup
- Configure the following settings as per your requirements
- Payload URL: Add your Jenkin hostname (make sure the hostname is accessible by the GitHub) and append /github-webhook/. For Example http://jenkins hosting ip address/github-webhook/
- Content-type: select an application/JSON type or YAML type, here i am taking YAML type
- Which events would you like to trigger this webhook? select “send me everything” this will trigger this webhook when anyone made any change in the repository. In this article, I want to trigger a webhook on each change so I selected the send me everything.
- Active: This means the webhook status is active and will deliver event details when this hook is triggered.
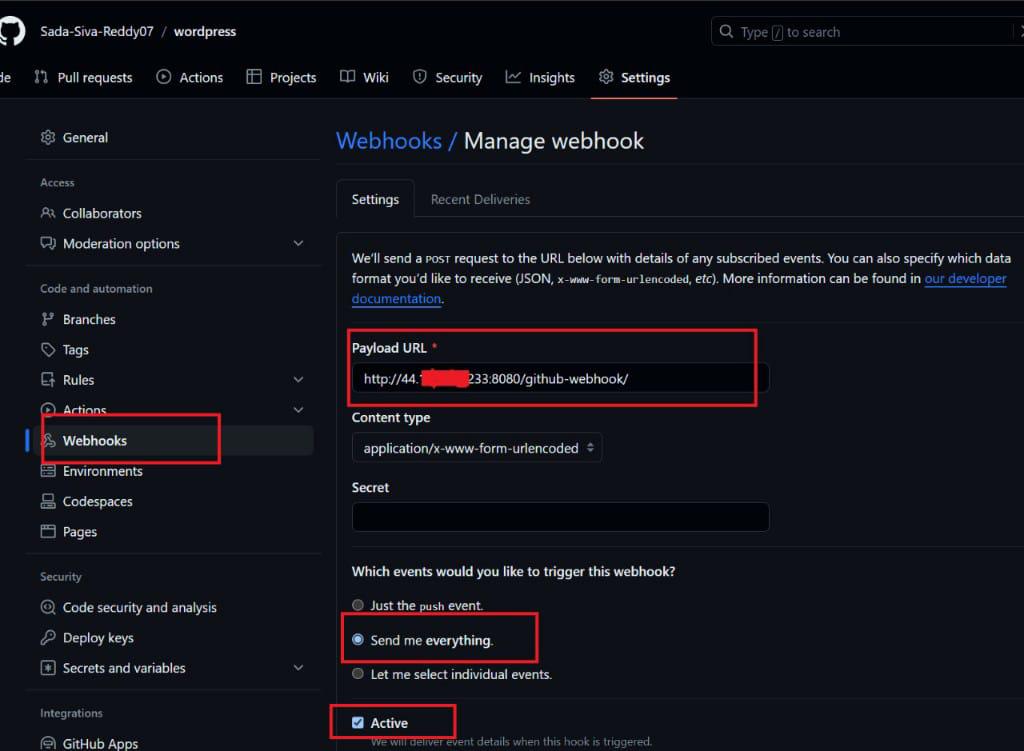
webhook configuration
- All the configuration has done, Now Jenkin build will be triggered automatically when a new changes was made in the repository.
- Green tick indicates that was successfully connected to our jenkins it was shown in below figure
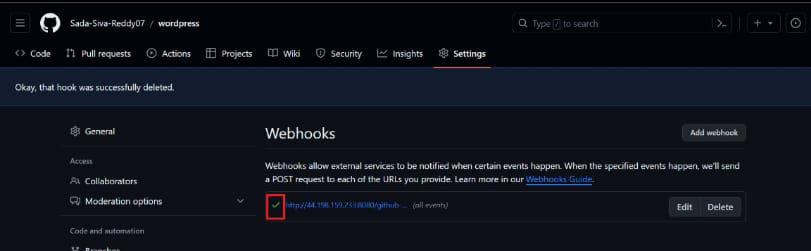
Test success
- Now change any changes in repository after changes go to jenkins page and view it.
- Here i made a minor change in repository and it was shown in pipeline view as shown in below.

Pipe line view
- Our clone-job and build job was success, To test this now copy our instance public IP Address and browse it launch an application. Here, i am use wordpress application
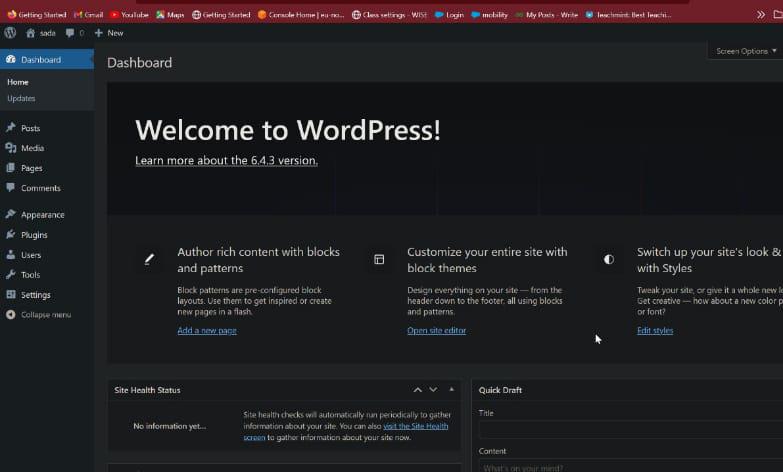
Final output
Conclusion
Setting up Jenkins webhooks for mechanized forms is a pivotal move toward enhancing your persistent coordination (CI) pipeline. Webhooks empower constant correspondence between your adaptation control framework (VCS) and Jenkins, setting off forms naturally upon code changes. This reconciliation smoothes out the advancement cycle, decreases manual mediation, and guarantees that your applications are consistently coordinated and tried. With legitimate design and testing, Jenkins webhooks give a responsive and productive component for staying up with the latest.
Setting up Jenkins webhooks for automated builds – FAQ’s
What is the distinction between Jenkins webhooks and polling?
Jenkins webhooks utilize a push-based approach, triggering builds forms continuously when occasions happen. Polling, then again, is a pull based approach where Jenkins intermittently checks for changes at planned spans.
Will Jenkins webhooks be utilized with any version control system?
Yes, Jenkins webhooks can be arranged with different form control systems, including Git, SVN, Fluctuating, and others.
How might I get Jenkins webhooks to prevent unauthorized access?
Utilize secret tokens in the webhook design to upgrade security. These tokens go about as divided mysteries among Jenkins and the version control system.
Can a Jenkins job contain multiple webhooks?
Yes, your version control system can set up multiple webhooks to trigger the same Jenkins job on different events, giving you flexibility in your CI pipeline.
When a webhook is triggered, what happens if Jenkins cannot be reached?
On the off chance that Jenkins is inaccessible during a webhook trigger, the occasion is ordinarily retried in light of the design in the rendition control system. Make sure Jenkins is accessible and set up to receive webhooks correctly.
Share your thoughts in the comments
Please Login to comment...