How to Set up Azure Site Recovery?
Last Updated :
30 Oct, 2023
Azure Site Recovery is a service provided by Microsoft Azure that contributes to an organization’s business continuity and disaster recovery (BCDR) strategy. It ensures that business-critical applications and workloads remain operational during both planned and unplanned outages.
What are the Components of Azure Site Recovery?
- Site Recovery Service: This component helps maintain business continuity by replicating workloads running on physical and virtual machines (VMs) from a primary site to a secondary location (such as another data center or Azure region). In the event of an outage at the primary site, the service enables a failover to the secondary location, allowing access to applications from there. Once the primary location is operational again, you can fail back to it.
- Backup Service: Azure Backup service is another component of Azure Site Recovery, primarily focused on ensuring the safe storage and recoverability of data.
What Replication Capabilities Does Site Recovery Offer?
- Replicate Azure VMs from
- One Azure region to another.
- Azure Public MEC to the Azure region it’s connected to.
- One Azure Public MEC to another Public MEC connected to same Azure region.
- Replicate on-premises VMware VMs, Hyper-V VMs, physical servers (Windows and Linux), Azure Stack VMs to Azure.
- Replicate AWS Windows instances to Azure.
- Replicate on-premises VMware VMs, Hyper-V VMs managed by System Center VMM, and physical servers to a secondary site.
What are the Key Site Recovery Features?
- Centralized Management: Easily set up and manage replication, failover, and failback from a single location in the Azure portal.
- Azure VM Replication: Enable disaster recovery for Azure VMs between regions or Azure Public MECs.
- VMware VM Replication: Replicate VMware VMs to Azure using improved Azure Site Recovery replication appliances.
- On-Premises VM Replication: Replicate on-premises VMs and physical servers to Azure or a secondary on-premises datacenter, eliminating the need for maintaining a secondary datacenter.
- Workload Replication: Replicate workloads from various sources, including supported Azure VMs, on-premises Hyper-V and VMware VMs, and Windows/Linux physical servers.
- Data Resilience: Replication without interfering with application data storage and data resilience in Azure.
- RTO and RPO Targets: Meet recovery time objectives (RTO) and recovery point objectives (RPO) with flexible replication frequencies.
- Application-Consistent Snapshots: Create snapshots for application-consistent recovery points.
- Testing without Disruption: Conduct disaster recovery drills without affecting ongoing replication.
- Flexible Failovers: Plan both expected and unexpected failovers with customizable failback options.
- Customized Recovery Plans: Customize and sequence multi-tier application failover and recovery.
- BCDR Integration: Integrate with other BCDR technologies, such as SQL Server Always On.
- Azure Automation Integration: Use Azure Automation scripts for production-ready integration.
- Network Integration: Manage application network settings, IP addresses, load balancers, and network switchovers within Azure.
Steps to Set up Azure Site Recovery
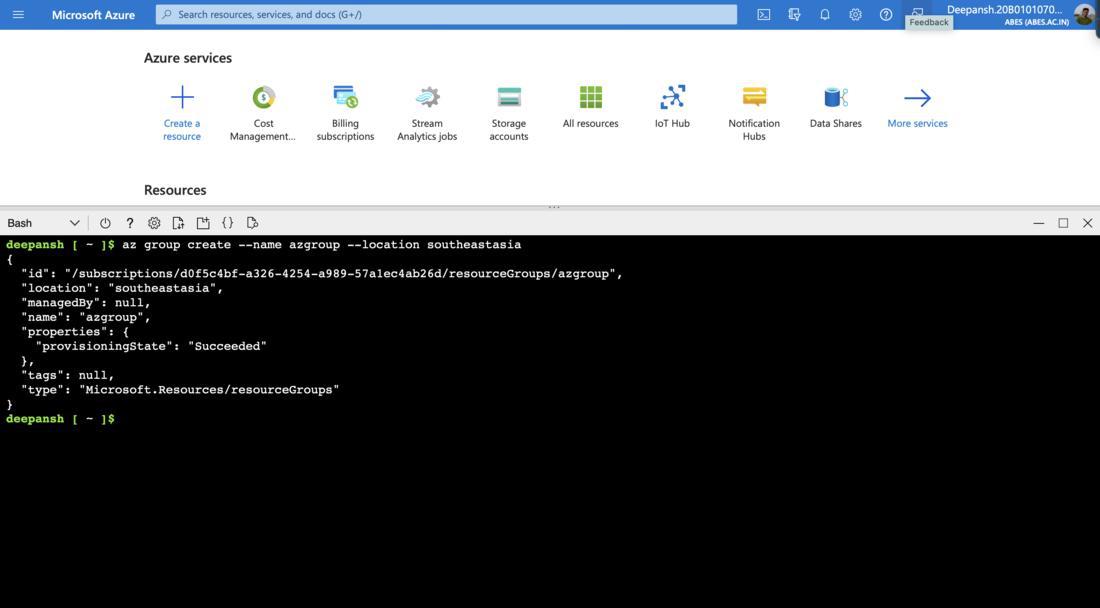
Step 1: Create a Resource Group.
HTML
az group create --name azgroup --location southeastasia
|
- az group create is the command that is used for creating a Resource Group in Azure.
- –name: Assigns a name to the Resource Group
- –location: Refers to a physical data center or geographic region where Azure resources can be provisioned.
Some common locations available in Azure are: East US, West Europe, Southeast Asia etc.
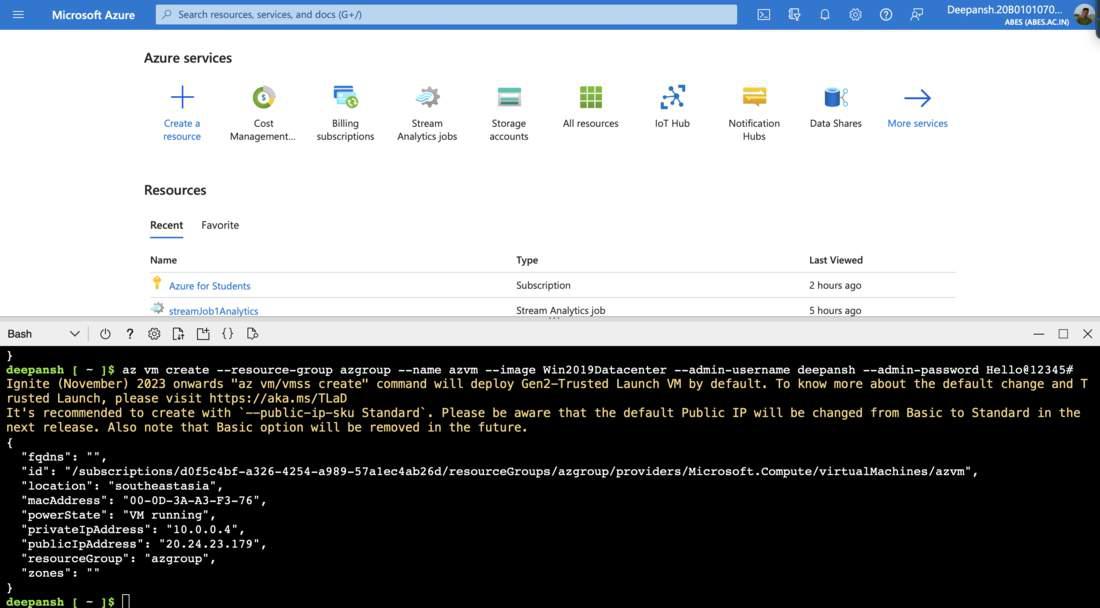
Step 2: Create a Virtual Machine.
HTML
az vm create --resource-group azgroup --name azvm --image Win2019Datacenter --admin-username deepansh --admin-password Hello@12345#
|
- az vm create: Used to create a Virtual Machine in Azure.
- –resource-group: Specifies the target Resource Group for VM deployment.
- –name: Assigns a name to the Virtual Machine.
- –image: Specifies the VM image or operating system to use.
- –admin-username: Sets the administrator username for the VM.
- –admin-password: Sets the administrator password for the VM.
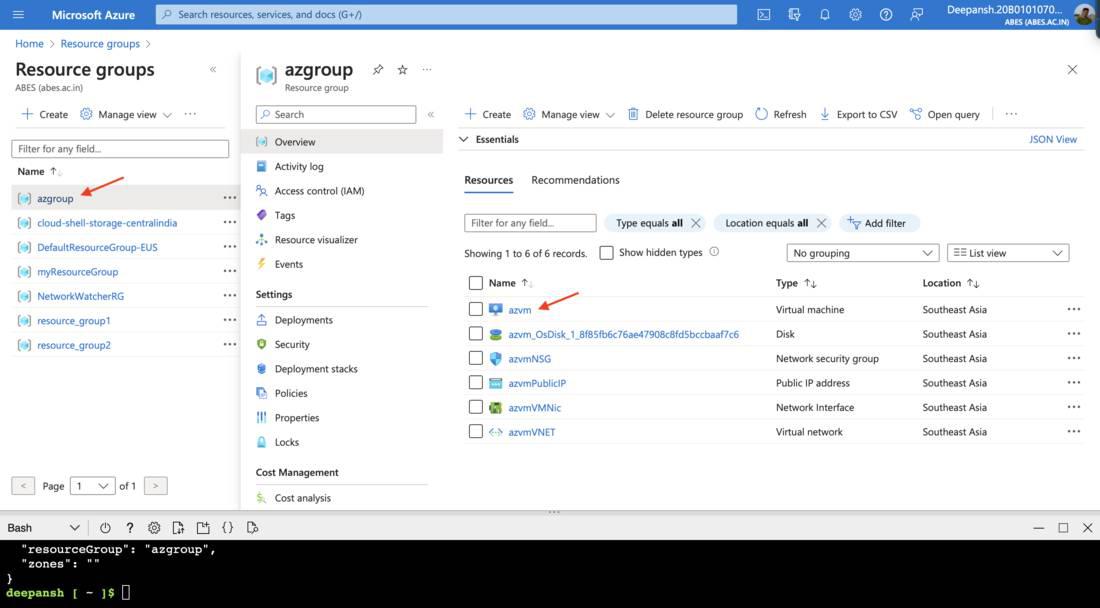
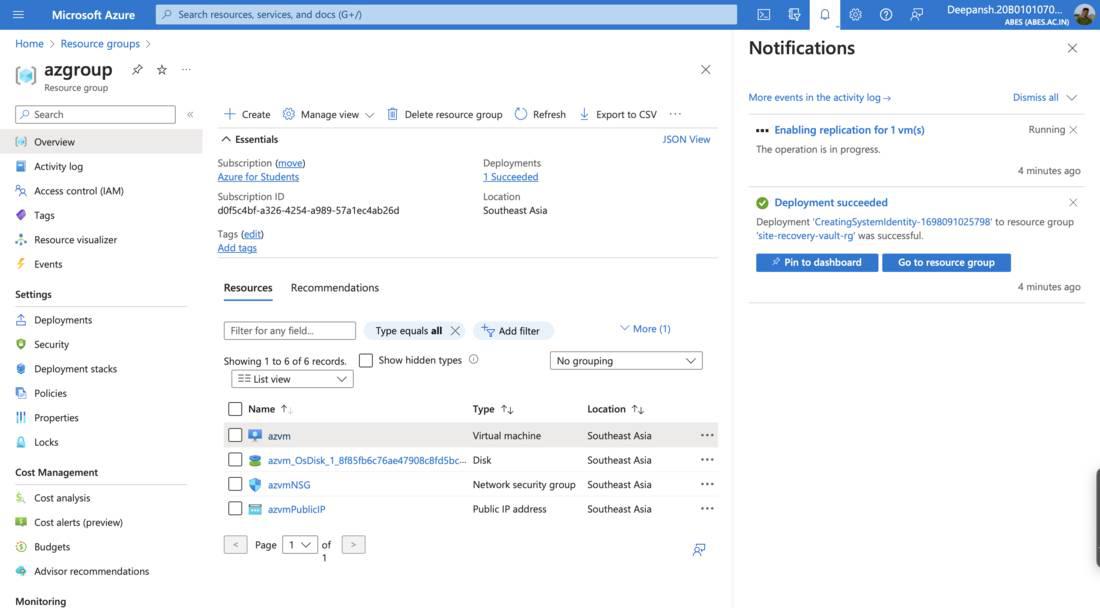
Step 3: Verify the creation of the Resource Group and Virtual Machine.
- In the search bar, enter Resource Group and choose Resource Groups from the available options.
- On the next window, choose the recently created Resource Group.
Step 4: Configuring Disaster Recovery.
- In the search bar, enter Virtual Machine and choose Virtual Machine from the available options.
- Select the recently created Virtual Machine.
- In the let-hand menu, under Operations, and then select the Disaster Recovery blade.
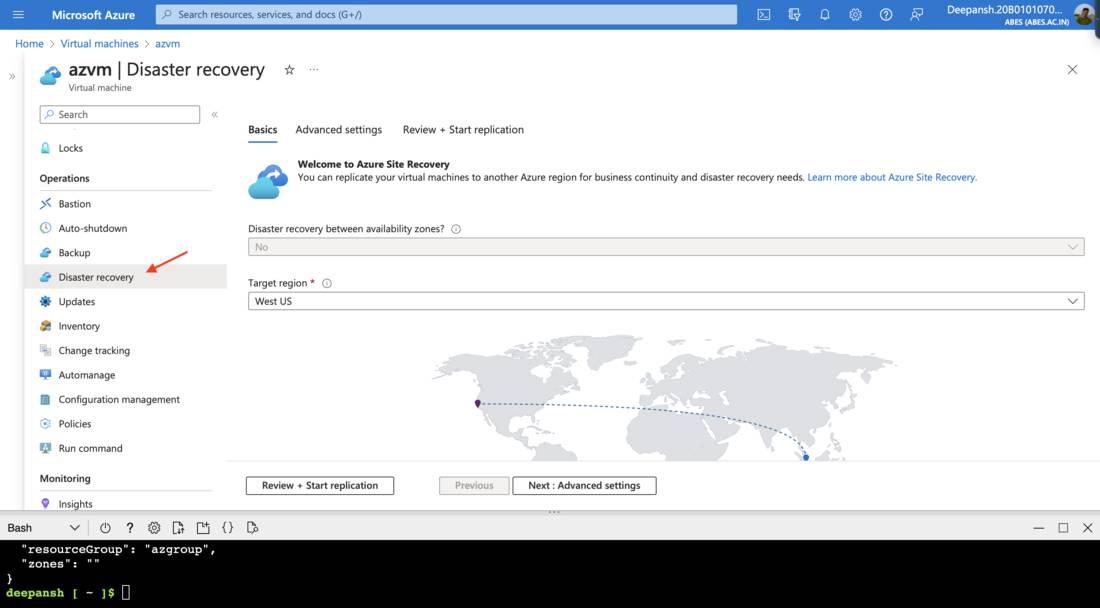
- Under the Basics tab, select the Target Region.
- Click on Next: Advanced Settings.
- Configure the Target Settings,
- Subscription: Select the target Subscription.
- VM Resource Group: Choose the target Vm Resource Group. It creates a new Resource group by default.
- Virtual Network: Choose the virtual network where we are deploying the VM; a new Virtual Network is created by default.
- Availability: Select target region’s availability type,
- Single Instance: A standalone virtual machine or resource without redundancy or fault tolerance.
- Availability Set: A group of virtual machines within Azure that are designed to provide high availability by distributing them across multiple physical servers and racks to minimize the risk of downtime due to hardware failures or maintenance.
- Availability Zone: A physically separate and independent data center within an Azure region, providing fault isolation and redundancy to enhance the availability and reliability of Azure services and resources.
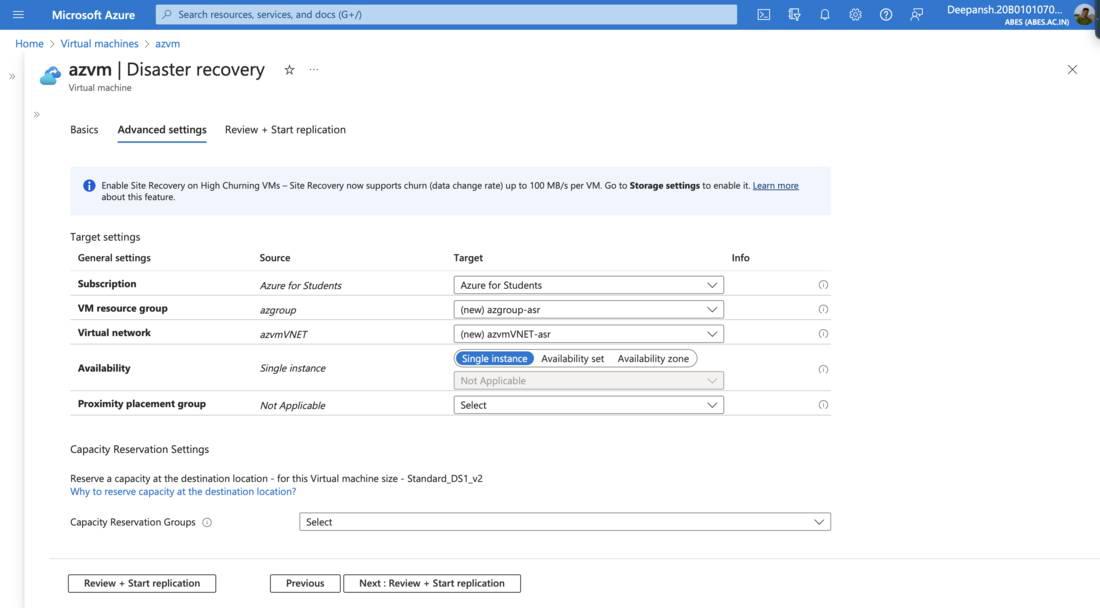
- Clcik on Review + Start Replication. Click on Start Replication.
This may take a few minutes.
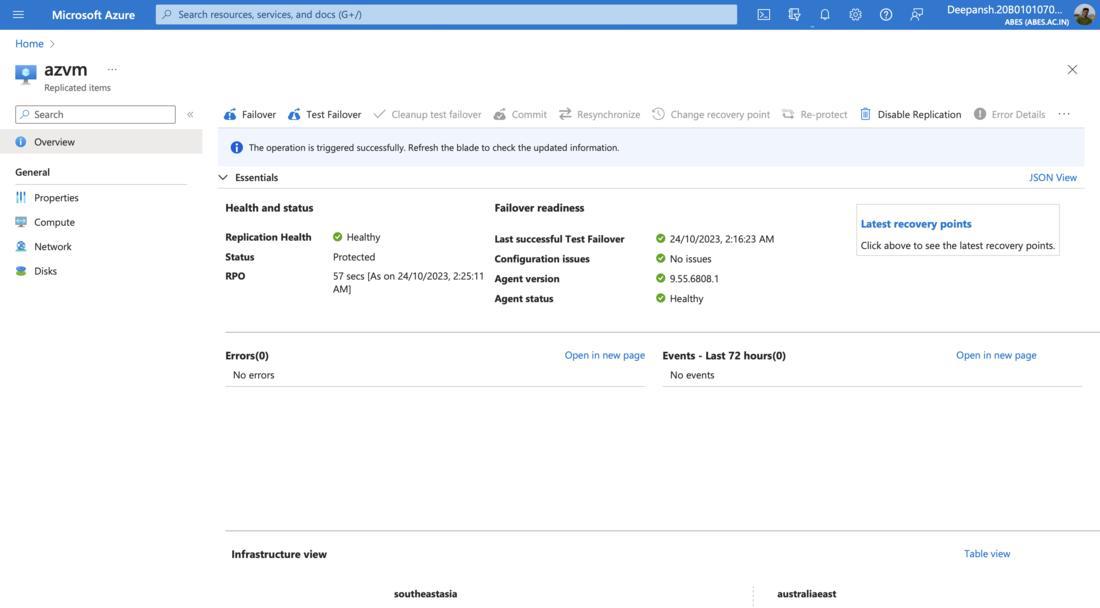
Step 5: Navigating to the Replicated Items dashboard.
- In the search bar, search Recovery Services Vault.
- On the Recovery Services Vaults page, select the required Recovery Services vault.
- From the left-hand menu, under Protected Items, select Replicated Items.
- Select the required Virtual Machine.
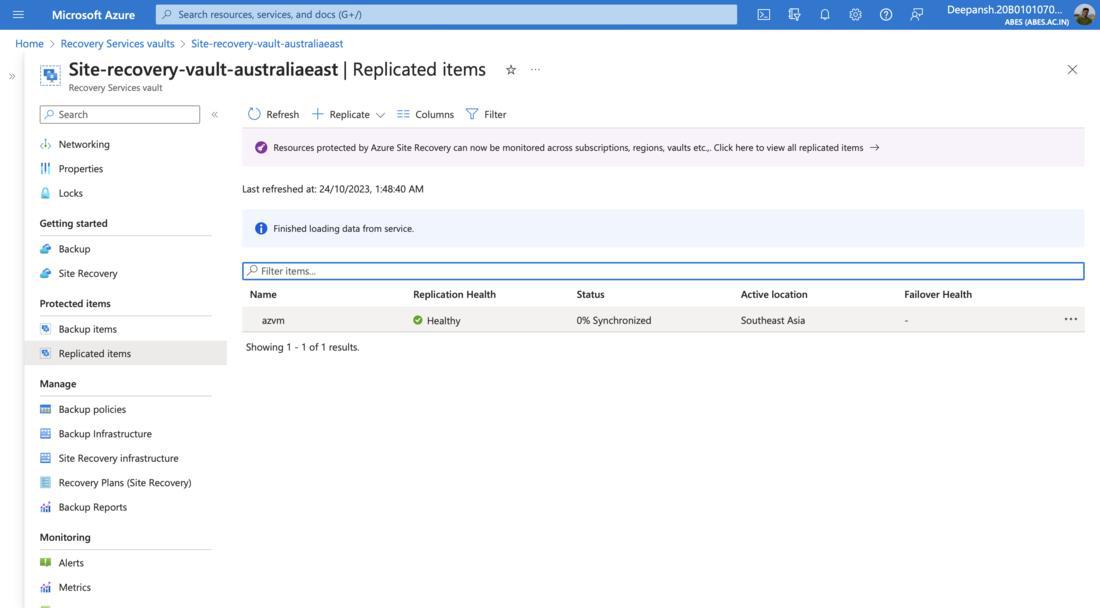
Note: Wait for the status to change to Protected before proceeding to the next step.
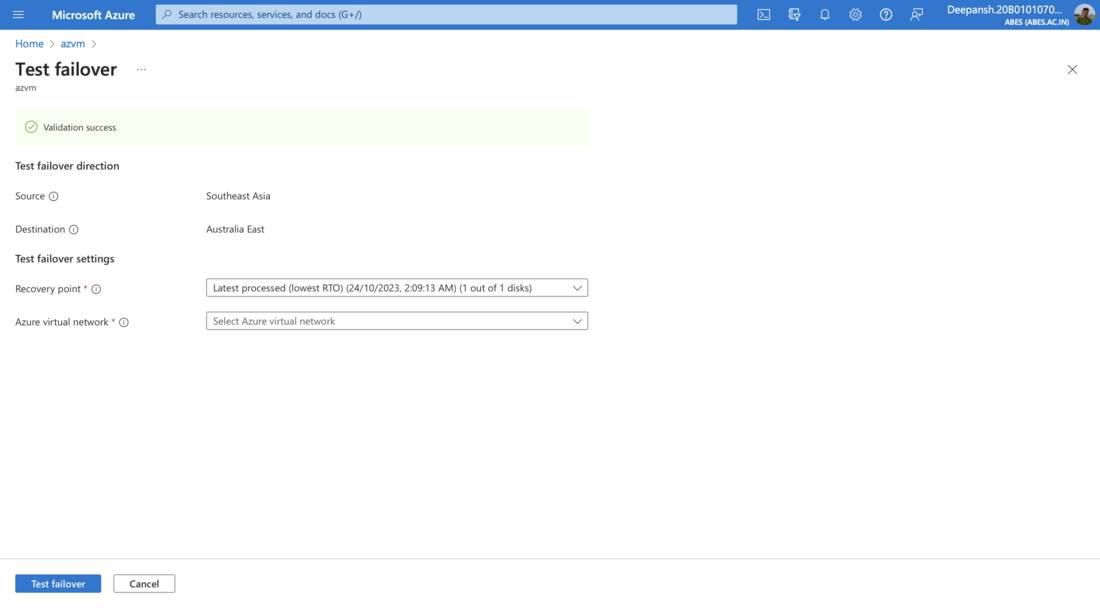
Step 6: Performing a Test Failover.
- In the Replicated Items window, click on Test Failover.
- On the next window, configure the Test failover settings,
- Recovery point: Select a point in time snapshot to recover.
- Azure virtual network: The virtual machine will be connected to this network after failover. The network will only be used for this test failover.
- Click on Test Failover.
Step 7: Cleanup Test Failover.
- In the Replicated Items window, click on Cleanup Test Failover.
- On the next window, tick the checkbox and then click OK.
Step 8: Performing Failover.
- In the Replicated Items window, click on Failover.
- On the next window, tick the Shut down machine before beginning the failover option.
- Click on Failover.
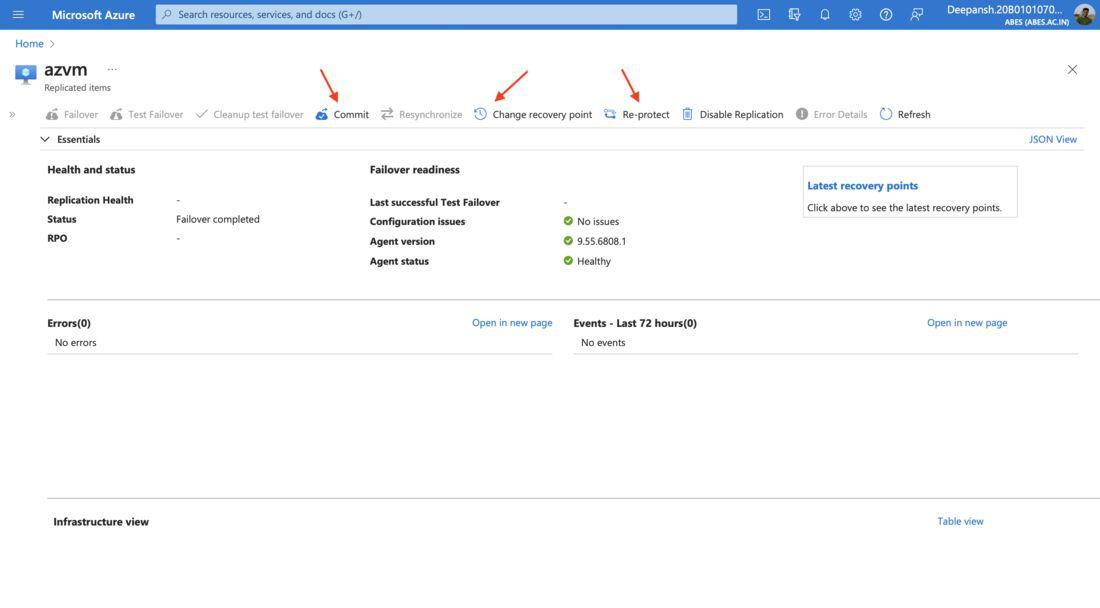
Once you have successfully failed over to Virtual Machine, you will have the following settings enabled:
- Commit
- Resynchronize
- Change Recovery Point
- Re-protect
Basic Troubleshooting
- I see this error when I open Disaster recovery.
 If you encounter an error when opening Disaster Recovery, it might be due to your VM still being created. Wait 4-5 minutes for the resource deployment to complete.
- Replication Failure occurs.
Replication failure in Azure or cloud services occurs when copying data or resources encounters issues, preventing successful replication.
Replication can fail for various reasons, including:
- Resource Limitations: Resource limits, such as available storage, in the target environment may be exceeded.
- Access Permissions: Incorrect permissions or access control issues can prevent data from being replicated.
- Software or Configuration Errors: Errors in replication software or misconfigurations in replication settings can lead to failure.
- Data Conflicts: Conflicts or inconsistencies in the data being replicated can cause issues.
- I don’t see a Recovery Point Objective when I open replicated items?
It just means that Internal Synchronization is happening. Wait for the Status to change to Protected.
Frequently Asked Questions
1. Is it a good practice to store passwords in scripts?
Storing passwords in scripts is generally not recommended for security reasons. We have done that here for demo purposes only.
2. Will the Disaster Recovery wizard also create a Target VM when setting up a virtual network?
No, it won’t create a VM until we failover to it.
3. Where is Cache Storage Account created?
This storage account will be created in the same region as the source environment. All your Virtual Machine data will be copied to this Cache Account before it copies the data to the disk created in the Target environment.
4. What is High Churn?
Azure Site Recovery has an option of High Churn, enabling you to configure disaster recovery for Azure VMs having data churn up to 100 MB/s. This helps you to enable disaster recovery for more IO intensive workloads.
5. What is the difference between ‘Failover’ and ‘Test Failover’?
In a test failover, your source environment remains active.In a test failover, you’re not deleting or stopping your source environment. In a failover, you should stop your source environment to prevent consistency issues.
Share your thoughts in the comments
Please Login to comment...