How to Restore a Dump File in SQL Server
Last Updated :
12 Feb, 2024
Restoring a dump file in SQL Server is a fundamental process essential for database administrators and developers alike. This procedure involves reconstructing a database from a backup file, ensuring data integrity and continuity in the event of system failures or migrations. Leveraging SQL Server’s robust tools and commands, administrators can seamlessly restore databases to their previous states, preserving critical information and configurations. Understanding the intricacies of this process is crucial for maintaining business continuity and minimizing downtime. By following best practices and employing efficient restoration techniques, organizations can safeguard against data loss and ensure smooth operations in their SQL Server environments.
How to Restore a Dump File in SQL Server
Step 1
To start using SQL Server Management Studio ( SSMS ), navigate to your Start menu and locate the ” Start “ button, typically found at the bottom left corner of your screen, marked with the Windows icon. From there, either scroll through your list of programs or utilize the search bar to find ” SQL Server Management Studio”. Once you’ve located it, click on the application to launch SSMS and begin your database management tasks.

SSMS
Step 2
After you have launched “SQL Server Management Studio”, connect to the SQL Server instance where you want to restore the database and enter the necessary credentials if prompted.

Connect to the SQL Server instance
Step 3
Now, you have to create a database where you will restore your dump file or backup file. Click on the “New Query” button to create the database, I am creating a database named “ig_clone”. You can name your database as per your choice. Write the following query to create the database:
CREATE DATABASE ig_clone;

CREATE DATABASE ig_clone
Step 4
The “Restore Database” window will open. Select the “Device” in the “Restore Database” and click on the three dots.
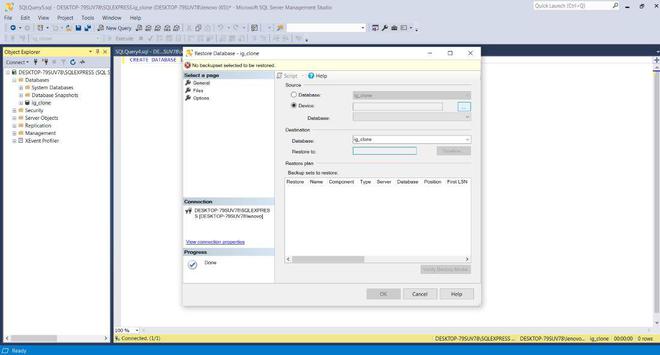
‘Restore Database’ window
Step 5:
The “Select backup devices” will open, here click on “Add”. After that select the dump file or backup file that you want to restore and copy the path of your backup file. Now click on “OK”.
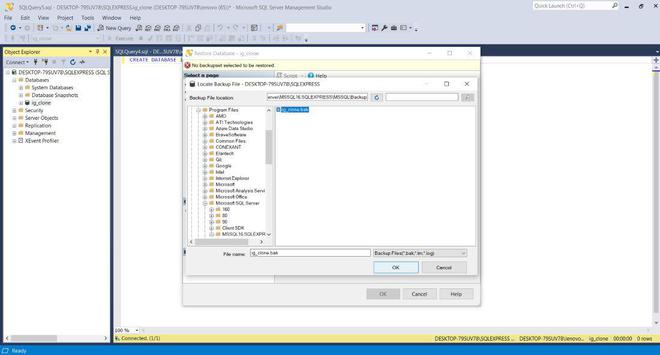
Select Backup File
Step 6:
Copy the path of your backup file next to the “Device” that you had selected previously and then click on “OK” It will take some time to restore your dump file. After the process is done click on “OK”
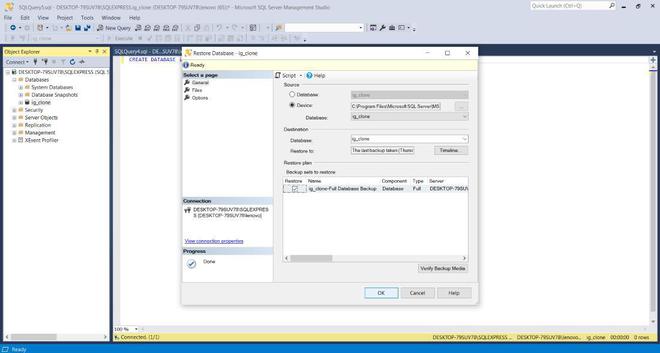
Restoring File
Step 7:
On the right side you can see the database that you had created earlier, expand it, now you can see all the tables in your database.
File Restored
Restoring a SQL Server dump file offers several benefits
- Data Recovery: Restore databases after data loss or corruption.
- Database Migration: Seamlessly move databases between servers or environments.
- Version Control: Capture a snapshot of the database at a specific point for versioning.
- Testing and Development: Create realistic test environments with production data.
- Database Cloning: Efficiently clone databases for backup instances or parallel testing.
Conclusion
In conclusion, the process of restoring a dump file in SQL Server is critical for maintaining data integrity. By following the steps in this article, users can seamlessly get better databases from backup files, mitigating the impact of unforeseen events including system failures or data corruption. Additionally, understanding the nuances of the restoring technique empowers database administrators to efficiently control data recovery tasks and troubleshoot any problems that could stand up. With the potential to restore dump files correctly, businesses can hopefully protect their crucial records assets and uphold high requirements of reliability and resilience of their SQL Server environments.
Share your thoughts in the comments
Please Login to comment...