Site-to-Site VPN helps customers to connect from their own on-premises network to the AWS side network and configure routing in order to pass traffic through the connection to the destination network. As we do not have an on-premises setup so in this article we will have two different VPCs in two different regions and we will assume an on-premises one with open swan software configuration.
Site-to-site VPNs are the most frequently used by many organizations that have multiple offices in the different geographic locations which needs to accessed and uses the corporate network for the organization’s ongoing basis. So, with a site-to-site VPN, a organization can securely gives connection of its corporate network with some of its remote offices so as to communicate and also share the resources with each them as a single networks. Many Companies also have used traditionally the site-to-site VPNs so as to connect their corporate network and remote branch offices in a easy manner. So, this approach will only works when an organization has an its in-house data center or have highly sensitive applications. Therefore, from now most of the organizations have moved their applications. Also moved their data to the cloud. and also have the large mobile workforces, so it is no longer makes any sense for the users to go through an in-house data center. Also, instead to go to the cloud directly, get the data to the cloud when in use. In simple Words, site-to-site VPN is a type of permanent connection that is designed as function for the encrypted link between offices.
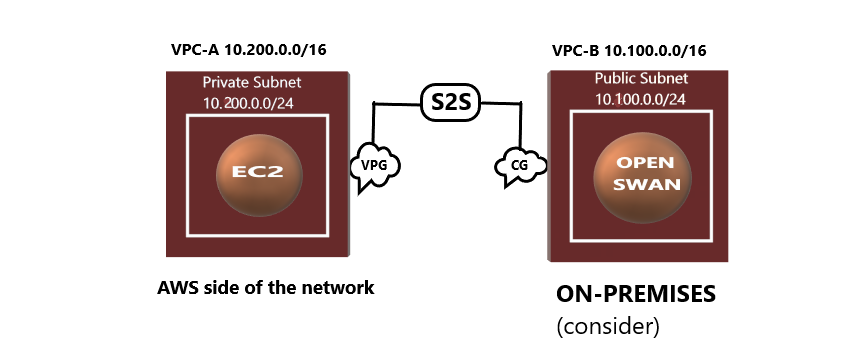
Our main objective is to access the private subnet through the public subnet of the Open swan software configuration.
Step 1: Log in to your AWS account >>Choose a region (Here I have chosen the Mumbai region) >>In the console page search for as follows,
VPC >> Go to VPC page>> Click on create VPC >> Click on VPC only >> Give a name to your VPC(name-vpc-aws),
IPv4 CIDR range
Here we have given 10.100.0.0/16), Tenancy-default>>Click on create VPC.
Step 2: Create a Private subnet under it- For that search, subnet>>Click on create subnet>>Fill in the details (Choose above created VPC, give a Name, Availability zone, CIDR range-10.100.0.0/24)>>Click on create a subnet.
Step 3: Go to route table>>Click on create route>>Fill in the details(Give it name and choose VPC created on step-1)>>Click on create.
Step 4: Associate route table with the subnet- Select Route table -> Subnet Associations -> Edit Subnet Associations -> Select above created Subnet -> Save.
Step 5: Now launch a EC2 instance>>Go to EC2 instance>>Click on Launch an instance>>Fill in the details(Type: t2.micro, Storage: Default, Tags – Name: give a name, Security: Give it according to your requirement, Keypair: your existing key pair or create new if you don’t have an existing keypair >> Launch instance.
The above steps form the AWS side network
Step 6: Go to other regions (different from the previous one)>> Then create a VPC as mentioned in Step-1(Give it CIDR -10.200.0.0/16)
Step 7: Create a Public subnet under it- For that search, subnet>>Click on create subnet>>Fill in the details (Choose above created VPC, give a Name, Availability zone, CIDR range-10.200.0.0/24)>>Click on create a subnet.
Step 8: Since it is a public subnet it will have access to the internet so we need an Internet gateway. Go to internet gateway click on create internet gateway>>Give it a name and create>>click on created gateway(Actions->attach with vpc->give the above created VPC).
Step 9: Go to route table>>Click on create route>>Fill in the details(Give it name and choose VPC created on step-6)>>Click on create.
Step 10: Add a route entry for Internet gateway- Select Route table ->Go to Routes ->Click Edit Routes -> Add Route(give the internet gateway created) -> Save.
Associate route table with the subnet- Select Route table -> Subnet Associations -> Edit Subnet Associations -> Select above created Subnet -> Save.
Step 11: Now launch a EC2 instance>>Go to EC2 instance>>Click on Launch an instance>>Fill in the details(Type: t2.micro, Storage: Default, Tags – Name: give a name, Security: Allow port 22 for your own IP and All TCP and ICMP-IPv4 from sources, Keypair: your existing key pair or create new if you don’t have an existing keypair>>Launch instance.
Step 12: Now to create Virtual Private Gateway>> Search virtual private gateway>>Click on create VPG>>(Give it a name).
Step 13: Now go to actions>>Attach VPC>>Choose VPC-aws(VPC with private subnet).
Step 14: Go to route table>>Click on edit route propagation>>Enable On your Virtual private gateway on all created route tables for both the vpc.
Step 15: Now to create Customer Gateway>>Go to Customer Gateway>>Click on create CGW>>Give name, give IP address as Public IP of Instance you launched with public subnet>>Select routing as static-Keep all other things as it is>>click on create.
Step 16: To create Site-To-Site connection: Go to site-to-site VPN connections>>Click on create VPN(Give a name, Target gateway-Virtual Private gateway(Give the VPG created above), Customer gateway-Existing(Give the CG you created above), Routing option-static) keep all others as it is and creates.
Wait till the state becomes available. After it is available.
Step 17: Download the configuration(select vendor as Openswan).
Step 18: Now SSH into your instance created with a public subnet:
Run the following commands:
->$ sudo su
->Install openswan: $ yum install openswan –y
->Go to- vim /etc/sysctl.conf and update
net.ipv4.ip_forward = 1
net.ipv4.conf.all.accept_redirects = 0
net.ipv4.conf.all.send_redirects = 0
->Restart service Network- $ service network restart
->Create a file /etc/ipsec.d/aws.conf
->Inside that file paste the conn Tunnel1 details  from downloaded configuration file.
(IMPORTANT- Remove  auth=esp line, Replace leftsubnet=Customer end VPC CIDR range and
 rightsubnet=AWS side VPC CIDR)
-> Create another file /etc/ipsec.d/aws.secrets in that paste the key file present in
   configuration(In IPSEC Tunnel 1  5th point)
-> start IPSEC service- $ systemctl start ipsec
-> Check status of ipsec - $ systemctl status ipsec
Now to you need to ping the private Instance from the open swan instance. Give the command: ping “the-private-IP –of-Instance” –If you get a response, the setup was successful.
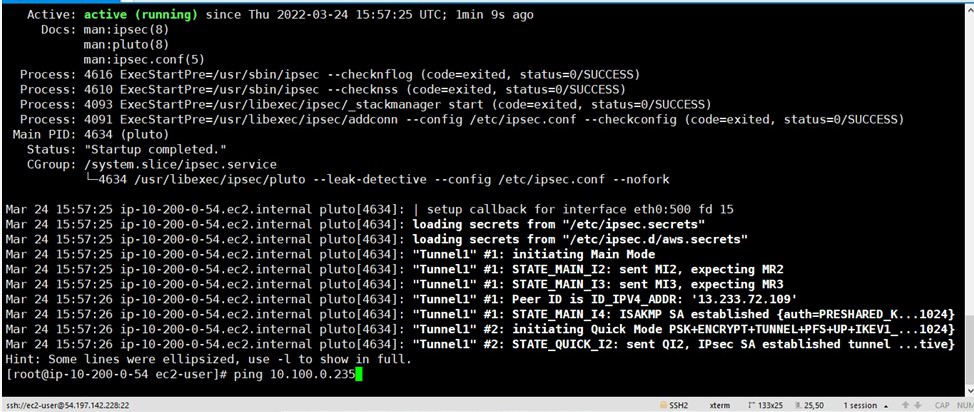
You will be able to ping.
Like Article
Suggest improvement
Share your thoughts in the comments
Please Login to comment...