SQL stands for Structured Query Language, which is the common language (with minor changes) used to manipulate relational databases. It is used to create, store, retrieve, and manipulate databases and tables. SQLite is a lightweight version of SQL with some major changes, it doesn’t have a separate server, it is not a common language, and it can’t connect with databases like Oracle or MySQL server.
In this article, we will learn about DUMP Command in SQLite in depth along with its examples, practical implementations, and so on.
SQLite DUMP
The DUMP command in SQLite is used to Backup or Restore any Database, Table, or Schema. But unlike other Functions of SQLite, the DUMP command is used with e “.” (Dot) in front of it. These types of SQLite commands are called Dot-Commands. DUMP commands are used to dump Tables, Databases, Schemas, etc to some other file.
How To Use The SQLite Dump Command
In this section, we will learn about the syntax and the working procedure of the DUMP dot command.
As mentioned earlier, the DUMP command is a Dot-Command used in SQLite3, so it is used with a preceding dot.
Syntax:
.dump <table_name> [OPTIONAL]
Explanation:
The <table_name> after the DUMP command must be provided whenever the user want to just dump a single Table and not the entire Database. In other times, it is not necessary to provide anything after the DUMP command.
If we use the .dump command singularly, then all the SQL statements used will be given as output in the same Command Line, it will not be saved anywhere.
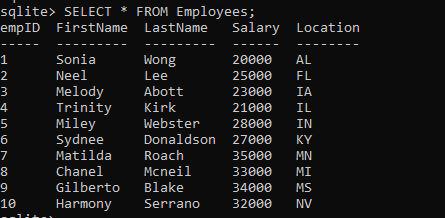
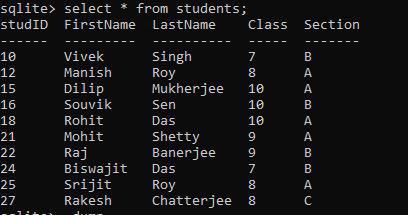
To understand the DUMP command in more depth we need a 2 table on which we will perform queries. Here we have table called Employees and Students.
After inserting data into the table, Our table looks:
Employees Table:
Students Table:
Now, if we use the dump command now, without mentioning anything else, then all the SQL statements used to create and populate the table will be given as output.
.dump
Output:
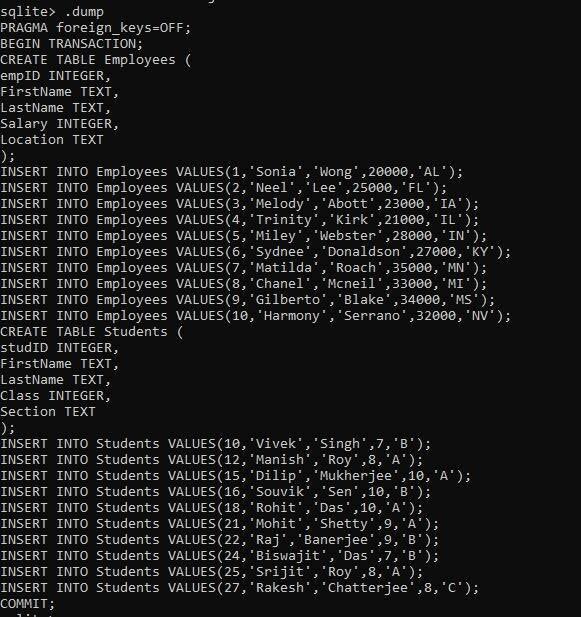
Explanation: Using the DUMP dot command, it alone returns all the commands used till now to create and populate the table. It returns the output as a transaction, that’s why the BEGIN TRANSACTION and COMMIT is being displayed here which is not required while writing the actual commands.
Dump Entire Database Into file using DUMP Command
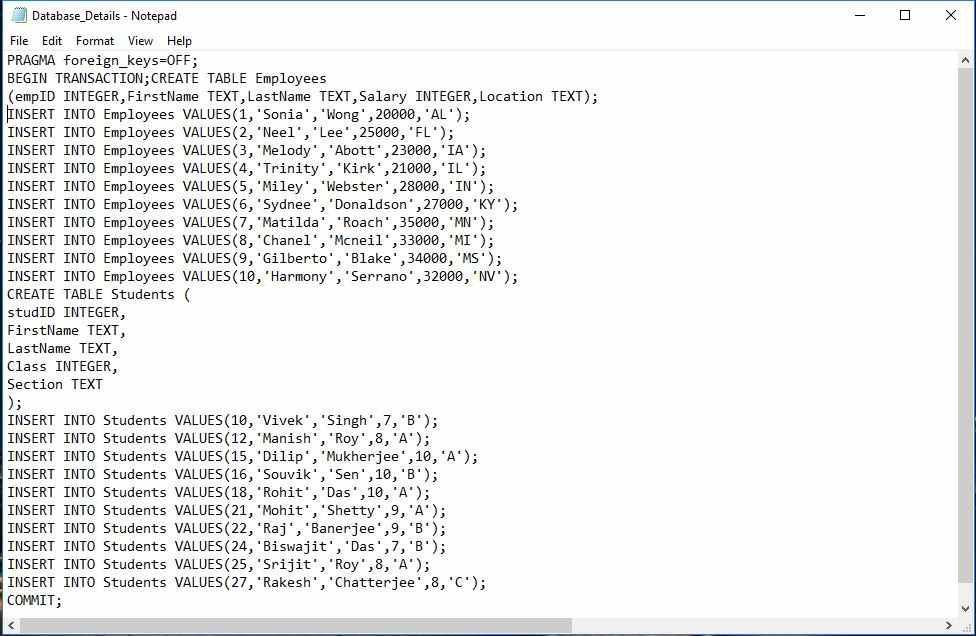
Here, we will dump an entire database into a file using the DUMP command. To do that firstly, we need to provide the name and extension of the file in which we want to store the result with the .output command. Then we have to use the .dump command.
Query:
.output <Location of File with Filename.Extension>
.dump
Now, we will store all those commands i.e the output of the .dump command to a text file named Employee_Details.txt. Write the below commands one by one, just replace the file’s location with the user’s one:
Query:
.output C:\Users\user\Downloads\SQLite\Database_Details.txt
.dump
Output:

Explanation: Here we are providing the entire path and the name of the file in which we want to store the results of the dump dot command. Even though the file and the SQLite resides in the same folder, it is recommended to provide the entire path of the file to stay on the safer side. After that we will just run the DUMP command and everything will be stored in the file we mentioned in the previous step alongwith the .output command.
Content saved in the Output File:
Dump Specific Table Using Dump Command
In this section we will see how we can use the dump command to dump a specific table of the database into a text file, not the entire database.
Sometimes, we might need to dump only a specific table into another file, not the entire database. For that, the syntax will change a bit. We need to provide the output filename as last time, but with the dump command, we need to provide the name of the specific table, which we want to dump.
Syntax:
.output <Location of File with Filename.Extension>
.dump <Table_Name>
Query:
Here, we will dump just the Employees table into a file named Employee_Table.txt
.output C:\Users\user\Downloads\SQLite\Employee_Table.txt
.dump Employees

Explanation: Here, just like the last time we are using the output dot-command and providing the entire path of the file in which we want to store the results / commands. But the difference is, here we just want to store the commands used to create and populate a certain table of the database, not the entire database. This is why we need to provide the name of the Table after the DUMP command to signify that we want to store the commands related to that table only.
Content of the Employee_Table Text File After Dumping:
.JPG)
Explanation: As we can see, only the details of the Employees table has been saved / dumped. Not the entire Database.
Dump Tables Structure Only Using Schema Command
Here we will see how we can only dump the schmea i.e the structure of the table or tables using the dump command. There is a variation of this command, using it alone will store the schema of all the tables present in database, but if we pass the name of a specific table then it will only store that.
Now, we will not dump the contents of any table, but we will dump the structures of the table using the .schema command. .schema is a dot-command same as of the .dump command, it is used to dump only the structure or schema of the tables, just like the .dump command, it is used after the .output command.
Syntax:
.output <Location of File with Filename.Extension>
.schema
Query:
We will store the structure in a file called Table_Structure.txt. Write the below command to Dump the tables structure using the schema command:
.output C:\Users\user\Downloads\SQLite\Table_Structure.txt
.schema

Explanation: Just like everytime, we will first provide the entire path of the file in which we want to store the schema of the tables with the output dot command. Then we will call the schema dot command alone, and this will store every tables’ structure into that file.
Contents of the Table_Structure.txt:

Explanation: This stores the structures of all the tables present in the database.
If we want to store the structure of a specific Table of the database, then we need to provide the table name after the .schema command.
Syntax:
.output <Location of File with Filename.Extension>
.schema <Table_Name>
Query:
Saving the Schema of the Students table:
.output C:\Users\user\Downloads\SQLite\Student_Structure.txt
.schema Students
Explanation: Here after providing the path of the file in which we want to store the output, we are using the schema command alongside the table called Students. This is to signify that we want to store the schema of the only Students table, not every table present in database.
Contents of the Student_Structure.txt file:

Dump Data of One or More Tables Into File
Here we will see how we can dump the data of one or more tables into a file using the dump command, whenever we will use the SELECT statement, in the file we mentioned, all the INSERT commands we have used previously will be stored.
To dump the data of one or more tables into a file, we first need to change the mode into insert, this will ensure that whenever we use the select statement in command line, in the file all the insert statements will be dumped. We also need to provide a filename with an extension with the .output dot-command to point out in which file the results will be stored.
Syntax:
.mode insert
.output <filename.extension>
Query:
Now if we run the select statement to fetch the values of Employees table only, all the insert statement used for the Employees table, will be dumped and saved in the file mentioned.
.mode insert
.output mydata.txt
Query:
Now using the Select statement:
SELECT * FROM Employees;
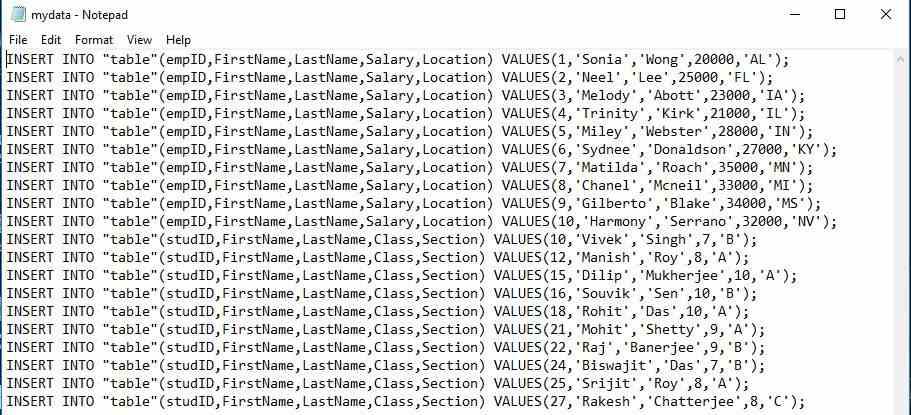
Content of the mydata.txt file:
INSERT INTO "table"(empID, FirstName, LastName, Salary, Location) VALUES(1, 'Sonia', 'Wong',20000,'AL');
INSERT INTO "table"(empID, FirstName, LastName, Salary, Location) VALUES(2, 'Neel', 'Lee', 25000, 'FL');
INSERT INTO "table"(empID, FirstName, LastName, Salary, Location) VALUES(3, 'Melody','Abott', 23000, 'IA');
INSERT INTO "table"(empID, FirstName, LastName, Salary, Location) VALUES(4, 'Trinity', 'Kirk', 21000, 'IL');
INSERT INTO "table"(empID, FirstName, LastName, Salary, Location) VALUES(5, 'Miley', 'Webster',28000, 'IN');
INSERT INTO "table"(empID, FirstName, LastName, Salary, Location) VALUES(6, 'Sydnee', 'Donaldson', 27000, 'KY');
INSERT INTO "table"(empID, FirstName,  LastName, Salary, Location) VALUES(7, 'Matilda', 'Roach', 35000, 'MN');
INSERT INTO "table"(empID, FirstName, LastName, Salary, Location) VALUES(8, 'Chanel', 'Mcneil', 33000, 'MI');
INSERT INTO "table"(empID, FirstName, LastName, Salary, Location) VALUES(9, 'Gilberto', 'Blake', 34000, 'MS');
INSERT INTO "table"(empID, FirstName, LastName, Salary, Location) VALUES(10, 'Harmony', 'Serrano', 32000, 'NV');
If we now run the select statement again but for the Students Table, the content will be updated as below:
Output:
Conclusion
In this article, we saw how we can use the DUMP dot-command of SQLite3 for various purposes. Using it singularly or grouped together with other commands like Schema or Output, the main task what DUMP command does is to store the commands used to create the database, or any table, or the structure of any table.
This command is very much useful when dealing with a large database which consists of a lot of tables, when the user wants to know about the structure of the database, or the commands used to populate the tables, they can just use this DUMP command to get all of them in a file without doing any extra manual work.
Share your thoughts in the comments
Please Login to comment...