Copying database schemas without transferring data is a common requirement in database management, particularly when we need to replicate a database’s structure across different environments or instances without the associated content. In SQL Server, a database schema comprises the organization of tables, views, stored procedures, and other objects that define the database’s structure. This process is crucial for various scenarios, such as creating development or testing environments, deploying schema changes, or sharing database structures across different SQL Server instances.
In this article, we will explore several methods to efficiently copy database schemas without including the actual data. These methods provide flexibility and control, allowing database administrators and developers to streamline the deployment of schema changes, maintain consistency across environments, and ensure efficient collaboration in database development. Whether we prefer using SQL Server Management Studio (SSMS) tools, command-line utilities like SQLPackage, or other techniques, understanding how to selectively copy database schemas empowers us to manage database structures with precision and simplicity.
Prerequisites
Before proceeding with the process of copying database schemas without data in SQL Server, ensure the following prerequisites are met:
- SQL Server Installation: SQL Server should be successfully installed on your system. If not installed, obtain the appropriate version of SQL Server and complete the installation process.
- SQL Server Management Studio (SSMS): SSMS, the graphical user interface tool for managing SQL Server, should be installed. It is commonly bundled with SQL Server installations, but you can also download and install it separately if needed.
- SQLPackage Utility: The SQLPackage utility is a command-line tool used for various database deployment tasks. It is typically included with SQL Server installations. Ensure that SQLPackage is available in your system If not present then you might need to install the Data-Tier Application Framework (DACFx), which includes the SQLPackage utility.
With these prerequisites in place, you’ll have the necessary tools and utilities to proceed with copying database schemas without data using the methods mentioned earlier.
Ways to Copy Database Schemas without Data in SQL Server
Method 1: Generate Scripts using SSMS
SQL Server Management Studio (SSMS) offers an efficient user interface for scripting all SQL Server objects. Follow the steps outlined below to accomplish this task.
Step 1: Task Selection
Launch the SSMS and right-click on the target database and navigating to the “Task” section. Numerous options will be available, but our focus is on “Generate Scripts.” Choose this option as illustrated in the image.
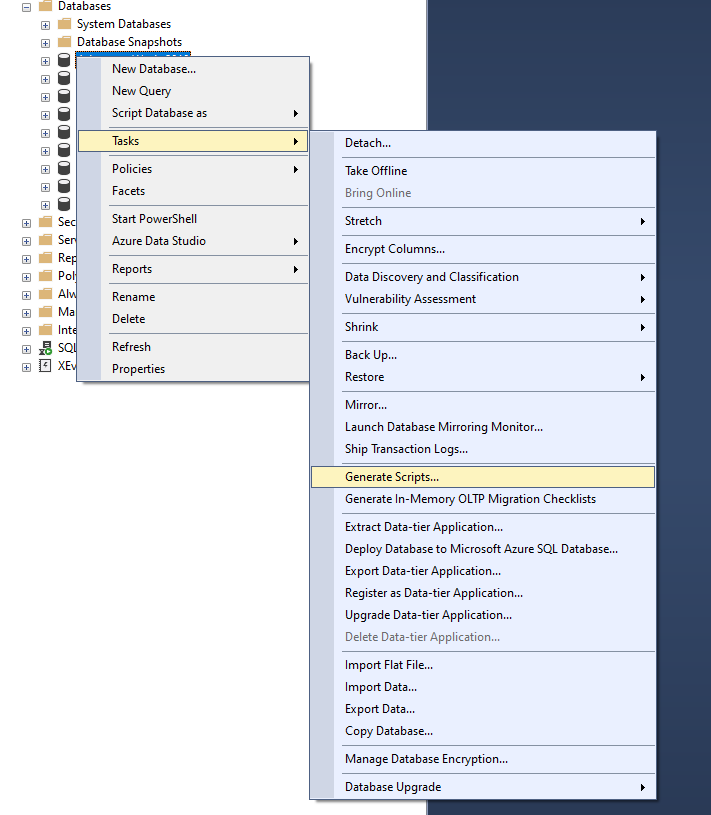
Figure 1 : Select Generate Script option.
Step 2: Object Selection
Upon selecting “Generate Scripts,” a wizard window will open. Here, choose the objects for which you want to generate scripts and proceed by clicking the “Next” button. In this instance, we are opting for all schema objects, as depicted in the image.
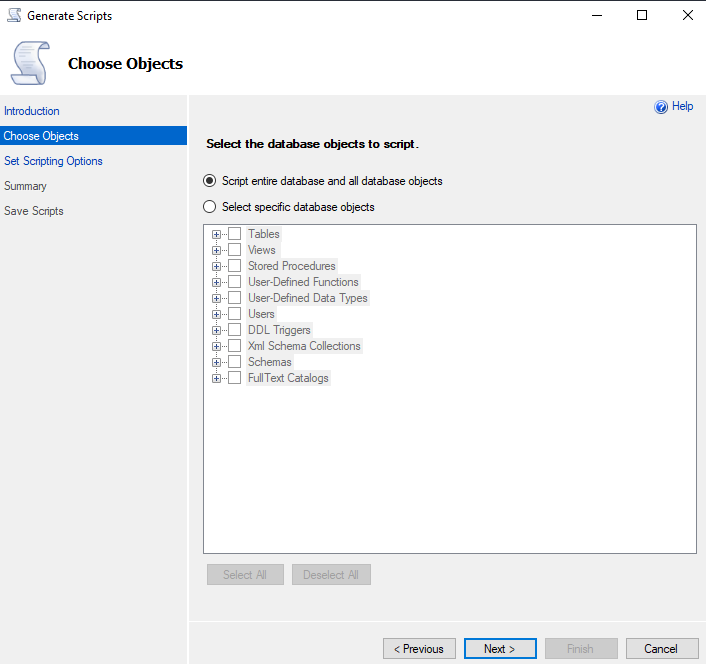
Figure 2 : We have selected all the database objects
We have the flexibility to selectively choose tables, views, or specific schema categories. In the example image, only a few tables are selected for script generation.
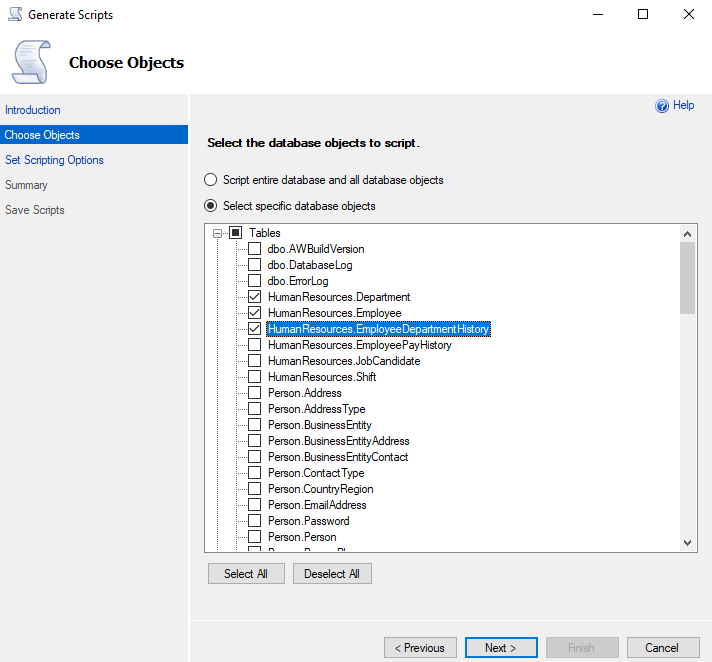
Figure 3 : We have selected few objects only
Step 3: Scripting Options
In this step, configure scripting options by clicking the “Advanced” button. A small window will appear, allowing you to set various options such as script syntax compatibility, inclusion of indexes, and collation. Focus on the “Types of data to script” property and choose “Schema Only” to exclusively script the schema, excluding data. See the image for reference.
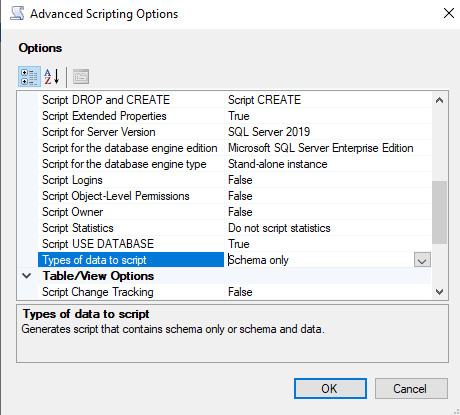
Figure 4 : We chose schema only option for Types of Data to script.
Step 4: Save Scripts
Specify how the scripts should be saved, whether in a single file or one script file per object. For this demonstration, a single file is chosen, and the filename and path are provided. An additional option is to select “Open in new query window” if both servers are accessible or if the database needs to be created on the same server.
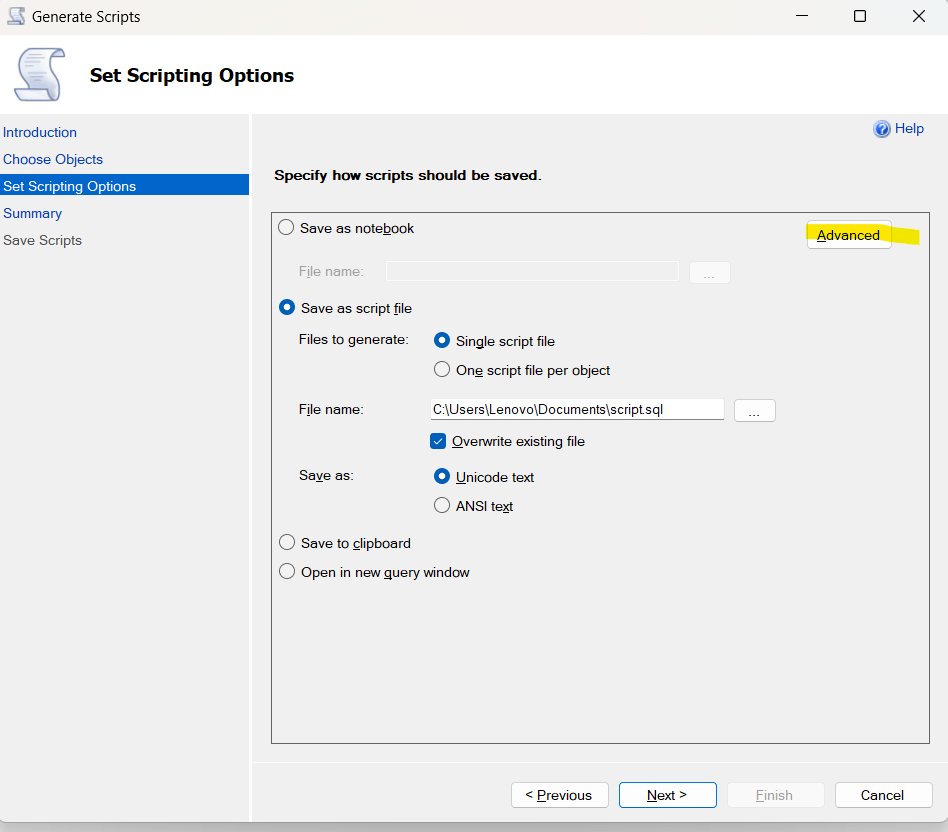
Figure 5 : We have selected single file to script the schema and highlighted is the Advanced Button for above step.
Step 5: Review Selections
Review your selections and verify the chosen options before proceeding to the next step.
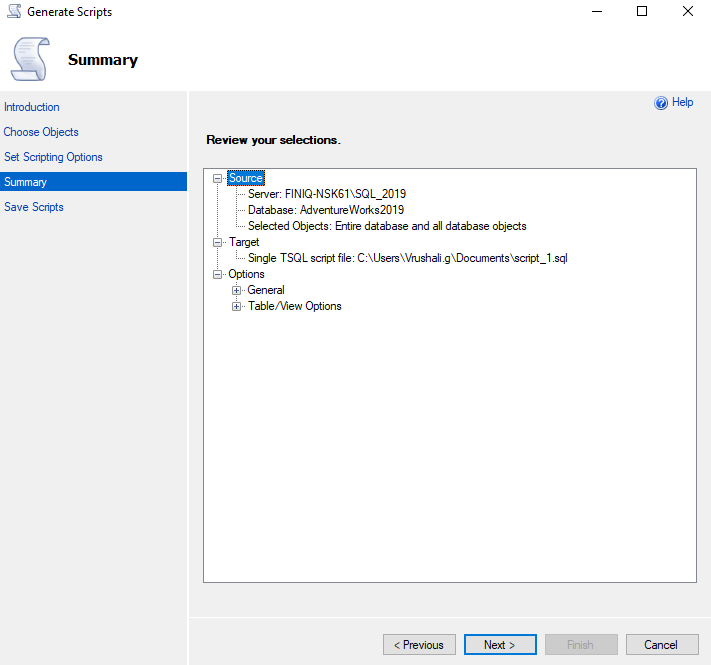
Figure 6 : Verify the data here.
Step 6: Execution
In this final step, a summary of actions will be listed. If everything is configured correctly, the result column should display a “Success” tag. Click the “Finish” button to conclude the process and verify the generated output file, which should resemble the image provided.
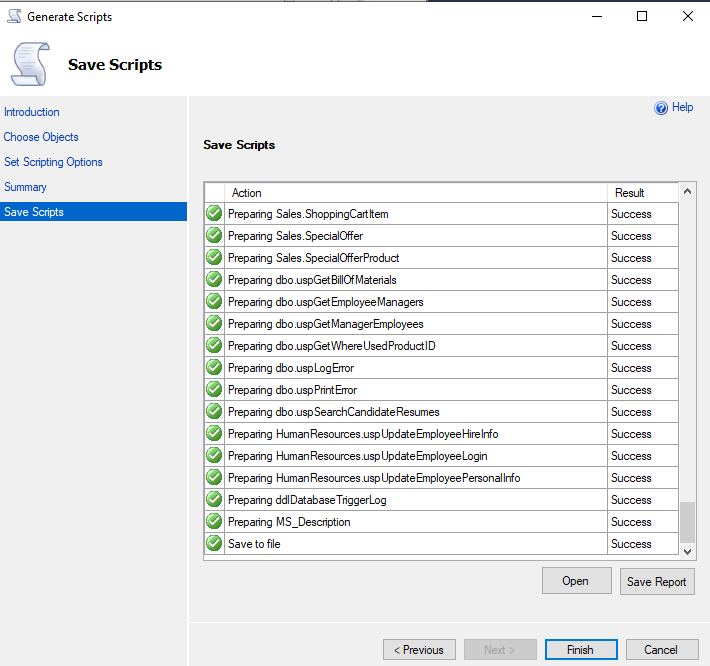
Figure 7: Here we can see the list of all objects’ script generated. And last entry is always save to file.
Step 7: Implementation
To transfer schema objects, execute the generated file. This file encompasses everything from creating the database to all schema objects. If necessary, make modifications within the file, such as altering the database name or file path.
So, we’ve discussed our initial approach for moving database schema without data. Now, let’s delve into another method.
Method 2: Creating and Publishing DACPAC File using SSMS
Before diving into the implementation of this method, let’s grasp what DACPAC is and how it functions. DACPAC stands for Data Tier Application Package, a file type in SQL Server that encapsulates the definition of database objects like tables, functions, logins, etc. It excludes data but serves as a compressed zip folder containing the database model in XML format and other essential files for deployment. SQL Server provides a command-line utility to unpack DACPAC files for content inspection. For this approach, we’ll generate a DACPAC file using SSMS and subsequently import it into an empty database to create all schema objects.
Step 1: Task Initialization
Right-click on the database and navigate to the “Task” section. From the multiple options available, select “Extract Data–Tier Application,” as depicted in the image.
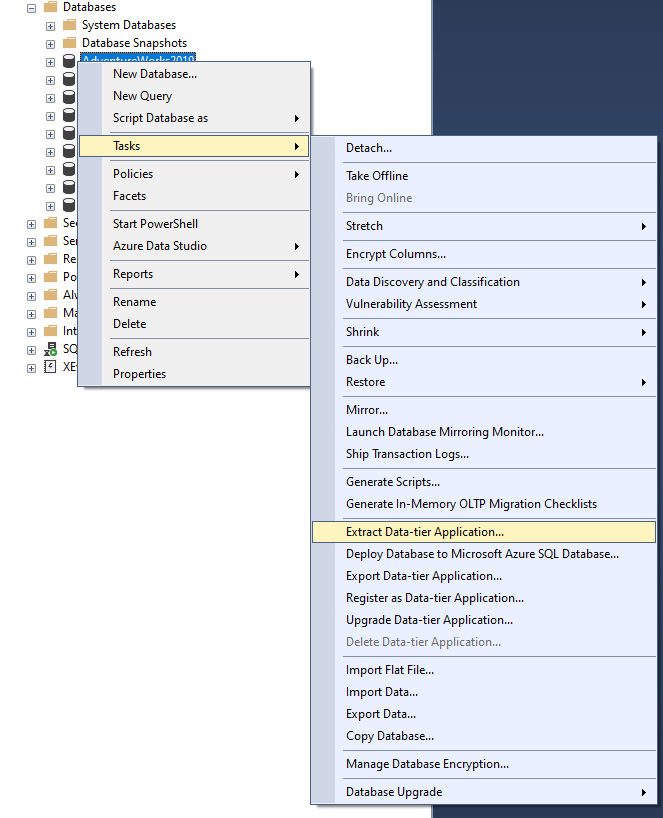
Figure 8 : Select Extract Data-Tier Application to open our required wizard.
Step 2: DACPAC Wizard Configuration
The DACPAC wizard opens, allowing us to set DAC properties such as file name and location for saving the file.
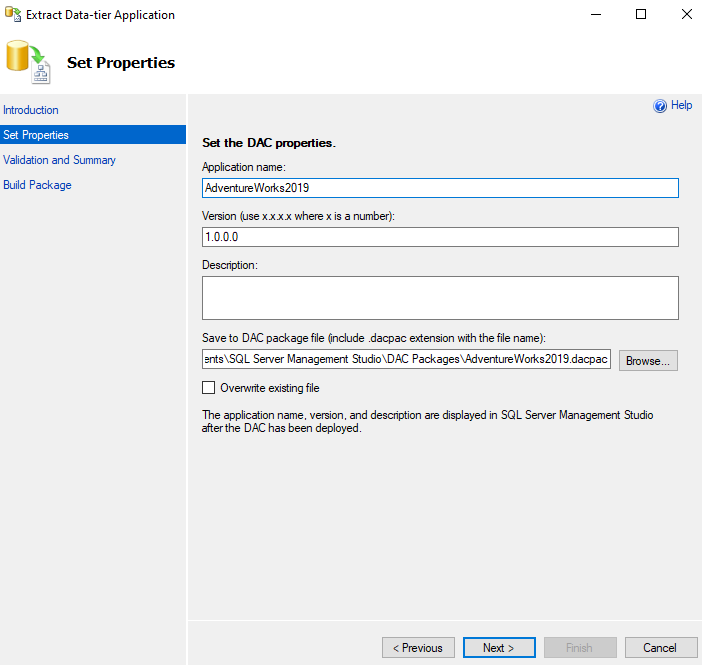
Figure 9: We have selected the output file path, if we want we can enable the Overwrite existing file.
Step 3: Summary Verification
Similar to the previous example, review the summary of options/properties used in the wizard, then click the “Next” button.
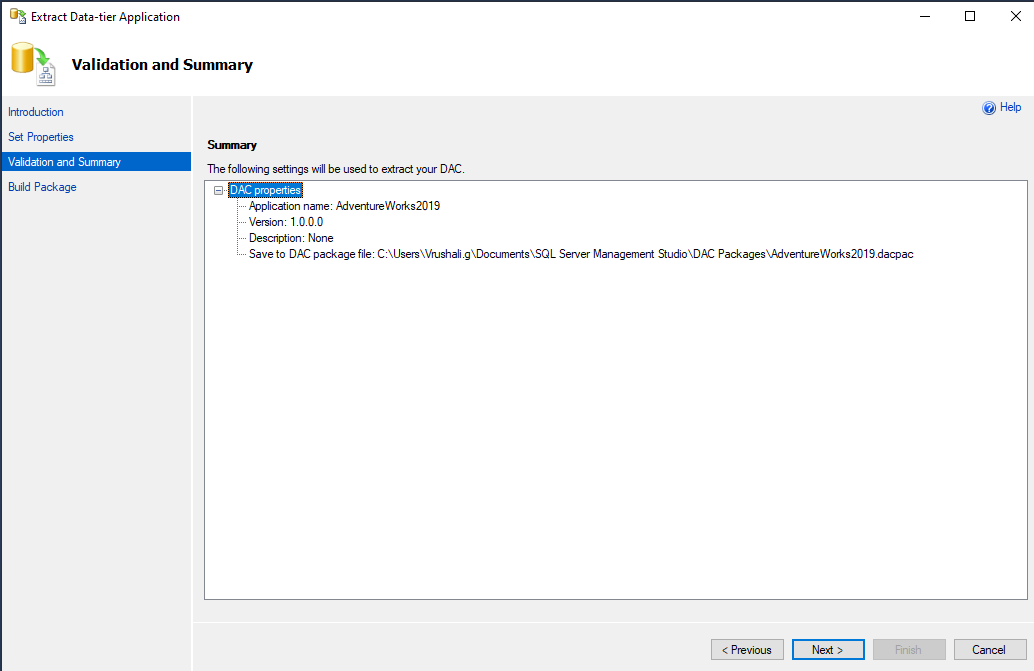
Figure 10 : This is summary page.
Step 4: DACPAC Building
SSMS initiates the DACPAC creation process. Once completed, the window should resemble the image below. Click on the “Finish” button and confirm the file’s creation in the specified location.
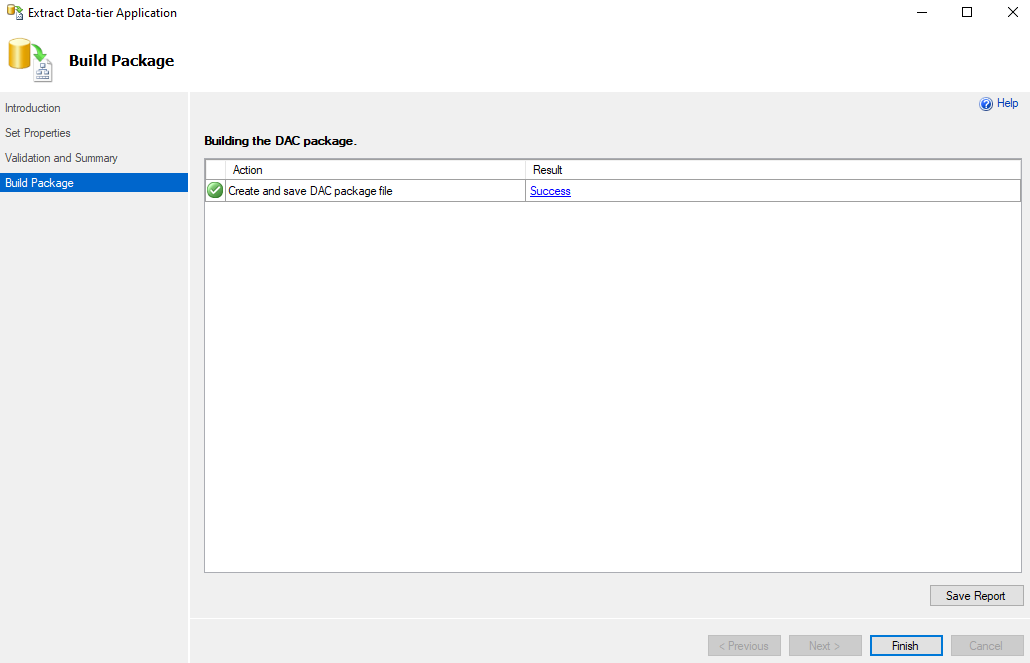
Figure 10 : This window builds the DAC package file.
Now, having completed the DACPAC creation, we move on to the second part which is importing the DACPAC into an empty database.
Step 5: New Database Creation
Create a new database named “AdventureWorksDacpac” using the provided query. File paths for data and log files are included for creation at default locations.
Syntax to create database:
CREATE DATABASE AdventureWorksDacpac
Step 6: Database Task Initiation
In the database list, locate the newly created database, right-click on its name, and select the “Upgrade Data-Tier Application” option from the task menu to open a new window.
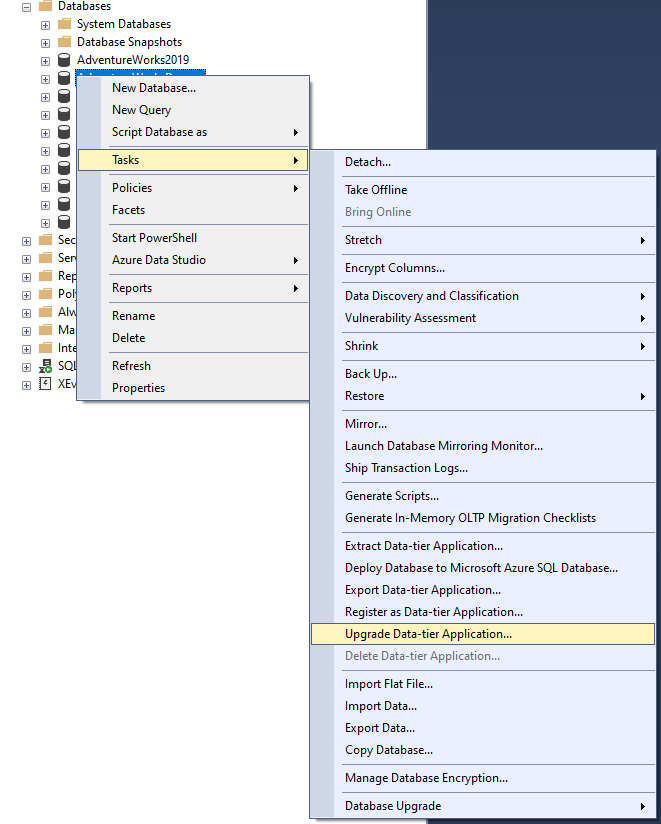
Figure 11 : Select Upgrade Data-Tier Application.
Step 7: Input File Selection
Provide the input file created in the previous steps. DACPAC files are easily portable, allowing flexibility in file selection.
Here, we are selecting input file which we have created in previous steps.
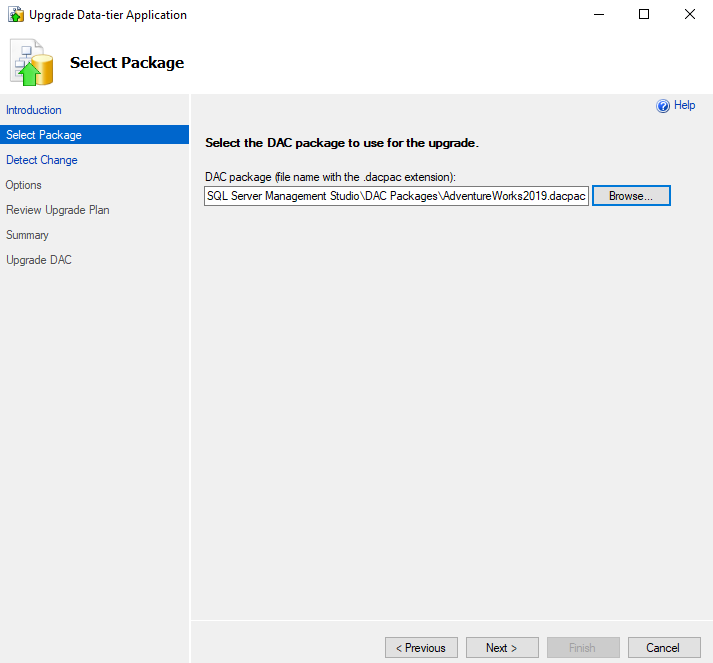
Figure 12 : Select the input DACPAC file.
Step 8: Change Detection
The process will detect changes. While upgrading an existing database, it compares existing database schema objects with DACPAC file schema objects, listing down the comparison report. In our case, as we’re using an empty database, no changes will be detected.
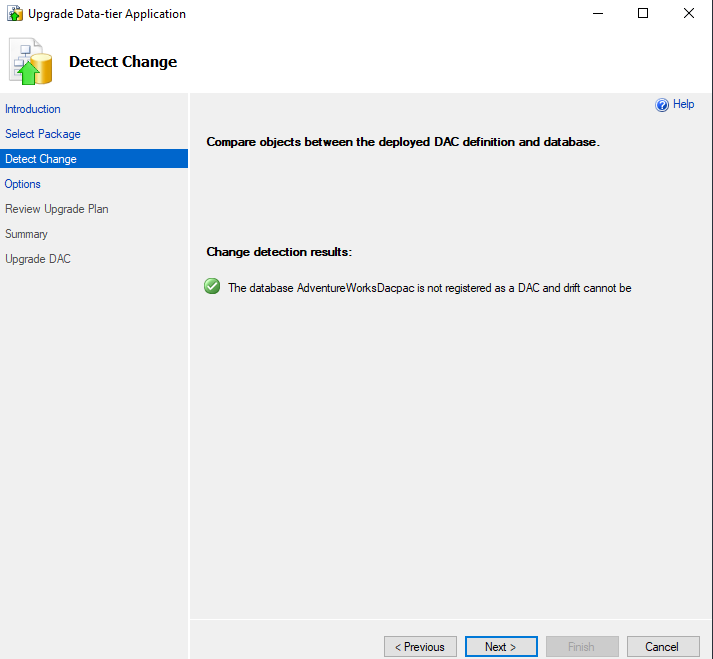
Figure 13 : In this window, no change is detected.
Step 9: Upgrade Plan Review
Review the upgrade plan, displaying a list of actions SQL Server will take based on DACPAC metadata. It indicates operations like table creation, mentioning the possibility of data loss. For our scenario, the operation is Create only, if we use existing database then there would be Alter or Drop options too.
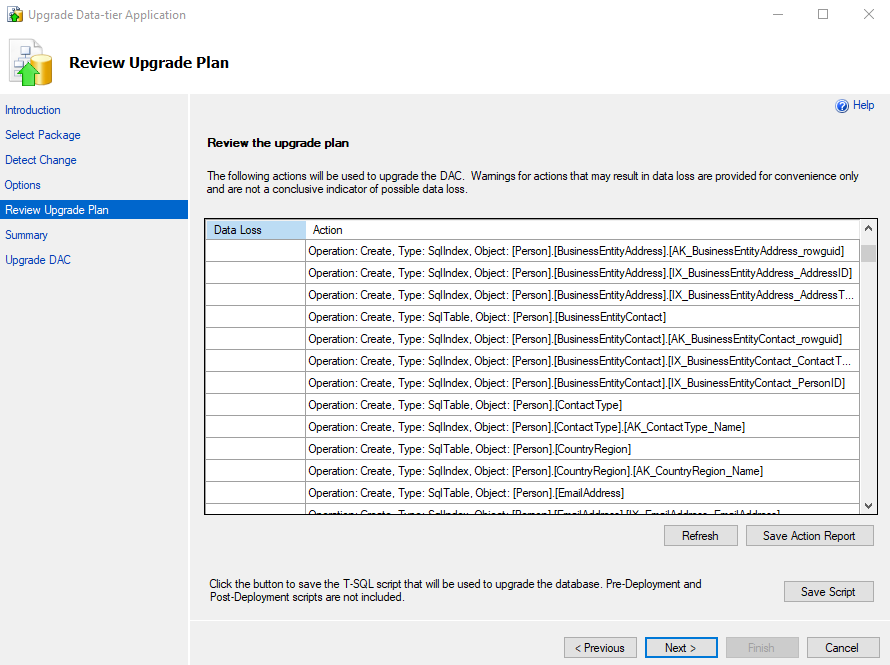
Figure 14 : Create objects list is here.
Step 10: Verification
As with any task, the second step is to verify changes and review the summary.
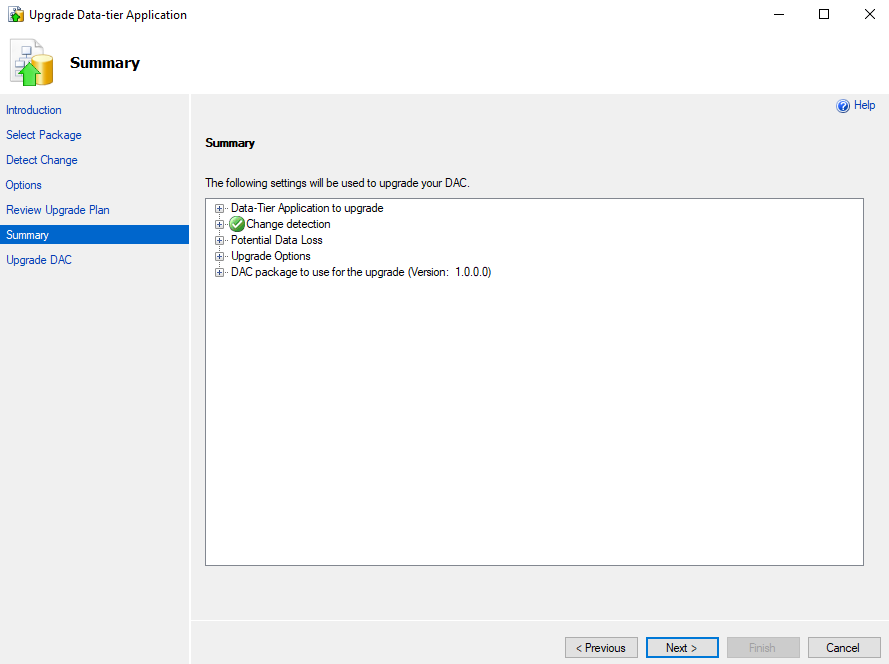
Figure 15 : SQL Server always gives summary window to confirm the task to perform.
Step 11: Upgrade Execution
Initiate the DAC upgrade; success in the result section indicates that all schema objects are created. Confirm with a SQL query to count user-defined schema objects, showing identical counts in both databases with empty tables.

Figure 16 : Successfully imported DACPAC file to create the schema objects.
After this step also, we can verify the schema. We can execute above select queries to check the objects count.
This covers the process of creating and deploying DACPAC files using SSMS. In cases where SSMS access is limited, a command-line utility, SQLpackage, can be used for the same purpose.
Method 3: Creating and Publishing DACPAC File using Command Line SQLPackage
Let’s explore how it works with SQLPackage for creating and publishing DACPAC files using command line instructions.
If you haven’t installed SQLPackage, you can download it from Microsoft official page. The SQLPackage utility is typically found at the following path:
Query:
C:\Program Files\Microsoft SQL Server\160\DAC\bin
Now, let’s proceed with the actions:
Step 1: Extraction of DACPAC
Open a command prompt window at the specified path and execute the following command:
Query:
sqlpackage /action:Extract /TargetFile:"D:\AdventureWorks2019.dacpac" /SourceDatabaseName:AdventureWorks2019 /SourceServerName:"localhost" /SourceUser:sa /SourcePassword:YourPassword
In this command, replace “localhost” and “YourPassword” with your server name and password. This command extracts the DACPAC, specifying the target file’s full path and the name of the database from which the DACPAC is extracted. If no username and password are provided, Windows authentication is assumed.
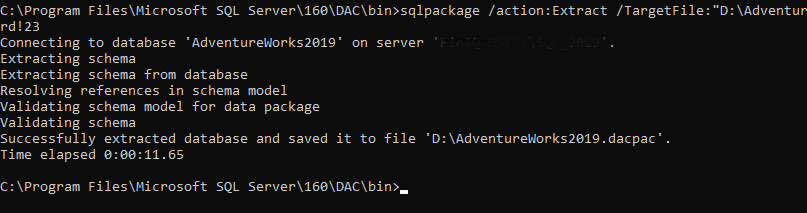
Figure 17 : Command window output.
Explanation: The above image shows the successful creation of the DACPAC at the specified path.
Step 2: Publishing DACPAC
Now, let’s publish the created DACPAC file containing schema objects on the server using the following command:
Query:
sqlpackage /action:Publish /SourceFile:"D:\AdventureWorks2019.dacpac" /TargetDatabaseName:AdventureWorks2019SQLPackage /TargetServerName:"localhost" /SourceUser:sa /SourcePassword:YourPassword
The “Publish” action deploys the DACPAC file incrementally to the database server. If the database doesn’t exist, a new database will be created. We are using the database name “AdventureWorks2019SQLPackage,” which is not present on the server, and the database along with all schema objects will be created without data.
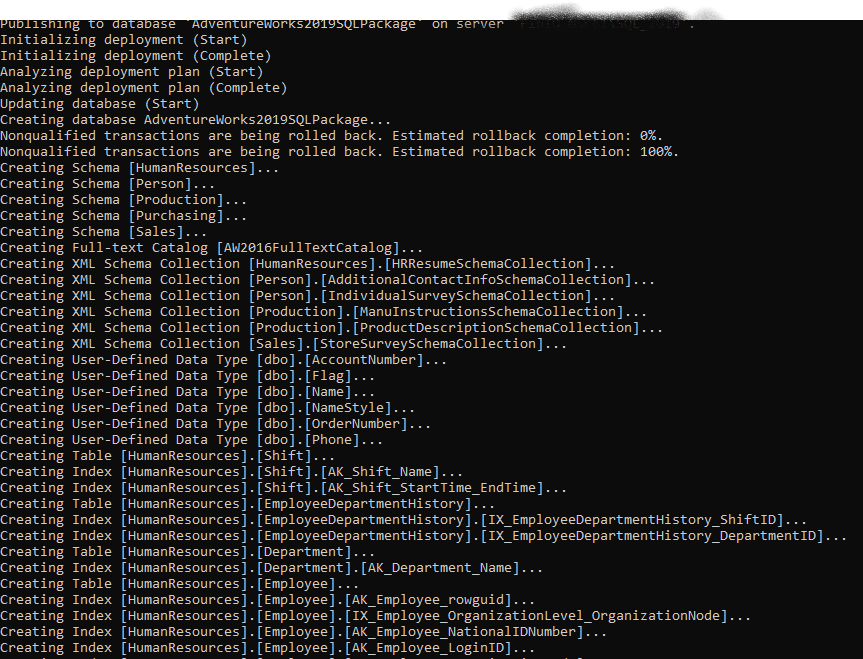
Figure 18 : List of all the schema objects can be seen on command window.
Successfully Published Database:
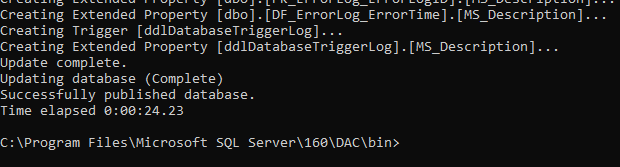
Figure 19: Successfully published database.
Explanation: The above image display the creation of a new database at the default path and a list of all schema objects. We can even see the total time elapsed for the action.
Conclusion
In conclusion, we’ve explored two effective methods for copying database schemas without including data in SQL Server. The first method, utilizing SQL Server Management Studio (SSMS), offers a user-friendly interface for generating scripts. This approach provides flexibility in selecting specific schema objects and controlling script content, making it a practical choice for various scenarios.
The second method involves creating and publishing Data Tier Application Package (DACPAC) files. DACPAC, a file type in SQL Server, encapsulates the definition of database objects without including data. Whether using SSMS or the command-line utility SQLPackage, this method allows for a more automated deployment process, especially useful when SSMS access is limited.
Both methods enable the seamless transfer of schema structures, fostering consistency across different SQL Server instances or aiding in the creation of development and testing environments. Whether you prefer the visual interface of SSMS or the command-line efficiency of SQLPackage, mastering these techniques empowers you to manage database schemas with precision and ease. Choose the method that best aligns with your workflow and requirements, and enhance your database management capabilities in SQL Server.
Share your thoughts in the comments
Please Login to comment...