Efficiently managing database connections is important for Node.js applications using MongoDB. MongoDB connection reuse in Node.js is a practice that optimizes resource utilization and enhances application performance.
By reusing connections, developers can reduce the overhead associated with establishing new connections for each database interaction, especially in high–traffic applications.
In this article, We will explore various methods of easily reusing MongoDB connections across routes in Node.js projects with the help of examples and so on.
How to Efficiently Manage MongoDB Connections Across Routes in a Node.js
Properly reusing connections to MongoDB across Node.js applications and modules is essential for optimizing performance and resource utilization. This practice involves establishing a single database connection that is shared and reused throughout the application’s lifecycle.
To achieve this Below are the approach or methods that help us are as follows:
- Dedicated Connection Pool (Using MongoClient)
- Mongoose (ODM Library)
1. Dedicated Connection Pool (Using MongoClient)
When a driver initializes, a new connection pool is generated, acting as a repository for pre-established connections, all managed by the database driver (a ). Whenever our Node.js application requires database interaction, it retrieves a connection from the pool, executes the operation, and automatically returns it to the pool.
These pools are thread-safe, ensuring smooth concurrent access to the MongoDB database. Since a connection pool is created only once, it also helps reduce application latency.
Before going into code, here are the steps to create a project.
Step 1: Create a folder named ‘node_app‘.
mkdir node_app
Step 2: Go to that folder using the cd command.
cd node_app
Step 3: Create a new Node.js Project.
npm init -y
Step 4: Install MongoDB driver:
npm install mongodb

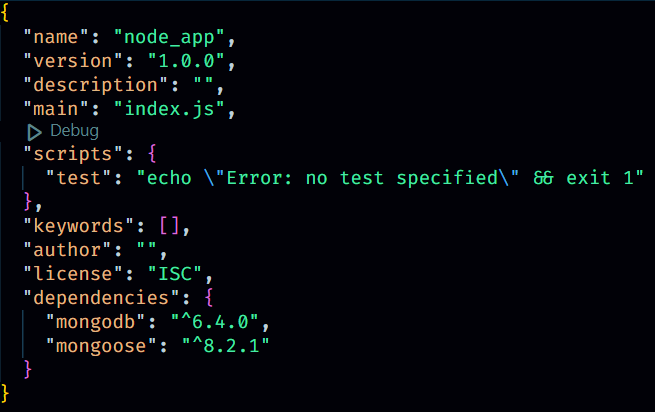
package.json
Step 5: create a folder db and inside create connection.js file.
mkdir db
cd db
echo . > connection.js
Step 6: create index.js file in root folder.
echo . > index.js

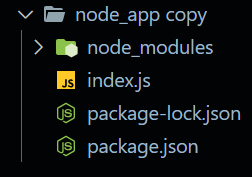
folder structure
Step 7: Add this code in both files.
The below code defines a module that exports a function connectToDb, which creates and returns a MongoDB client instance. It uses the mongodb package to connect to a MongoDB database specified by the connection URI (mongodb://localhost:27017) and database name (university).
The function also sets the maximum pool size for the connection pool to 10. If a client instance already exists, it reuses it instead of creating a new one.
// File name: db/connection.js

const { MongoClient } = require('mongodb');

const url = 'mongodb://localhost:27017'; // MongoDB connection URI
const databaseName = 'university';

let mongoClientInstance = null;

// Setting the maximum pool size for the connection pool.
let maxPoolSize = 10;

// Object of connection Option
const connectionOption = {
    maxPoolSize: maxPoolSize
}

async function connectToDb() {
    if (!mongoClientInstance) {
        mongoClientInstance = await MongoClient.connect(url, connectionOption);
        console.log("Database Connected Successfully")
    }

    // returning a reference to the database
    return mongoClientInstance.db(databaseName);
}

module.exports = { connectToDb };
This index.js file demonstrates the usage of the connectToDb function from ./db/connection.js to establish a connection to a MongoDB database named “university“. It then inserts a sample document into a collection named “articles” and fetches documents where the “tags” array includes “NoSQL“, converting the result to an array and logging it to the console.
// File name: index.js

const { connectToDb } = require('./db/connection');

async function main() {
    const db = await connectToDb();

    // Using database instance
    const collection = db.collection('articles');

    // sample data
    const data = {
        "title": "Using MongoDB for Efficient Data Storage and Retrieval in Real-world Applications",
        "author": "Rizwan Bhavnagri",
        "published_date": "2024-03-20",
        "content": "MongoDB is a popular NoSQL database that provides a flexible and scalable solution for storing and retrieving data in real-world applications.",
        "tags": ["MongoDB", "NoSQL", "Database", "GeeksforGeeks", "Tutorial"]
    }

    // Insertiing a document
    const doc = await collection.insertOne(data);
    console.log("Inserted document with _id:", doc.insertedId);

    // Fetching and Converting collection to array
    const result = await collection.find({ tags: "NoSQL" }).toArray();
    console.log(result);
}

main();
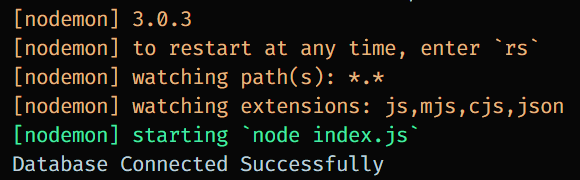
Output:
Database Connected Successfully
Inserted document with _id: new ObjectId('65ee028e099a0359d5ed55fd')
[
  {
    _id: new ObjectId('65ee028e099a0359d5ed55fd'),
    title: 'Using MongoDB for Efficient Data Storage and Retrieval in Real-world Applications',
    author: 'Rizwan Bhavnagri',
    published_date: '2024-03-20',
    content: 'MongoDB is a popular NoSQL database that provides a flexible and scalable solution for storing and retrieving data in real-world applications.',
    tags: [ 'MongoDB', 'NoSQL', 'Database', 'GeeksforGeeks', 'Tutorial' ]
  }
]
Output:

run – node index.js
Note: Here, i had added one document which you can view in MongoDB Compass.
Explanation:
- Firstly, we import MongoClient from MongoDB, which serves as the primary entry point for establishing connections with the MongoDB Server.
- Next, we define the MongoDB connection URI and specify the database name.
- We initialize a MongoClient instance with null and some connection options.
- The connectToDb function is responsible for establishing a connection to the MongoDB Server, returning a database reference.
- In the main function, we retrieve a collection named ‘articles‘ from the database, if it does not exist, it will be automatically created.
- We then insert one document into the ‘articles‘ collection.
- Lastly, we fetch one document and convert it to an array.
2. Using Mongoose Library
Mongoose is a popular Object Data Modelling (ODM) library for node.js with MongoDB, it simplifies data interaction and connection management. Mongoose provide tools to define schemas, perform validations, and execute queries in easy way compared to raw database interactions.
Step 1: Install mongoose library.
npm install mongoose
package.json
Step 2: Create index.js file
echo . > index.js
folder structure
Step 3: Put this code in index.js file.
This below code demonstrates how to connect to a MongoDB database using Mongoose in a Node.js application. It first imports the Mongoose library and defines the MongoDB connection URI. The main function attempts to establish a connection to the MongoDB database using mongoose.connect, and logs a success message if the connection is successful. If an error occurs during the connection attempt, it logs the error message.
// File name: index.js

const mongoose = require('mongoose');

// MongoDB connection URI
const mongoURI = 'mongodb://localhost:27017/university';

async function main() {
    try {
        // Connect to the MongoDB with the connection URI
        await mongoose.connect(mongoURI);

        console.log('Database connected successfully');

    } catch (error) {
        console.error('MongoDB connection error:', error);
    }
}

main();
Output:
Output
Explanation:
- The mongoose.connect function is called within the main function, where it receives the connection URI as a parameter.
- Error handling for potential connection failures is implemented within a try…catch block.
Conclusion
Overall, Properly managing MongoDB connections across routes in a Node.js project is crucial for optimal performance. Utilizing a dedicated connection pool with MongoClient or leveraging the Mongoose library helps efficiently reuse connections, minimizing latency. These approaches ensure smooth database interactions, enhancing the application’s overall performance and reliability.
Share your thoughts in the comments
Please Login to comment...