How To Install and Update Azure PowerShell on Windows Machine?
Last Updated :
16 Jul, 2023
Pre-requisite: Azure
Azure PowerShell is a command-line tool that allows you to manage Azure resources from the command line. It is a powerful tool that can be used to automate tasks, provision resources, manage users and policies in Azure a,d also for troubleshooting problems. Actually, Azure PowerShell is built on top of Windows PowerShell, so if you are familiar with PowerShell, you will be able to pick up Azure PowerShell quickly.
To install this we will be using PowerShellGet which is a module that allows you to install PowerShell modules from the PowerShell Gallery. Follow the steps to get started.
Steps to Install Azure PowerShell on Windows Machine
Step 1: To install Azure PowerShell using PowerShellGet, you need to open PowerShell as an administrator.
Step 2: Verify PowerShell Version
Make sure that you are running a supported version of PowerShell. The minimum supported version is PowerShell 5.0 and above. Run the following command to check the PowerShell version:
$PSVersionTable.PSVersion

Step 3: Run the following command to set the PowerShell execution policy to remote signed >> Select ‘Y’ to proceed.
Set-ExecutionPolicy -ExecutionPolicy RemoteSigned -Scope CurrentUser

Step 4: Run the following command to install the latest version of the Az PowerShell module.
Install-Module -Name Az
This will install the latest version of the Az PowerShell module.
or
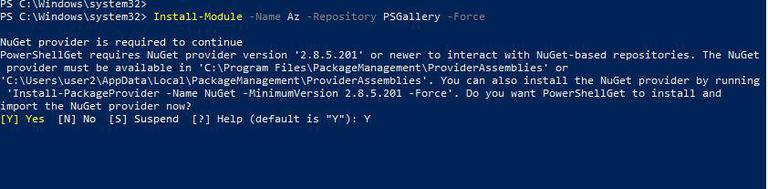
Run the following command to install the latest version of the Az PowerShell module to PSGallery Repository at force. For this NuGet provider is required if it ask for NuGet provider type ‘Y’ to continue.
Install-Module -Name Az -Repository PSGallery -Force
 This process takes around 15-20 minutes to install all the Az module packages wait until it gets completed and then proceed to Step 5.
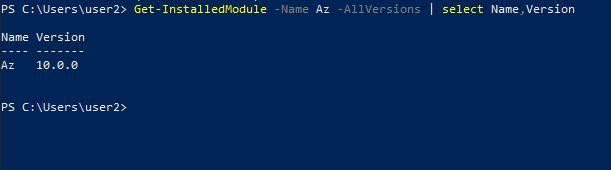
Step 5: Once you have installed Azure PowerShell, you can use this command to verify the installation:
Get-InstalledModule -Name Az -AllVersions | select Name,Version
You can also verify the installation by running the following command by connecting your Azure Account:
Connect-AzAccount
Next, you will get a Microsoft Azure popup to sign in interactively >> Enter your Azure username and password to get started.
 How to Update the existing Azure PowerShell Modules on Windows Machine?
To Update Az Modules you need to just run the following command to update Az modules.
Update-Module -Name Az -Force

Troubleshooting Installation or Update Issues
If you are having problems installing or updating Azure PowerShell, Check the system logs for any errors that might have occurred during the installation or update process. Try uninstalling and reinstalling Azure PowerShell. Make sure that you have the latest version of the PowerShellGet module installed. You can install the PowerShellGet module by running the following command. Run this command only when needed.
Install-Module -Name PowerShellGet -Force
Share your thoughts in the comments
Please Login to comment...