How to implement Conditional Rendering in React?
Last Updated :
30 Jan, 2024
This article explores JavaScript’s conditional rendering in React JS, including various methods, syntax, and applications, leveraging React’s virtual DOM, reusable components, props, and rapid rendering capabilities in single-page UI applications.
We will use the following approaches to implement conditional rendering in React
if-else statements:
if(condition){
    expression1
}
else{
    expression2
}
if-elseif statements:
if (condition) {
    expression1
}
elseif(condition){
    expression2
}
else {
    expression3
}
‘&&’ operator:
condition && expression
A short-circuit logical AND is represented by the && operator. If this condition is satisfied, the following && expression shall be considered; if not, it shall be disregarded entirely. For simple conditional rendering, this approach is brief and widely used.
‘&&’ operator with the alternative operator ‘||’:
condition && expression1 || expression2
If the condition is incorrect, a && operator and || can be combined to produce an alternate expression if there is a need for fallback expressions. This allows for different rendering scenarios to be handled more flexibly.
using ternary ( ?: ) operator:
condition ? expression1 : expression2
A more explicit way of expressing conditional rendering is provided by the ternary operator. In determining whether the condition is true or false, it will return a single expression.
Steps to Create the React App:
Step 1: Create a React project:
npx create-react-app conditional-rendering
Step 2: Navigate to the project:
cd conditional-rendering
Project Structure:
.png)
Project structure of the app
The updated dependencies in package.json file will look like:
"dependencies": {
    "@testing-library/jest-dom": "^5.16.4",
    "@testing-library/react": "^13.2.0",
    "@testing-library/user-event": "^13.5.0",
    "bootstrap": "^5.1.3",
    "react": "^18.1.0",
    "react-dom": "^18.1.0",
    "react-icons-kit": "^2.0.0",
    "react-redux": "^8.0.2",
    "react-scripts": "^5.0.1",
    "redux": "^4.2.0",
    "web-vitals": "^2.1.4"
}
Example: This example showcases a dynamic toggle switch controlled by the Dynamic App component, with UI updates based on state, and dynamic notifications indicating its status. Visual styles are managed through CSS classes, enabling modular reuse, and users can toggle the switch for immediate updates.
Javascript
import React, { useState } from "react";
import "./App.css";
const DynamicApp = () => {
const [isToggled, setToggled] = useState(false);
const handleToggle =
() => {
setToggled(
(prevState) => !prevState);
};
return (
<div className={
`toggle-slider
${isToggled ? "on" : "off"}`
}>
<h1>Switch Application</h1>
<ToggleSwitch isToggled={isToggled}
onToggle={handleToggle} />
{isToggled ? (
<p>The color switch is ON!</p>
) : (
<p>The color switch is OFF!</p>
)}
</div>
);
};
const ToggleSwitch =
(
{
isToggled,
onToggle
}) => {
return (
<div
className={
`toggle-switch
${isToggled ? "on" : "off"}
`}
onClick={onToggle}>
<button>
{isToggled ? "Switch on" : "Switch off"}
</button>
</div>
);
};
export default DynamicApp;
|
CSS
.App {
font-family: sans-serif;
text-align: center;
}
body {
margin: 0;
padding: 0;
}
.toggle-slider {
height: 100vh;
display: flex;
align-items: center;
justify-content: center;
flex-direction: column;
}
.on {
background-color: aqua;
}
.off {
background-color: aliceblue;
}
button {
padding: 10px 15px;
border: none;
background-color: grey;
}
|
Steps to run the app:
npm start
Output:
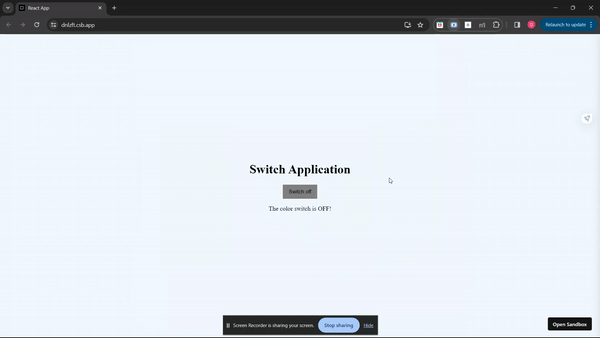
The output of the above code
Example 2: This example features a basic React component showcasing hide-and-display functionality toggled by a button click. Utilizing the useState hook, it manages visibility state for dynamic UI updates.
Javascript
import { useState } from "react";
export default function App() {
const [showText, setShowText] = useState(true);
const textVisibility = () => {
setShowText(!showText);
};
return (
<div className="App">
<center>
{!showText && (
<p>
GeeksforGeeks is a leading platform that provides
computer science resources and coding challenges for
programmers and technology enthusiasts, along with
interview and exam preparations for upcoming aspirants.
With a strong emphasis on enhancing coding skills and
knowledge, it has become a trusted destination for over
12 million plus registered users worldwide. The platform
offers a vast collection of tutorials, practice
problems, interview tutorials, articles, and courses,
covering various domains of computer science.
</p>
)}
<button onClick={textVisibility}>
{showText ? "Show some text" : "Hide it"}
</button>
</center>
</div>
);
}
|
CSS
.App {
font-family: sans-serif;
text-align: center;
display: flex;
align-items: center;
justify-content: center;
min-height: 90vh;
}
button {
color: white;
background-color: black;
padding: 10px 20px;
}
|
Step to run the app:
npm start
Output:
.gif)
Output
Share your thoughts in the comments
Please Login to comment...