Use of the Ternary Operator in Conditional Rendering.
Last Updated :
25 Jan, 2024
In React, conditional rendering helps show different things based on certain conditions. The ternary operator is a concise way to do this quickly and clearly. In this article, we will learn step by step process to use the ternary operator for conditional rendering in React.
Syntax: React developers have multiple approaches for implementing conditional rendering, but the ternary operator stands out for its concise syntax.
condition ? expression_if_true : expression_if_false;
Different approaches discussed below:
Basic Ternary Operator:
the basic form of the ternary operator is used to assign a value based on a condition. Here’s a simple example:
const result = condition ? 'True Value' : 'False Value';
In this case, if the condition is true, the variable result will be assigned the value ‘True Value’; otherwise, it will be assigned ‘False Value’.
Ternary Operator in JSX:
This approach showcases the ternary operator within JSX, a common scenario in React components for conditional rendering.
Syntax:
return (
    <div>
        {
            isLoggedIn ? <p>Welcome, User!</p> :
                <button
                    onClick={() => setLoggedIn(true)}>
                    Log In
                </button>
        }
    </div>
);
Here, if isLoggedIn is true, it renders a welcoming message; otherwise, it displays a login button. This concise syntax is a powerful way to handle dynamic content in React components.
Steps to Create the React App:
Step 1: Create a ReactJS project:
npx create-vite@latest conditional-rendering-app --template react
Step 2: Navigate to the project:
cd conditional-rendering
Step 3: Installing the modules:
npm install
Project Structure:
.png)
Project structure of the app
The updated dependencies in package.json file will look like:
"dependencies": {
    "react": "^18.2.0",
    "react-dom": "^18.2.0"
},
Example: Below is the code example of the ternary operator in conditional rendering:
Javascript
import React,
{
useState
} from 'react';
import './ConditionalRenderingExample.css';
const ConditionalRenderingExample = () => {
const [isLoggedIn, setLoggedIn] = useState(false);
return (
<div className="conditional-container">
{}
{isLoggedIn ? (
<div className="logged-in">
<p className="welcome-message">
Welcome, Geek!
</p>
<p className="status-message">
You are logged in!
</p>
<button className="logout-button"
onClick={() => setLoggedIn(false)}>
Log Out
</button>
</div>
) : (
<div className="logged-out">
<p className="greeting-message">
Hey, you are not logged in!
</p>
<p className="instruction-message">
Please log in to continue
</p>
<button className="login-button"
onClick={() => setLoggedIn(true)}>
Log In
</button>
</div>
)}
</div>
);
};
export default ConditionalRenderingExample;
|
Javascript
import './App.css'
import ConditionalRenderingExample
from './Components/ConditionalRenderingExample'
function App() {
return (
<>
<ConditionalRenderingExample />
</>
)
}
export default App
|
CSS
.conditional-container {
text-align: center;
margin-top: 50px;
}
.logged-in,
.logged-out {
font-size: 1.5em;
margin-bottom: 20px;
}
.welcome-message {
color: #27ae60;
font-size: 2em;
}
.status-message {
color: #3498db;
}
.greeting-message {
color: #e74c3c;
}
.instruction-message {
color: #f39c12;
}
.logout-button,
.login-button {
padding: 10px 20px;
font-size: 1.2em;
cursor: pointer;
}
.logout-button {
background-color: #e74c3c;
color: #fff;
border: none;
}
.login-button {
background-color: #27ae60;
color: #fff;
border: none;
}
|
Steps to run the app:
npm run start
Output:
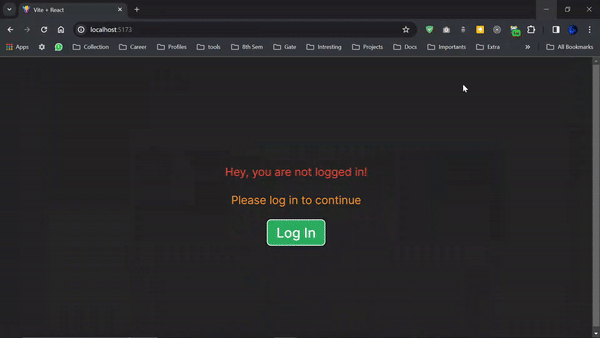
Output
Share your thoughts in the comments
Please Login to comment...