How to implement a simple file upload with multipart form in Angular ?
Last Updated :
09 Jan, 2024
In this article, we will see how to implement a simple file upload functionality in an Angular application. File uploading is a most common and significant functionality of any web application, to get the data in terms of files from the user or client to the server. We will see how to implement the file uploading feature for two different cases namely uploading a single file and uploading multiple files under the same field name using FormsModule & HTTP Client Module of Angular.
Implementing Simple File Upload in Angular
Let’s discuss the step-by-step procedure for implementing the file upload functionality in Angular.
Step 1: To install Angular CLI, we use the below command:
npm install --global @angular/cli
Step 2: Create a new angular project with the below command (this uses Angular CLI, i.e. the ng-command to create a basic angular application to bootstrap our project quickly)
ng new file_upload
Step 3: Setting up a Mock REST Endpoint
- To send the files to a backend endpoint, we should also set up some kind of server setup to respond us back for our request.
- For simplicity, we will create a simple express project with multer library to process the file upload functionality.
- Create a basic node application by typing the below command:
npm init -y
- Install the express.js and multer dependency with the npm install command.
npm install --save express multer
- Create a file named server.js to hold the server logic for the mock backend server.
- Add the below code for the server application.
Javascript
const express = require("express");
const multer = require("multer");
const path = require("node:path");
const app = express();
const PORT = 8080;
const storageConfig = multer.diskStorage({
destination: path.join(__dirname, "uploads"),
filename: (req, file, res) =& gt; {
res(null, Date.now() + "-" + file.originalname);
},
});
const upload = multer({
storage: storageConfig
});
app.use((req, res, next) =& gt; {
res.setHeader("Access-Control-Allow-Origin", "*");
next();
});
app.post("/upload", upload.array("file"), (req, res) =& gt; {
if (!req.files) {
res
.status(413)
.send("File not uploaded!, Please attach jpeg file under 5 MB");
return;
}
res.status(201).send({ msg: "Files uploaded successfully" });
});
app.listen(8080, () =& gt; {
console.log(`server is started and listening at port: ${PORT}`);
});
|
Step 4: Implementing File Upload
In this step, we will start implementing the file upload functionality in Angular, for ease of understanding we will use the AppComponent itself to host a form for uploading.
Example: In this example, we have created a form, & we have attached our function to the (ngSubmit) event handling to submit our form through Angular. Now, Configure the multiple attributes of the input tag with data binded “isMultiple” variable.
HTML
<div class="container">
<div class="row">
<h1>GeeksForGeeks</h1>
<h3>
A simple file upload form using Angular!
</h3>
<h3>
{{ isMultiple ? "Multiple Files Upload" : "Single File Upload" }}
</h3>
</div>
<div class="row">
<form (ngSubmit)="uploadFiles(this.filesElement)">
<input class="form-element"
name="file"
type="file"
(change)="changeFiles($event)"
[multiple]="isMultiple" #filesElement />
<div class="row">
<input type="checkbox"
id="checkBox"
name="checkBox"
[(ngModel)]="isMultiple"
(change)="this.filesElement.value = ''" />
<label for="checkBox">
Multiple Files Upload
</label>
</div>
<button class="btn"
type="submit">
Upload
</button>
</form>
</div>
</div>
|
CSS
.container {
display: flex;
justify-content: center;
align-items: center;
flex-direction: column;
text-align: center;
height: 100vh;
font-family: Arial, Helvetica, sans-serif;
}
.row {
margin: 1rem 0;
width: 700px;
}
h1 {
color: #308d46;
}
.btn {
color: #fff;
padding: 10px 20px;
font-size: 16px;
background: rgb(180, 25, 25);
border: none;
border-radius: 5px;
width: 100%;
cursor: pointer;
text-shadow: 0 1px 1px rgba(0, 0, 0, 0.2);
}
.btn:hover {
background: rgb(255, 25, 25);
}
.form-element {
padding: 5px;
font-size: 16px;
width: 100%;
border: 2px solid #084cdf;
border-radius: 5px;
}
input[type="file"]::file-selector-button {
margin-right: 20px;
border: none;
background: #084cdf;
padding: 10px 20px;
border-radius: 10px;
color: #fff;
cursor: pointer;
transition: background 0.2s ease-in-out;
}
input[type="file"]::file-selector-button:hover {
background: #0d45a5;
}
|
Step 5: Configure the app.component.ts file to hold the Files array and also inject a service to handle the file upload. Here, the uploadFiles() Function uses the service function to upload the file to the server. The changeFiles() Function will capture the input file tag event, and take the files from the target element, and then store it in the local files array.
Javascript
import { CommonModule }
from '@angular/common';
import { Component }
from '@angular/core';
import { FormsModule }
from '@angular/forms';
import { RouterOutlet }
from '@angular/router';
import { FileuploadService }
from './fileupload.service';
@Component({
selector: 'app-root',
standalone: true,
imports: [CommonModule, RouterOutlet, FormsModule],
templateUrl: './app.component.html',
styleUrl: './app.component.css',
})
export class AppComponent {
files?: File[];
isMultiple = false;
constructor(private uploadService: FileuploadService) { }
uploadFiles(filesElement: HTMLInputElement) {
if (this.files) {
this.uploadService.uploadFile(this.files)
.subscribe((res: any) => {
alert(res.msg);
filesElement.value = '';
});
} else {
alert('Please select files to upload!');
}
}
changeFiles(event: any) {
this.files = event.target.files;
}
}
|
Note: Import the FormsModule in this App standalone component in the imports array of @Component annotation.
Step 6: Creating File Upload Service in Angular
Set up the File Upload service to get the files array and upload it to the backend REST endpoint.
ng generate service fileupload
The above command will give you an Angular service prebuilt inject in the root component, add the below code in the generated `fileupload.service.ts` file.
Javascript
import { HttpClient } from '@angular/common/http';
import { Injectable } from '@angular/core';
@Injectable({
providedIn: 'root',
})
export class FileuploadService {
constructor(private http: HttpClient) { }
uploadFile(files: File[]) {
const formData = new FormData();
for (const file of files) {
formData.append('file', file);
}
return this.http.post(
}
}
|
Here, in the above code, A service is injected at the root of the angular application and has an uploadFiles method to upload files array. The uploadFiles get the File array as input and go through every file, and then add it to a formData object. It will return an observable to make a post request to the server.
Step 7:
- Configure the ApplicationConfig in `app.config.ts` to provide the HttpClientModule for injection in the services that require the Http Client.
- This adds the HTTP Client module to the provider’s list so that it can be injected anywhere an HTTP client is required.
provideHttpClient(withFetch());
Javascript
import { ApplicationConfig }
from '@angular/core';
import { provideRouter }
from '@angular/router';
import { routes }
from './app.routes';
import { provideHttpClient, withFetch }
from '@angular/common/http';
export const appConfig: ApplicationConfig = {
providers: [provideRouter(routes),
provideHttpClient(withFetch())],
};
|
Step 8: Test File Upload in Angular
- To test the file upload run the below commands to start the Angular app and the mock Backend with express.
- Run “ng serve” to start your Angular application
- Run “npm start” in your express project folder to start your express application.
- Open your browser and enter your Angular app url, by default it is “http://localhost:4200/”
- You will be greeted with a file upload form.
Step 9: Single File Upload
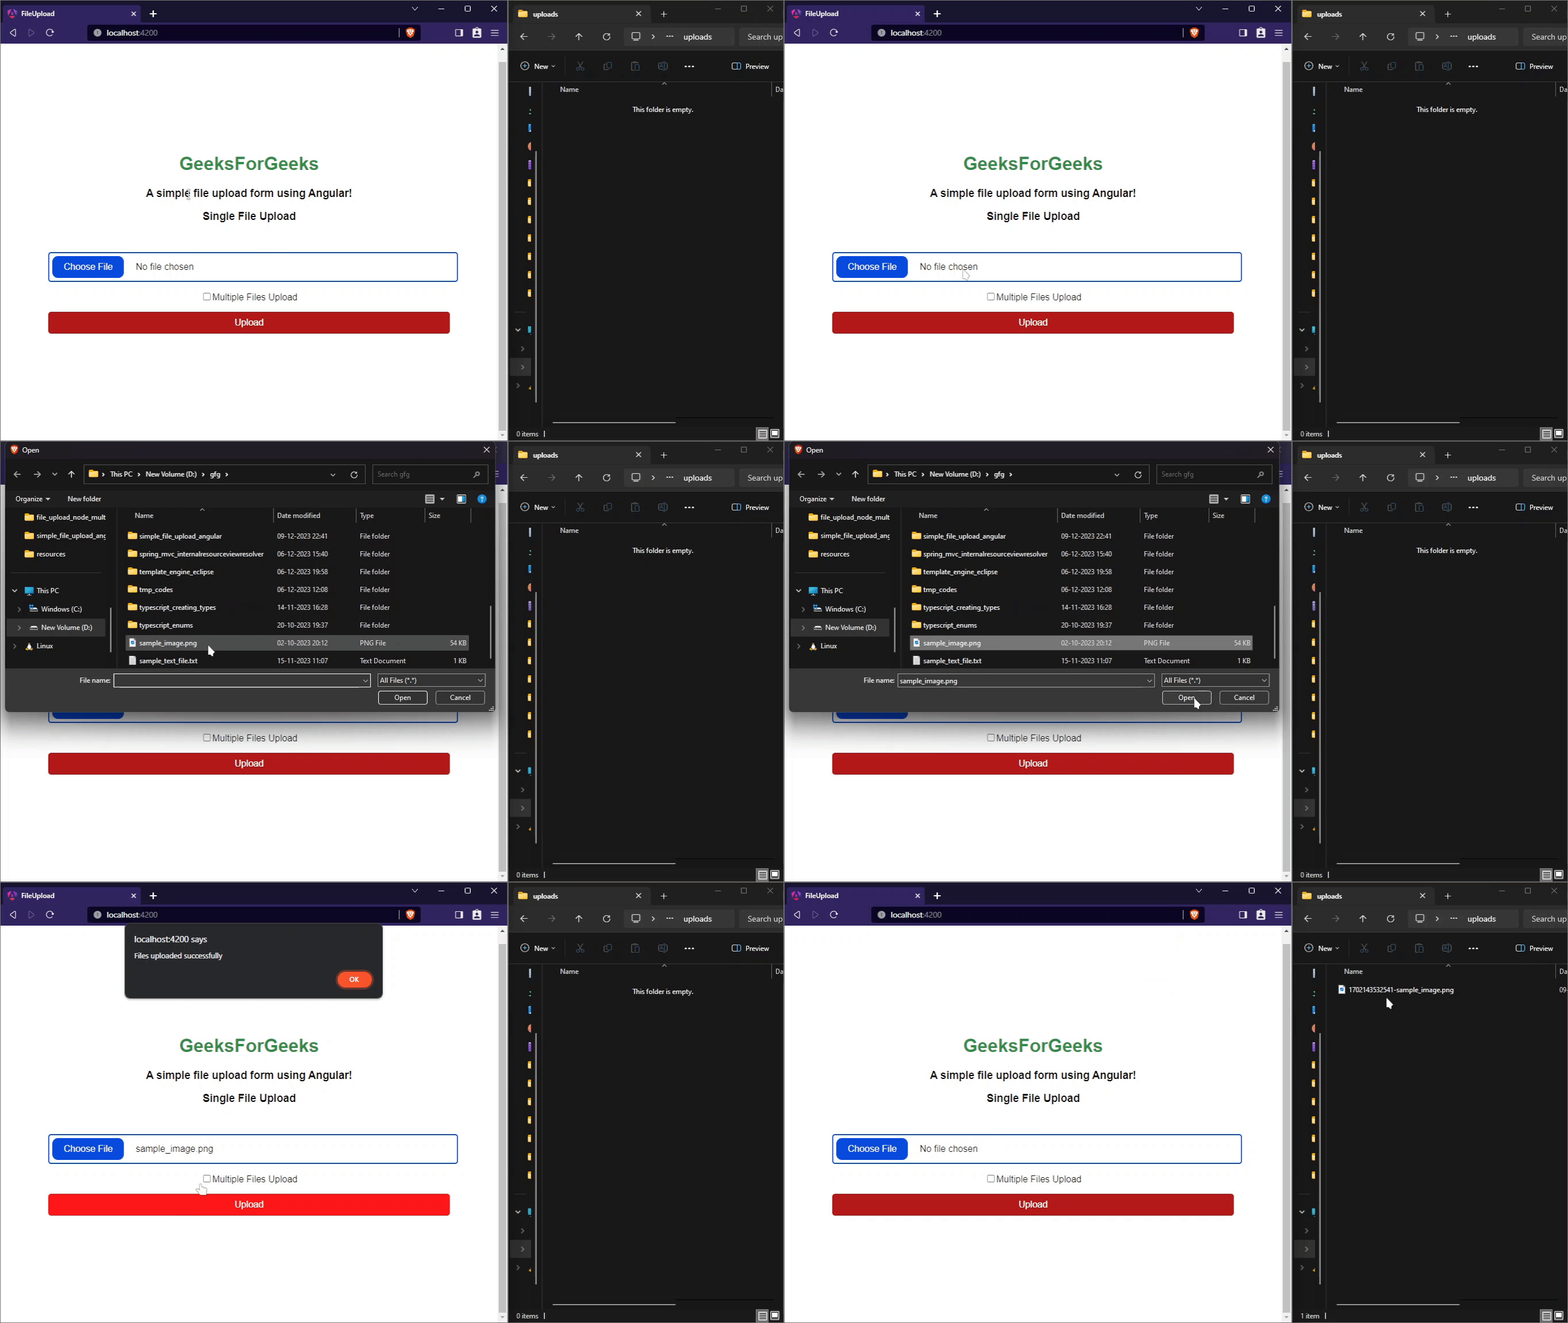
Testing Single File upload, make sure you have unchecked the checkbox to send only one file to upload, select the file and click the Upload button.
Output:

single file upload output
Step 10: Multiples File Upload
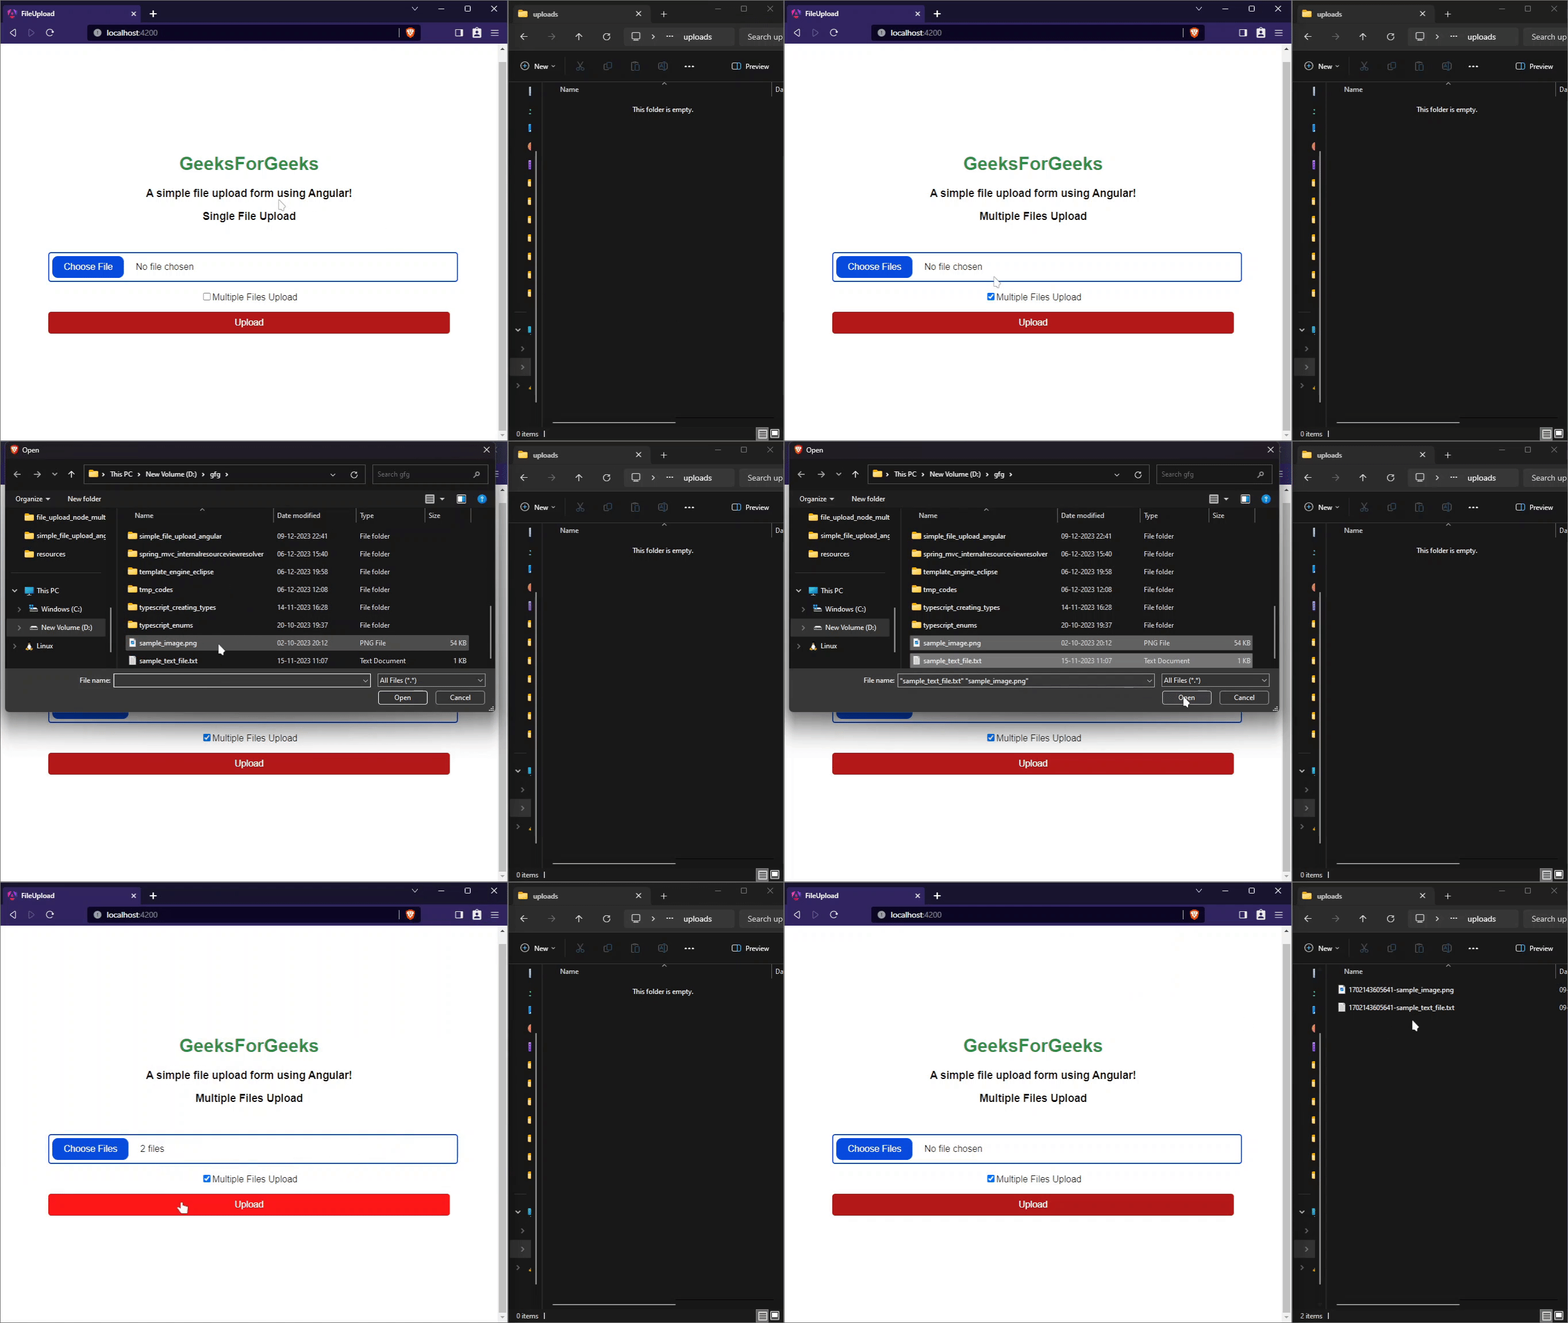
Testing Multiple files upload, make sure you have checked the checkbox for multiple files upload and attach the files in the input tag. Finally hit the upload button to send multiple files to the server.
Output:

multiple file upload output
Conclusion
We have seen how we can easily implement the file upload functionality in Angular applications using FormData, FormsModule, and HttpClient of Angular and also implement it in two different approaches, single files and multiple files of each. Use the approaches according to your project configuration and needs.
Share your thoughts in the comments
Please Login to comment...