When working with large datasets in R programming, it’s often necessary to create tables and spreadsheets to better visualize and analyze the data. One important aspect of formatting these spreadsheets is applying borders to the cells. Borders help to separate and distinguish different sections of the table, making it easier to read and interpret the information. In this article, we will explore how to add borders to all cells using the XLSX package in R.
Set Border for Cells using XLSX Package in R
To give borders to all cells in an Excel file using the XLSX package in R, you can use the ‘Border’ function. This function allows you to apply a border to a range of cells in an Excel worksheet, and you can set different border styles, colors, and widths.
To use the ‘Border’ function, you will need to first create an Excel workbook and worksheet and then add data to the worksheet using the ‘addDataFrame()’ function or other data input functions. Once you have added data to the worksheet, you can use the ‘Border()’ function to apply borders to all cells in a specific range.
Steps to set Border to all Cells using XLSX Package
Let us see the step-by-step process to add borders to Excel cells using the XLSX Package.
Step 1: Install and load Package
First, we need to install and load the XLSX package in R. This can be done using the following commands:
install.packages("xlsx")
library(xlsx)
Step 2: Create a Workbook
Next, we need to create a new workbook and worksheet using the createWorkbook() and createSheet() functions. The createSheet() function takes the workbook object and the name of the sheet in the workbook as the parameters.
wb <- createWorkbook()
sheet <- createSheet(wb, sheetName = "Sheet_name")
Step 3: Add Data
Now, we can add data to our worksheet using the addDataFrame() function. This function allows us to add a data frame to the specific worksheet and specify the starting cell where the data should be added.
mydata <- data.frame(
  Name = c("John", "Emily", "Tom", "Samantha"),
  Age = c(25, 30, 22, 27),
  Occupation = c("Engineer", "Teacher", "Student", "Doctor")
)

addDataFrame(mydata, sheet, startRow = 1, startCol = 1)
Step 4: Add Borders to Cells
To add borders to all cells, we can use the Border() function to specify the style and position of the border and use the setCellStyle() function to set the style of the cells.
border_style <- CellStyle(wb) +
                Border(color = "black", position = c("LEFT","TOP", "RIGHT","BOTTOM"))

setCellStyle(cell, border_style)
Step 5: Saving the Workbook
Finally, we need to save the workbook using the saveWorkbook() function. The saveWorkbook() function takes the workbook object and the name of the workbook with ‘.xlsx’ extension as the parameters.
saveWorkbook(wb, "Workbook_name.xlsx")
Examples to add borders to Excel cells
Now let us see a few examples to add borders to Excel cells.
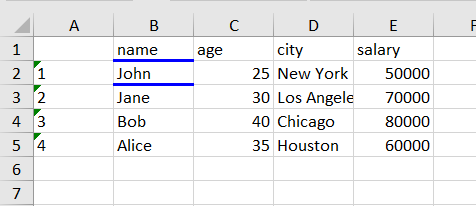
Example 1: Applying borders to a range of cells
In this example, after creating and adding the data to the workbook sheet, we used the ‘getRows()’ function to retrieve all the rows in the Excel sheet. The ‘getCells()’ function then is used to get all the columns of the rows retrieved earlier.
Then we created a new cell style using the Border() function to set the color of the borders to Black and applied border to all 4 sides of the cell by specifying the position parameter to “LEFT”, “TOP”, “RIGHT”, and “BOTTOM”. Then using the setCellStyle() function, we set the border style to all the cells in the Excel sheet. Lastly, we saved the workbook after making all the changes to it.
R
install.packages("xlsx")
library(xlsx)
mydata <- data.frame(
name = c("John", "Jane", "Bob", "Alice"),
age = c(25, 30, 40, 35),
city = c("New York", "Los Angeles", "Chicago", "Houston"),
salary = c(50000, 70000, 80000, 60000)
)
wb <- createWorkbook()
sheet <- createSheet(wb, sheetName = "MySheet")
addDataFrame(mydata, sheet, startRow = 1)
row <- getRows(sheet)
cells <- getCells(row)
style <- CellStyle(wb) +
Border(color = "black", position = c("LEFT","TOP", "RIGHT","BOTTOM"))
for(i in names(cells))
{
setCellStyle(cells[[i]], style)
}
saveWorkbook(wb, "MyWorkbook.xlsx")
|
Output:
.png)
Applying border to all the cells using the XLSX package
Example 2: Applying a border to a single cell
In this example, we applied a border to a specific cell. After creating and adding data to the worksheet, we get the row and column to which we want to apply the border using the ‘getRows()’ and ‘getCells()’ functions, respectively. In the ‘getRows()’ function, we passed the workbook sheet and the number of the row as the parameter, and in the ‘getCell()’ function we specified the row and its column number to which we want to apply the border.
Then we specified the cell border style, i.e., color to blue, border only to the “TOP” and “BOTTOM” of the cell, and increased its thickness using the ‘pen’ parameter.
R
library(xlsx)
wb <- createWorkbook()
sheet <- createSheet(wb, sheetName = "MySheet")
addDataFrame(mydata, sheet, startRow = 1)
row <- getRows(sheet,2)
cell <- getCells(row,2)
style <- CellStyle(wb) +
Border(color="black", position=c("LEFT", "TOP", "RIGHT", "BOTTOM"),
pen = "BORDER_THICK")
for(i in names(cell))
{
setCellStyle(cell[[i]], style)
}
saveWorkbook(wb, "myworkbook.xlsx")
|
Output:
Applying a border to a specific cell
Example 3: Applying a border to a Single Row
We will apply a new border to a complete row. Our sample sheet contains five rows of data including the header row. We will get the fifth row and apply a new border style with red color and a dashed border style.
R
library(xlsx)
wb<-createWorkbook()
sheet<-createSheet(wb,sheetName="MySheet")
addDataFrame(mydata,sheet,startRow=1)
row <- getRows(sheet,5)
cell <- getCells(row)
style <- CellStyle(wb) +
Border(color = "red", position = c("TOP", "LEFT", "RIGHT", "BOTTOM"),
pen = "BORDER_DASHED")
for(i in names(cell))
{
setCellStyle(cell[[i]], style)
}
saveWorkbook(wb,"myworkbook6.xlsx")
|
Output:
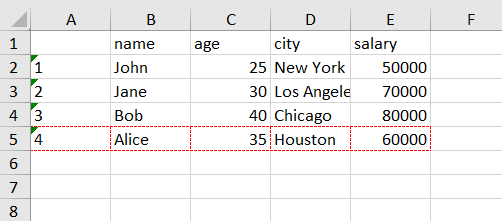
Adding a border to a single row
We have successfully added borders to all cells in our worksheet using the XLSX package in R. By formatting our spreadsheets in this way, we can make our data more visually appealing and easier to understand.
Share your thoughts in the comments
Please Login to comment...