How to Deploy ExpressJS on Netlify ?
Last Updated :
30 Apr, 2024
This guide explores the process of deploying an Express.js application on Netlify, a popular platform known for hosting web projects with ease. From understanding the basics of Express.js to configuring serverless functions on Netlify, this comprehensive guide offers step-by-step instructions in simple English, making the deployment process accessible to developers of all levels. Whether you’re a seasoned developer or just starting, this guide equips you with the knowledge and tools to deploy your Express.js application confidently and efficiently. Let’s dive in and bring your Express.js project to life on the web!
Prerequisites:
Approach:
- Make your Express.js application: Make sure your Express.js application is structured in a way that separates your server logic from your frontend code (if applicable). This typically means having your frontend code in a separate folder or repository from your backend code. Ensure that your application can run locally with a command like npm start or node server.js.
- Create serverless functions: Break down your Express.js application into individual serverless functions. Each function will handle a specific endpoint or group of related endpoints. Netlify supports serverless functions written in JavaScript/Node.js. You can create these functions in a folder named functions in your project directory.
- Configure Netlify:Sign up or log in to your Netlify account. Create a new site from your Git repository where your Express.js application resides. Netlify will detect the type of project and give you options to set up your build settings. Configure your build settings to build your frontend assets (if applicable) and deploy your serverless functions. You may need to specify the build command and the output directory for your frontend assets.
- Deploy your application: Once you’ve configured your build settings, commit and push your changes to your Git repository. Netlify will automatically trigger a new build and deploy your application. During the deployment process, Netlify will compile your serverless functions and make them available as endpoints on your Netlify site.
- Test your deployment: Once the deployment is complete, you can test your Express.js application by visiting the URLs of your serverless functions provided by Netlify. Make sure that your frontend code (if applicable) can interact with your Express.js backend through these endpoints.
- Handle environment variables: If your Express.js application relies on environment variables, you’ll need to configure them in your Netlify site settings. Netlify allows you to define environment variables through the UI or a .env file.
Steps to create the application:
Step 1: Create a Simple Express Application.
Open your terminal and type:
mkdir my-express-app
cd my-express-app

npm init -y
 npm i express netlify-cli netlify-lambda serverless-http
Create the file named netlify.toml
[build]
  functions = "functions"

[dev]
  publish = "dist"
Create the folder named dest inside make the empty index.html for the static files
Create a folder named functions inside make file named server.js in your project directory
JavaScript
const express = require('express');
const serverless = require('serverless-http');
const app = express();
const router = express.Router();
let records = [];
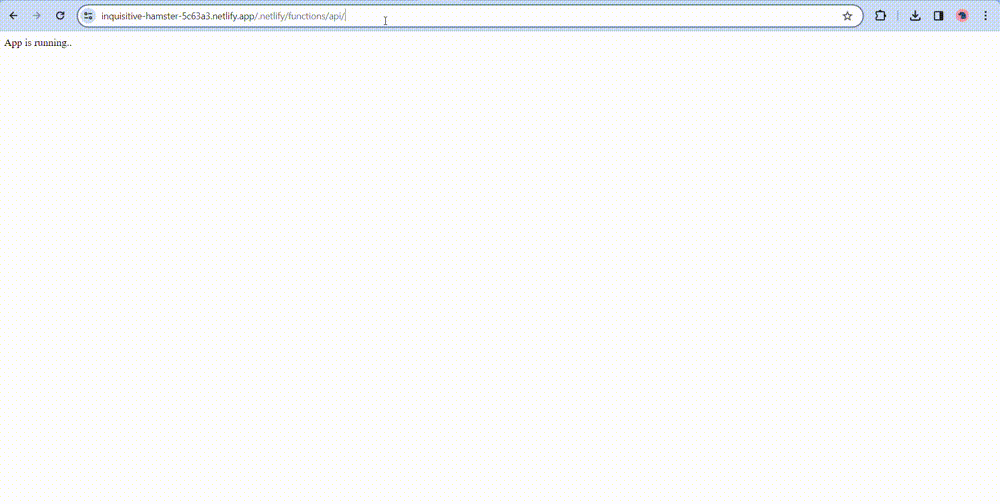
router.get('/', (req, res) => {
res.send('App is running..');
});
router.post('/add', (req, res) => {
res.send('New record added.');
});
router.delete('/', (req, res) => {
res.send('Deleted existing record');
});
router.put('/', (req, res) => {
res.send('Updating existing record');
});
router.get('/demo', (req, res) => {
res.json([
{
id: '001',
name: 'Aayush',
},
{
id: '002',
name: 'rohit',
},
{
id: '003',
name: 'Mohit',
},
]);
});
app.use('/.netlify/functions/api', router);
module.exports.handler = serverless(app);
Project folder structure:

folder structure
Step 2: Set Up Git Repository: To make our project accessible and manageable, we’ll upload it to GitHub. First, we navigate to GitHub and sign in to our account. Then, we create a new repository, naming it something like “simple-express-app”. Selecting the option to initialize the repository with a README file is optional for our purposes. Next, we follow the provided instructions to add a remote repository to our local project and push our code to GitHub. These commands, executed in the terminal, establish the connection between our local project and the GitHub repository, making our code accessible from the cloud and enabling collaboration with others. With our project now hosted on GitHub, we’re ready to proceed with deploying it on Netlify.
Step 3: Deploying Express.js Application on Netlify
- Sign in to your Netlify account (or sign up if you haven’t already) at https://app.netlify.com/login.
- Once logged in, click on the “Sites” tab in the dashboard.
- Click on the “New site from Git” button.
- Select GitHub as your continuous deployment provider and authorize Netlify to access your GitHub repositories.
- Choose the repository containing your Express.js application from the list of repositories.
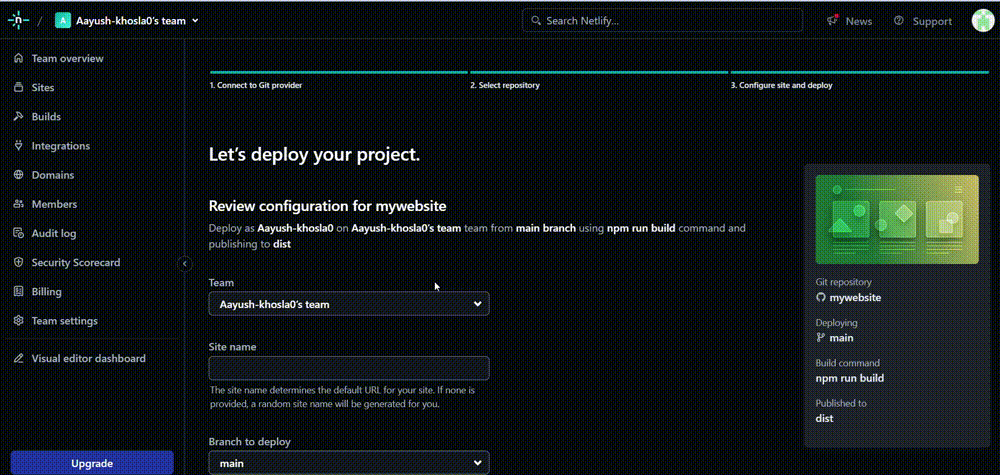
- Configure the build settings:
- Build command: npm run build
- Publish directory: (Leave this blank or specify if you have static assets to publish)
- Functions directory: functions (This is where our serverless functions will reside)
- Optionally, set environment variables if your application requires them. For example, you can set the PORT variable to the port number your Express.js server listens on.
- Click on the “Deploy site” button.
- Netlify will automatically start the deployment process. Once completed, it will provide you with a unique URL where your Express.js application is hosted.
output
Step 4: Testing the Deployment
- Open a web browser and navigate to the URL provided by Netlify after the deployment process completes.
- Once the page loads, interact with the application to ensure all features and functionality are working as intended.
- Specifically, test any endpoints or routes defined in your Express.js application to verify that they respond correctly.
- Check the browser console for any errors or warnings that may indicate issues with the deployment.
- If everything looks good, congratulations! Your Express.js application is now live on the internet.
output
Share your thoughts in the comments
Please Login to comment...