How to Create a pop up in pygame with pgu?
Last Updated :
10 Jan, 2023
In this article, we will learn about how to create a pop-up in pygame with pgu in Python.
PyGame
The pygame library is an open-source Python module designed to assist you in creating games and other multimedia applications. Pygame, which is built on top of the highly portable SDL (Simple DirectMedia Layer) development library, can run on a variety of platforms and operating systems.
Phil’s pyGame Utilities (PGU)
A collection of handy modules and scripts for PyGame. It is a simple GUI widget to be used in pygame such as text boxes, windows, buttons, etc.
pgu – modules
tileedit  -- edit tga based images
leveledit -- edit tga based levels in tile, isometric, and hexagonal formats
tganew    -- create tga files
levelfancy-- prettify your levels
gui     -- gui with standard widget, dialogs, html, connections, and themes
html    -- html rendering utilities
layout  -- layout utilities
text    -- text rendering utilities
tilevid -- sprite and tile engine
isovid  -- isometric sprite and tile engine
hexvid  -- hexagonal sprite and tile engine (alpha)
engine  -- state engine
timer   -- a timer for games with set-rate FPS
high    -- high score tracking
ani     -- animation helpers
algo    -- helpful pathfinding algorithms
fonts   -- font wrappers, bitmapped fonts
Installing pygame and pygame-pgu:
Execute the below commands in the command prompt or terminal to install the required packages.
pip install pygame
pip install pygame-pgu
A step-by-step approach for creating a popup in pygame using pgu:
Step 1: First we are importing the necessary libraries.
This GUI module will allow us to create standard widgets, dialogs, themes, etc.
Step 2: We have created a Class and passed gui.Dialog as an argument.
- The gui.Dialog will create a dialog window with a title bar and a “close” button on the bar.
- There is a constructor which accepts variable-length arguments.
- Next, we are setting the label for the pop-up box using gui.Label(“popup Box”).
- A table is created with specified width and height.
- The Second label we are creating for the Sample text in our pop-up box using gui.Label(“This is a sample pop up!”).
- A button is created using gui.Button(“OK”) and the text of the button will be Ok.
- connect(gui.CLICK,self.close,None): Connect an event code to a callback function. Note that there may be multiple callbacks per event code. When the ok button will click the class will be closed or the pop-up will disappear.
- main.tr() – Next row in the table.
- main.td(label) – Add a widget to a table after wrapping it in a TD container. Wrapping the label and the button in td container.
- In the last Initializing the constructor.
Python3
class POPDialog(gui.Dialog):
def __init__(self, value, **params):
title = gui.Label("Popup Box")
main = gui.Table(width=100, height=70)
label = gui.Label("This is a sample pop up!")
btn = gui.Button("Ok")
btn.connect(gui.CLICK, self.close, None)
main.tr()
main.td(label)
main.tr()
main.tr()
main.td(btn)
gui.Dialog.__init__(self, title, main)
|
Step 3: Main Section of the code.
- The first statement will directly run the file without import.
- The initial app is created using gui.Desktop() with the default theme.
- Quit Event and call back function app.quit will stop the execution of the application.
- In the next line, the table is created.
- After that Create the object for the class and pass the color for the theme.
- “Click me” button is created and connected with the Click event and obj.open callback function which will open the class widget or pop-up window.
- This Connection is added in our initial table row’s TD container.
- app.run() – Run an application. Automatically calls App.init and then forever loops while calling App.event and App.update
- Keyword arguments:
widget — the top-level widget to use screen — the pygame surface to render to delay — the delay between updates (in milliseconds).
Python3
if __name__ == '__main__':
app = gui.Desktop()
app.connect(gui.QUIT, app.quit, None)
c = gui.Table(width=320, height=240)
dialog = POPDialog("#00ffff")
e = gui.Button("Click Me")
e.connect(gui.CLICK, dialog.open, None)
c.tr()
c.td(e)
app.run(c)
|
Initial Application:
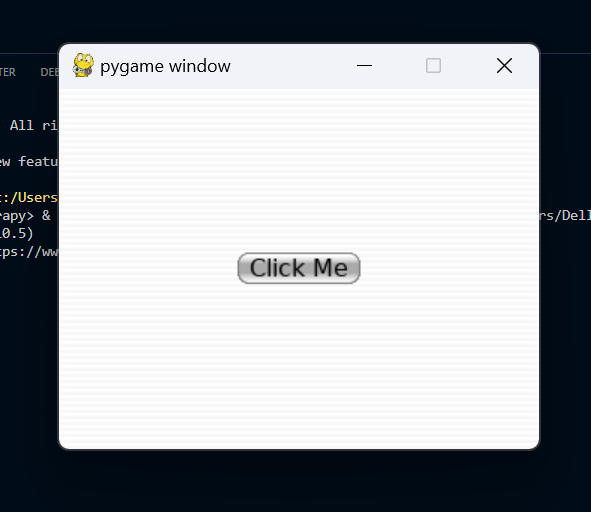
APP
When the “click me” button is pressed, a new widget appears as a popup.
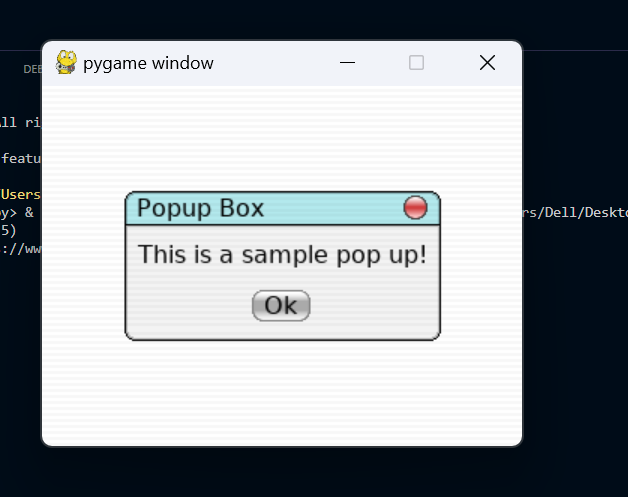
Pop up box
When the OK button is clicked, the app returns to its original state.
Initial APP
Final Code:
Python3
from pgu import gui
class POPDialog(gui.Dialog):
def __init__(self,value,**params):
title = gui.Label("Popup Box")
main = gui.Table(width= 100,height= 70)
label =gui.Label("This is a sample pop up!")
btn = gui.Button("Ok")
btn.connect(gui.CLICK, self.close, None)
main.tr()
main.td(label)
main.tr()
main.tr()
main.td(btn)
gui.Dialog.__init__(self,title,main)
if __name__ == '__main__':
app = gui.Desktop()
app.connect(gui.QUIT,app.quit,None)
c = gui.Table(width= 320,height= 240)
dialog = POPDialog("#00ffff")
e = gui.Button("Click Me")
e.connect(gui.CLICK,dialog.open,None)
c.tr()
c.td(e)
app.run(c)
|
Final Output:
Share your thoughts in the comments
Please Login to comment...