In this article, we will show you how to create a custom personalized linktree using Flutter web and then deploy it on Firebase. Linktree is a great way to organize and showcase your online presence in a single, easy-to-navigate page. With Flutter Web, you can create a beautiful and responsive linktree that looks great on any device. And with Firebase, you can easily deploy your linktree to the web and keep it up-to-date with minimal effort. A sample video is given below to get an idea about what we are going to do in this article.

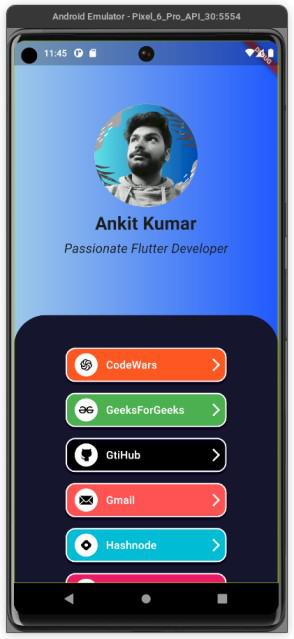
Below is what our final output will look like!
Step By Step Implementation
Step 1: Install Flutter and Flutter Web Plugins
To get started, you’ll need to have Flutter and the Flutter web plugins installed on your development environment. Flutter is a powerful open-source UI framework by Google for building natively compiled applications for mobile, web, and desktop from a single codebase. Flutter web extends this capability to create beautiful and interactive web applications.
1. Install the Flutter SDK. You can download the latest version of the Flutter SDK from the Flutter website: https://flutter.dev/docs/get-started/install.
2. Set up your development environment. You can use any IDE that supports Flutter, such as Visual Studio Code: https://code.visualstudio.com/ or Android Studio: https://developer.android.com/studio.
3. Enable web support. Run the following command in your terminal to enable web support for Flutter:
flutter config --enable-web
4. Create a new Flutter project. Run the following command to create a new Flutter project with web support:
flutter create my-project
This will create a new directory called my-project with all the necessary files for a Flutter web app.
5. Run your Flutter web app on a local development server. Run the following command to run your Flutter web app on a local development server:
flutter run -d web
This will launch your Flutter web app in a web browser.
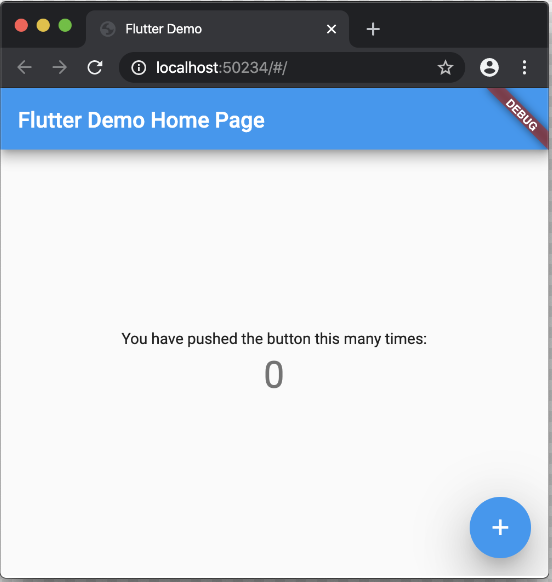
Flutter demo on web
Step 2: Create New Project & Install dependencies
Now that we have flutter installed and flutter web running then we can move ahead. You can create any project with the name of your liking or may continue on the already created demo project. I have named my project web_link.

You can take a look at the image below the see the project / folder structure.
Flder structure
So are only using one package as a depencency in this flutter web app, and that is url_launcher: ^6.1.12. To install this run the command below:
flutter pub add url_launcher
Step 3: Collect Assets
After that we need to collect all the necessery images and icons which are going to be used in our flutte app. You can find all the necessery social media icons on the gihub repo if you wish to user the same as me. All you would need is a sinle image of yours to be displayed on the app.
You need to make necessery changes in project pubspec.yaml file to make these assets recoginzable. Basically you need to add or uncomment the lines below:
  assets:
    - assets/
    - assets/png/
Make sure to use proper indentation.
Step 4: Start Coding
Now we will start coding our web app. In the main.dart file the code imports necessary dependencies, including the HomePage screen. The MyApp class, as the app’s root, configures the app’s title and theme. The theme’s primary color is set to deep purple. The app’s structure is defined using the MaterialApp widget, with a title and theme. The home screen is set to MyHomePage. This code showcases the fundamental setup of a Flutter web app, with a customized theme and a designated home page.
main.dart
Dart
import 'package:flutter/material.dart';
import 'Screens/home_page.dart';
void main() {
runApp(const MyApp());
}
class MyApp extends StatelessWidget {
const MyApp({super.key});
@override
Widget build(BuildContext context) {
return MaterialApp(
title: 'Ankit Kumar',
theme: ThemeData(
colorScheme: ColorScheme.fromSeed(seedColor: Colors.deepPurple),
useMaterial3: true,
),
home: const MyHomePage(),
);
}
}
|
Now we will code the home page of our application. First, we’ll create a `MyHomePage` widget, which is a `StatefulWidget`. Inside its state, we define the layout and components of our home page.
For responsive design, we detect whether the screen width is greater than 800 pixels to determine if it’s a desktop layout.
The `Scaffold` widget serves as the main container. Within it, we place a `Container` that covers the entire screen with a gradient background.
Inside the `Container`, we use a `Stack` to layer the content. The `Stack` contains a `Column` that holds the upper and lower sections of the page.
The upper section features an `Expanded` widget for flexible sizing. It contains a `Center` widget with a `Column` of elements: a circular avatar, the developer’s name, and a short bio. These elements are styled using various font sizes and weights.
The lower section is also wrapped in an `Expanded` widget. It’s a `Container` with a colored background, rounded top corners, and a vertical layout. Inside it, we have a `SingleChildScrollView` that contains a `Column` of social media links and icons. Depending on the screen size, either a `RowView` or `ColumnView` layout is used.
The `ColumnView` function returns a vertical arrangement of social media icons, with spacing adjusted for responsiveness.
The `RowView` function returns a horizontal arrangement of social media icons divided into two columns. Each column holds various social media links.
The `codewars`, `geeksforgeeks`, etc. are placeholders for functions or widgets that represent individual social media icons.
Finally, the `Footer` widget is placed at the bottom of the page, offering additional information or navigation.
This comprehensive code snippet constructs a responsive Flutter web page with a visually appealing layout and interactive social media links, tailored to desktop and mobile devices.
home_page.dart
Dart
import 'package:flutter/material.dart';
import 'package:web_links/widgets/animated_container.dart';
import 'package:web_links/widgets/footer.dart';
import 'package:web_links/widgets/socialCards.dart';
class MyHomePage extends StatefulWidget {
const MyHomePage({Key? key}) : super(key: key);
@override
State<MyHomePage> createState() => _MyHomePageState();
}
class _MyHomePageState extends State<MyHomePage> {
@override
Widget build(BuildContext context) {
bool isDesktop = MediaQuery.of(context).size.width > 800;
return Scaffold(
body: Container(
height: MediaQuery.of(context).size.height,
width: MediaQuery.of(context).size.width,
decoration: const BoxDecoration(
gradient: LinearGradient(
colors: [Color(0xff9dc9e9), Color(0xff2059ff)],
),
),
child: Stack(
children: [
Column(
mainAxisAlignment: MainAxisAlignment.spaceEvenly,
children: [
Expanded(
child: Padding(
padding: const EdgeInsets.only(top: 20.0),
child: Center(
child: Column(
mainAxisAlignment: MainAxisAlignment.center,
children: const [
CircleAvatar(
radius: 80,
backgroundImage: AssetImage('assets/ankit.png'),
),
SizedBox(
height: 5,
),
Text(
'Ankit Kumar',
style: TextStyle(
fontWeight: FontWeight.bold,
fontSize: 28,
),
),
SizedBox(
height: 5,
),
Text(
'Passionate Flutter Developer',
style: TextStyle(
fontWeight: FontWeight.w400,
fontStyle: FontStyle.italic,
fontSize: 20,
),
),
],
),
),
),
),
const SizedBox(
height: 10,
),
Expanded(
child: Container(
width: MediaQuery.of(context).size.width,
decoration: const BoxDecoration(
color: Color(0xff171430),
shape: BoxShape.rectangle,
borderRadius: BorderRadius.vertical(
top: Radius.circular(50.0),
),
),
child: SingleChildScrollView(
child: Column(
children: [
Center(
child: isDesktop ? RowView() : ColumnView(),
),
Footer(),
],
),
),
),
),
],
),
],
),
),
);
}
Column ColumnView() {
return Column(
mainAxisAlignment: MainAxisAlignment.center,
children: [
SizedBox(height: MediaQuery.of(context).size.height * 0.06),
codewars(),
geeksforgeeks(),
github(),
gmail(),
hashnode(),
instagram(),
playstore(),
portfolio(),
resume(),
twitter(),
whatsapp(),
youtube(),
SizedBox(height: MediaQuery.of(context).size.height * 0.05),
],
);
}
Row RowView() {
return Row(
mainAxisAlignment: MainAxisAlignment.center,
crossAxisAlignment: CrossAxisAlignment.center,
children: [
Column(
children: [
SizedBox(
height: MediaQuery.of(context).size.height * 0.05,
),
codewars(),
geeksforgeeks(),
github(),
gmail(),
hashnode(),
instagram(),
],
),
SizedBox(width: MediaQuery.of(context).size.width * 0.05),
Column(
children: [
SizedBox(
height: MediaQuery.of(context).size.height * 0.05,
),
playstore(),
portfolio(),
resume(),
twitter(),
whatsapp(),
youtube(),
],
),
],
);
}
}
|
Now, let’s dive into the code for the social cards. These are functions that return instances of the `CustomAnimatedContainer` widget, each representing a social media link.
**Resume:**
This function creates a social card for the developer’s latest resume. It has an orange container color, an image representing a resume, and a link to view the resume on Google Drive.
**Portfolio:**
This function creates a social card for the developer’s portfolio. It has a deep purple container color, an image representing a portfolio, and a link to the developer’s portfolio website.
**Twitter:**
This function creates a social card for the developer’s Twitter profile. It has a light blue container color, an image representing Twitter, and a link to the developer’s Twitter account.
**GitHub:**
This function creates a social card for the developer’s GitHub profile. It has a dark gray container color, an image representing GitHub, and a link to the developer’s GitHub repository.
**LinkedIn:**
This function creates a social card for the developer’s LinkedIn profile. It has a blue container color, an image representing LinkedIn, and a link to the developer’s LinkedIn page.
**Instagram:**
This function creates a social card for the developer’s Instagram profile. It has a pink container color, an image representing Instagram, and a link to the developer’s Instagram account.
**YouTube:**
This function creates a social card for the developer’s YouTube channel. It has a red container color, an image representing YouTube, and a link to the developer’s YouTube channel.
**Hashnode:**
This function creates a social card for the developer’s Hashnode blog. It has a cyan container color, an image representing Hashnode, and a link to the developer’s Hashnode blog.
**Gmail:**
This function creates a social card for the developer’s Gmail address. It has a red accent container color, an image representing Gmail, and a link to compose an email to the developer.
**GeeksForGeeks:**
This function creates a social card for the developer’s GeeksForGeeks profile. It has a green container color, an image representing GeeksForGeeks, and a link to the developer’s GeeksForGeeks articles.
**CodeWars:**
This function creates a social card for the developer’s CodeWars profile. It has a deep orange container color, an image representing CodeWars, and a link to the developer’s CodeWars profile.
**PlayStore:**
This function creates a social card for the developer’s app on the Play Store. It has a light blue accent container color, an image representing the Play Store, and a link to the developer’s app on the Play Store.
**WhatsApp:**
This function creates a social card for the developer’s WhatsApp contact. It has a green container color, an image representing WhatsApp, and a link to the developer’s WhatsApp contact.
These functions provide a consistent and reusable way to generate social media cards with various designs and links, enhancing the interactivity and aesthetics of the Flutter web app.
socialCards.dart
Dart
import 'package:flutter/material.dart';
import 'package:web_links/widgets/animated_container.dart';
CustomAnimatedContainer resume() {
return CustomAnimatedContainer(
containerColor: Color.fromARGB(255, 245, 176, 3),
borderColor: Color.fromARGB(
255, 245, 176, 3),
imagePath: 'assets/png/resume.png',
text: 'Latest Resume',
linkUrl:
);
}
CustomAnimatedContainer portfolio() {
return CustomAnimatedContainer(
containerColor: Colors.deepPurpleAccent,
borderColor: Colors.deepPurpleAccent,
imagePath: 'assets/png/portfolio.png',
text: 'Portfolio',
}
CustomAnimatedContainer twitter() {
return CustomAnimatedContainer(
containerColor: Colors.lightBlue,
borderColor: Colors.lightBlue,
imagePath: 'assets/png/twitter.png',
text: 'Twitter',
}
CustomAnimatedContainer github() {
return CustomAnimatedContainer(
containerColor: Colors.black38,
borderColor: Colors.black38,
imagePath: 'assets/png/github.png',
text: 'GtiHub',
}
CustomAnimatedContainer linkedin() {
return CustomAnimatedContainer(
containerColor: Colors.blueAccent,
borderColor: Colors.blueAccent,
imagePath: 'assets/png/linkedin.png',
text: 'LinkedIn',
}
CustomAnimatedContainer instagram() {
return CustomAnimatedContainer(
containerColor: Colors.pink,
borderColor: Colors.pink,
imagePath: 'assets/png/instagram.png',
text: 'Instagram',
);
}
CustomAnimatedContainer youtube() {
return CustomAnimatedContainer(
containerColor: Colors.red,
borderColor: Colors.red,
imagePath: 'assets/png/youtube.png',
text: 'YouTube',
);
}
CustomAnimatedContainer hashnode() {
return CustomAnimatedContainer(
containerColor: Colors.cyan,
borderColor: Colors.cyan,
imagePath: 'assets/png/hashnode.png',
text: 'Hashnode ',
);
}
CustomAnimatedContainer gmail() {
return CustomAnimatedContainer(
containerColor: Colors.redAccent,
borderColor: Colors.redAccent,
imagePath: 'assets/png/gmail.png',
text: 'Gmail',
linkUrl: 'mailto:ankit.k.j1999@gmail.com',
);
}
CustomAnimatedContainer geeksforgeeks() {
return CustomAnimatedContainer(
containerColor: Colors.green,
borderColor: Colors.green,
imagePath: 'assets/png/geeksforgeeks.png',
text: 'GeeksForGeeks',
);
}
CustomAnimatedContainer codewars() {
return CustomAnimatedContainer(
containerColor: Colors.deepOrange,
borderColor: Colors.black,
imagePath: 'assets/png/codewars.png',
text: 'CodeWars',
);
}
CustomAnimatedContainer playstore() {
return CustomAnimatedContainer(
containerColor: Colors.lightBlueAccent,
borderColor:
Colors.lightBlueAccent,
imagePath: 'assets/png/playstore.png',
text: 'PlayStore',
linkUrl:
);
}
CustomAnimatedContainer whatsapp() {
return CustomAnimatedContainer(
containerColor: Colors.green,
borderColor: Colors.green,
imagePath: 'assets/png/whatsapp.png',
text: 'WhatsApp',
);
}
|
Now, we shall see the code for the CustomAnimatedContainer baiscally it is the widget which is used as the instance for each social media function above. The code below defines a `CustomAnimatedContainer` widget, which is a stateful widget. This widget is designed to create interactive animated containers representing social media links. It takes several parameters for customization: `containerColor` (background color), `borderColor`, `imagePath` (path to the image), `text` (displayed text), and `linkUrl` (URL to be opened when clicked).
The `_CustomAnimatedContainerState` class manages the state of the widget. It has a `_isHovered` boolean variable to keep track of whether the container is being hovered over by the mouse.
In the `build` method, the widget renders a `Container` that enforces minimum height and width constraints and adds a bottom margin. The `InkWell` widget wraps the content of the container and handles the tap action to open the specified `linkUrl` in a browser.
Inside the `InkWell`, the `MouseRegion` widget tracks mouse enter and exit events to update the `_isHovered` state. When the mouse enters the container, `_isHovered` is set to `true`, and when it exits, `_isHovered` is set to `false`.
The `AnimatedContainer` within the `MouseRegion` is where the visual representation of the social media link is created. It changes appearance smoothly when `_isHovered` changes. It has a dynamic width and height based on the screen size. It also has a background color defined by `containerColor`, a rounded corner, and a border that changes color based on `_isHovered`. A subtle shadow is added for depth.
The content of the container is composed of a `Row` with three main elements:
1. An `Image.asset` widget displaying the social media icon. The size of the icon is based on the screen size.
2. A `Text` widget displaying the `text` of the link, with white color, font weight, and font size based on the screen size.
3. An `AnimatedSwitcher` that shows different icons depending on `_isHovered`. It either displays a “touch” icon or an arrow icon.
The code creates a highly customizable, interactive, and visually appealing social media link container that smoothly transitions between states when hovered over or clicked, enhancing the user experience of the Flutter web app.
animated_container.dart
Dart
import 'package:flutter/material.dart';
import 'package:url_launcher/url_launcher.dart';
class CustomAnimatedContainer extends StatefulWidget {
final Color containerColor;
final Color borderColor;
final String imagePath;
final String text;
final String linkUrl;
CustomAnimatedContainer({
required this.containerColor,
required this.borderColor,
required this.imagePath,
required this.text,
required this.linkUrl,
});
@override
_CustomAnimatedContainerState createState() =>
_CustomAnimatedContainerState();
}
class _CustomAnimatedContainerState extends State<CustomAnimatedContainer> {
bool _isHovered = false;
@override
Widget build(BuildContext context) {
return Container(
constraints: BoxConstraints(
minHeight: 50,
minWidth: 250,
),
margin:
EdgeInsets.only(bottom: MediaQuery.of(context).size.height * 0.02),
child: InkWell(
onTap: () {
launch(widget.linkUrl);
},
child: MouseRegion(
onEnter: (_) {
setState(() {
_isHovered = true;
});
},
onExit: (_) {
setState(() {
_isHovered = false;
});
},
child: AnimatedContainer(
duration: Duration(milliseconds: 400),
height: MediaQuery.of(context).size.height * 0.063,
width: MediaQuery.of(context).size.width * 0.13,
decoration: BoxDecoration(
color: widget.containerColor,
borderRadius: BorderRadius.circular(15),
border: Border.all(
color: _isHovered ? widget.borderColor : Colors.white,
width: 2,
),
boxShadow: [
BoxShadow(
color: Colors.black.withOpacity(0.5),
spreadRadius: 1,
blurRadius: 5,
offset: const Offset(0, 3),
),
],
),
child: Row(
mainAxisAlignment: MainAxisAlignment.spaceEvenly,
children: [
Expanded(
flex: 3,
child: Container(
padding: EdgeInsets.all(1),
decoration: BoxDecoration(
shape: BoxShape.circle,
color: Colors.white,
),
child: Image.asset(
widget.imagePath,
height: MediaQuery.of(context).size.height * 0.04,
width: MediaQuery.of(context).size.width * 0.04,
),
),
),
SizedBox(
width: MediaQuery.of(context).size.width * 0.002,
),
Expanded(
flex: 8,
child: Text(
widget.text,
style: TextStyle(
color: Colors.white,
fontWeight: FontWeight.w500,
fontSize: MediaQuery.of(context).size.height * 0.02,
),
),
),
AnimatedSwitcher(
duration: Duration(milliseconds: 400),
child: _isHovered
? Icon(
Icons.touch_app_outlined,
key: ValueKey<bool>(_isHovered),
color: Colors.white,
)
: Icon(
Icons.arrow_forward_ios,
key: ValueKey<bool>(_isHovered),
color: Colors.white,
),
),
SizedBox(
width: MediaQuery.of(context).size.width * 0.005,
),
],
),
),
),
),
);
}
}
|
We had also used a widget instance called Footer on our home page, so we shall see how its code looks like. The code defines a Footer widget for a Flutter web app. It features clickable icons and links. The _FooterState class manages its state, tracking hover and containing a GitHub repository URL.
In the build method, an InkWell widget handles taps and hover events. Icons change color on hover. The footer displays “Made with” text, icons, and the developer’s name.
The _launchUrl function launches URLs using url_launcher, handling launch success and errors. This interactive footer enhances user experience, providing GitHub attribution and easy URL access.
footer.dart
Dart
import 'package:flutter/material.dart';
import 'package:url_launcher/url_launcher.dart' as url_launcher;
class Footer extends StatefulWidget {
@override
_FooterState createState() => _FooterState();
}
class _FooterState extends State<Footer> {
bool isHovered = false;
@override
Widget build(BuildContext context) {
return InkWell(
onTap: () {
_launchUrl(Uri.parse(url));
},
onHover: (value) {
setState(() {
isHovered = value;
});
},
child: Container(
margin: EdgeInsets.only(top: 20, bottom: 20),
child: Row(
mainAxisAlignment: MainAxisAlignment.center,
children: [
_buildIcon(Icons.devices, isHovered),
SizedBox(width: 5),
Text(
'Made with',
style: TextStyle(
color: Colors.white,
fontSize: 16,
fontWeight: FontWeight.bold,
),
),
SizedBox(width: 5),
_buildIcon(Icons.star, isHovered),
SizedBox(width: 5),
Text(
'Flutter by Ankit Kumar',
style: TextStyle(
color: Colors.white,
fontSize: 16,
fontWeight: FontWeight.bold,
),
),
],
),
),
);
}
Widget _buildIcon(IconData icon, bool isHovered) {
return Icon(
icon,
color: isHovered ? Colors.amber : Colors.white,
);
}
void _launchUrl(Uri url) async {
if (await url_launcher.canLaunch(url.toString())) {
await url_launcher.launch(url.toString());
} else {
throw 'Could not launch $url';
}
}
}
|
Now that we are done we can use the command below to check our app, and before doing so select the device as chrome or any other browser. But you can also check it on mobile device.
flutter run -v
Testing app on android emulator
To make a build compatible for web i.e. flutter web use the command below:
flutter build web --release -v
You can see the file in the build folder in which would contain a folder named web. This is the content that will be uploaded on firebase.
Step 5: Firebase Deplpyment
Here I will give a quick overview of how to deplow the app we have created on firebase hosting. But for more detaild you can check out this article here: Hosting Flutter Website On Firebase For Free
1. Create a new project on firebae console.

2. Register the app using the preffered methed. I my case I have simply used the method of adding a script in my index.htmk file.
3. Install firebase cli using the command command:
npm install -g firebase-tools
Just make sure you need to have proper version of node installed on your system.
4. Initiate firebase by using below command but belore that make sure you are loggen in to firebase with the correct credentials:
firebase login // login
firebase init // starting services
Choose hosting with spacebar and move forward with the project that you just created. It will ask to create a pubic folder and we need to put all the content of the flutter web build in this.
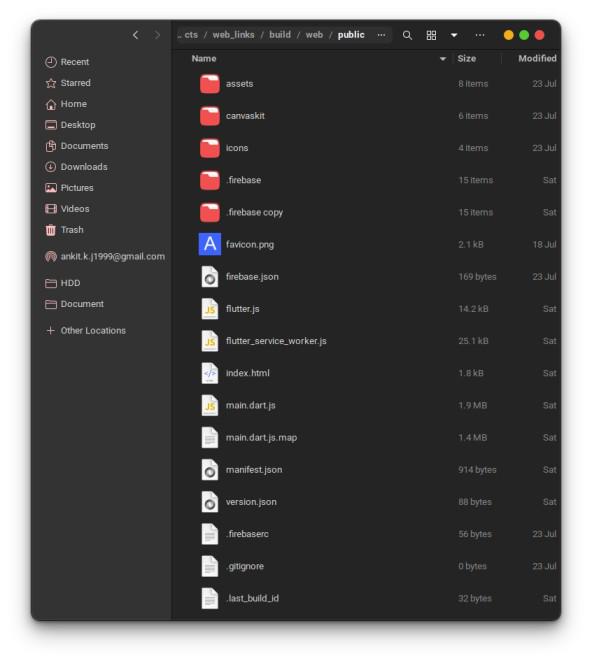
public folder content
And use the command below the deploy it to the firebase. When successful it would give you the url where you can asses that!
firebase deploy --only ankit-kumar-weblinks // user your own project ID

deployed!
Its all done! Now its the time to flaunt your newly custom created webliks with flutter! Enjoy!
Share your thoughts in the comments
Please Login to comment...