React, a popular library built on top of javascript was developed by Facebook in the year 2013. Over the coming years, React gained immense popularity to emerge as one of the best tools for developing front-end applications. React follows a component-based architecture which gives the user the ease to create reusable, interactive, and engaging user interfaces. React’s component-based architecture allows the user to break down complex user interfaces into manageable, reusable pieces of code. Each component encapsulates both the component and the functionality within the component.
In ReactJS, the flexibility it possesses is not only restricted to generating static interfaces but also extends to the designing of dynamic interfaces. Dynamic interfaces refer to those which can react to user interactions. Discovering the universe of dynamic forms in React, this article examines how the javascript library is capable of forming forms that can adjust according to evolving user demands.
What is Dynamic Forms in React?
First, let’s revisit static forms before diving into Dynamic Forms. Static forms have a fixed structure of elements that remain consistent regardless of user input. They are suitable when gathering information that remains the same, such as collecting a user’s name and age. However, due to their limited adaptability, static forms can sometimes be insufficient when dealing with varying user inputs.
Dynamic forms have the flexibility to adjust and modify based on user interactions. Users can add fields, change field types, and customize the form layout as needed. This adaptability makes dynamic forms highly effective when the type of form fields may vary depending on user requirements.
Now that we have got a basic understanding of what dynamic forms are, let’s go over the practical approach by creating a simple dynamic form with React.
Creating a Dynamic Form in React
Creating a dynamic form involves working with application states and rendering.
1. Requirements
To follow along, you will need npm and Node.js installed on your computer.
2. Setting Up the Application
In your working directory create a new React application with the following command:
npx create-react-app gfg-dynamic-form
The above command will load a basic project template which will lay a foundation for our application. Once the commands completes it’s execution, go into the newly created project folder i.e. “gfg-dynamic-form“, and open the project in your favorite code editor, eg. VS code.
cd gfg-dynamic-form
3. Setting Up the Form Component
In the ./src folder of the application, create a new file called TodosForm.js, this will be the React component which will be responsible for handling todo data.
Javascript
import { useState } from "react";
function TodoForm() {
const [todos, setTodos] = useState([{ name: "", label: "" }]);
const handleTodoChange = (e, i) => {
};
const handleAddTodo = () => {
};
const handleDeleteTodo = (i) => {
};
const handleSubmit = (event) => {
event.preventDefault();
console.log(todos);
setTodos([]);
};
return (
<form onSubmit={handleSubmit}>
{todos.map((todo, index) => (
<div key={index}>
<input
type="text"
placeholder="Name"
name="name"
value={todo.name}
onChange={(e) => handleTodoChange(e, index)}
required
/>
<select
value={todo.label}
name="label"
onChange={(e) => handleTodoChange(e, index)}
required
>
<option value="">label</option>
<option value="important">Important</option>
<option value="not-important">Not Important</option>
</select>
<button onClick={() => handleDeleteTodo(index)}>Delete</button>
</div>
))}
<button onClick={handleAddTodo}>Add Todo</button>
<button type="submit">Submit Todos</button>
</form>
);
}
export default TodoForm;
|
In the above implementation, the code provided creates a user interface that allows users to add their todo item using a form. It utilizes React’s useState hook to store an array of todo objects with their respective name and corresponding label. To update todo data, the input fields trigger the handleTodoChange() function, passing an index parameter to specify which todo’s information needs updating. If a new todo should be added, handleAddTodo() would be responsible for adding an empty entry for the new todo. In the same way, handleDeleteTodo() will be responsible for removing a todo record based on the given index. Once the form is submitted, handleSubmit() executes additional operations, in this case we will try to make it simple by just logging the data to the console window. The JSX code generates input fields for each todo and includes buttons to add or delete todos and submit their data.
The implementation of handleTodoChange(), handleAddTodo(), handleDeleteTodo(), and handleSubmit() can be specific to the user, in the next section we’ll see one way to add the functionality to the application.
4. Setting up Dynamic Functionality
Now in the same file, create functions for implementing the Addition, Deletion, and Modification of todos.
Javascript
import { useState } from "react";
function TodoForm() {
const [todos, setTodos] = useState([{ name: "", label: "" }]);
const handleTodoChange = (e, i) => {
const field = e.target.name;
const newTodos = [...todos];
newTodos[i][field] = e.target.value;
setTodos(newTodos);
};
const handleAddTodo = () => {
setTodos([...todos, { name: "", label: "" }]);
};
const handleDeleteTodo = (i) => {
const newTodos = [...todos];
newTodos.splice(i, 1);
setTodos(newTodos);
};
const handleSubmit = (event) => {
event.preventDefault();
console.log(todos);
setTodos([]);
};
return (
...
);
}
export default TodoForm;
|
The above section defines different functionalities, let’s see each one of them one by one,
A. handleTodoChange()
This function is triggered whenever a user makes changes to any of the input fields. It takes two parameters: the event object ‘e‘, which provides information about the change event, and the index ‘i’ of the todo that needs to be updated. The function first retrieves the field name from the event object’s name attribute. Then, it creates a copy of the todo’s array using the spread operator. This copy ensures that we do not directly modify the original array. Next, it updates the specific property of the individual todo with the new value obtained from the event object. Finally, it applies these changes by setting state with setTodos() which allows for appropriate updates to be reflected in our application.
B. handleAddTodo()
This function is triggered whenever a user clicks on the ‘Add Todo’. It does not take any parameter. The function creates a new object with empty name and label property. Then, the spread operator is used to create a new array with the new empty object appended to it. Finally, it applies these changes by setting state with setTodos() which allows for appropriate updates to be reflected in our application.
C. handleDeleteTodo()
This function is triggered when the user clicks on the ‘Delete’ button. It takes only one parameters: the index ‘i’ of the todo that needs to be deleted. Then, it creates a copy of the todo’s array using the spread operator. This copy ensures that we do not directly modify the original array. The splice() method is then used to delete the todo at the specified index. Finally, it applies these changes by setting state with setTodos() which allows for appropriate updates to be reflected in our application.
D. handleSubmit()
This function is triggered when the form is submitted when the user hits the ‘Submit Todos’ button. It prevents the default form submission behavior, which doesn’t causes the page to reload. The console displays the current todo’s array and shows the entered todo’s list. After submission, the form is cleared by setting the todo’s state to an empty array.
5. Integrating the Component
Once you have the component ready, add it to the App.js file.
Javascript
import React from 'react';
import './App.css';
import TodosForm from './TodosForm';
function App() {
return (
<div className="App">
<h1>Dynamic Todo List</h1>
<TodosForm />
</div>
);
}
export default App;
|
6. Dynamic Form is Ready Now!
You should see the form rendered in the image below.
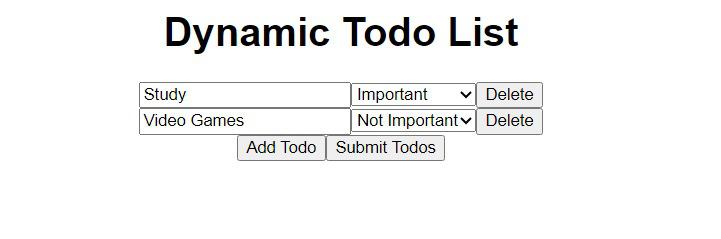
Todo List UI
You should see the below output logged into the console, once you hit the submit button
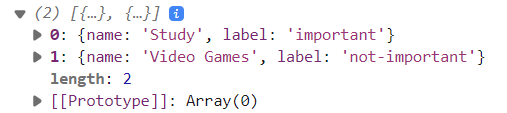
output
Congratulations! You now have a fully functional dynamic form at your disposal. This form showcases the power of React’s component-based structure and state management, ensuring a seamless and engaging user experience.
To further enhance the appearance of your application, you can apply various styling techniques such as CSS and bootstrap. This will give your todos a visually appealing and polished look.
Advantages of Dynamic Form in React
1. Flexibility
Dynamic forms are versatile and can be tailored to various applications, including surveys with branching logic or multi-step operations. These forms easily adapt to changing data requirements and user scenarios, enhancing their usability.
2. Efficiency
Dynamic forms make data entry more efficient by displaying only the relevant fields to users, reducing both the time and effort required.
3. User Engagement
Interfaces that respond to user activities tend to increase engagement, resulting in higher completion rates and overall user satisfaction.
4. Personalization
When interfaces respond to users’ specific actions, it increases engagement and satisfaction, leading to higher completion rates
5. Clean Interface
Dynamic forms simplify the user experience by presenting only the relevant fields based on their specific context. This approach helps create a clean and well-organized interface.
Conclusion
In this article, you have learned how to create dynamic forms using React. By utilizing the power of component-based architecture, implementing hooks, and leveraging other commonly used utilities provided by React, you can easily create these forms with just a few simple steps. How cool is that!
Adding dynamic forms into your ReactJS applications provides a layer of interactivity, which enables you to create personalized and efficient user experiences. They allow you to design forms that respond to user preferences and data needs. Whether you’re working on a contact form or a complex data collecting tool leveraging state management and conditional rendering can greatly enhance the usability and engagement of your applications. By customizing the layout and fields of your forms based on user interactions you can create a amazing experience, for your users.
FAQs: How to Create Dynamic Forms in React
1. How do dynamic forms differ from static forms?
Dynamic forms adapt and change based on user interactions, while static forms have a fixed layout. Dynamic forms enhance user experience by tailoring the form fields to individual needs, reducing clutter and improving efficiency.
2. Can I add further functionality to the dynamic form implemented here?
To enhance the forms functionality you can incorporate features like input validation, real time error feedback and local storage or API data transfer. With Reacts flexibility you have the freedom to customize the form according to your applications requirements.
3. Is React the only option for building dynamic forms?
No! React is not the only choice when it comes to developing forms. While React is renowned for its component based architecture and efficient state management system there are libraries and frameworks available that offer capabilities such, as Angular or VueJS.
Share your thoughts in the comments
Please Login to comment...