How to Add a @tailwind CSS Rule for CSS Checker ?
Last Updated :
21 Jun, 2023
Tailwind CSS is basically a Utility first CSS framework for building rapid custom UI. It is a highly customizable, low-level CSS framework that gives you all of the building blocks that you need. Also, it is a cool way to write inline styling and achieve an awesome interface without writing a single line of your own CSS.
In this article, we will explore how to add a tailwind CSS rule to a CSS checker which will help developers to check their Tailwind CSS code.
The CSS checkers are the tools that help developers to help identify and fix errors in their CSS code.
There are 2 approaches to including the @tailwind CSS rule in the CSS checker:
- By implementing the custom plugins
- By implementing the manual configuration
We will explore both approaches, along with understanding their implementation through the illustration.
Approach 1: Using custom plugins
CSS checkers like Stylelint support custom plugins. By creating a custom plugin you can extend the existing checker’s functionality to include Tailwind CSS rules.
Steps to Install & Configure the Stylelint:
Step 1: Create a new npm project. Run the following command to initialize a new npm project.
npm init -y
Step 2: Install Stylelint
npm install stylelint --save-dev
Step 3: Create a new JavaScript file for your custom plugin and add your custom Stylelint plugin code.
Javascript
const stylelint = require('stylelint');
const { ruleMessages, validateOptions } = stylelint.utils;
const ruleName = 'custom-plugin/no-invalid-classes';
const messages = ruleMessages(ruleName, {
invalidClass: (className) => `Invalid class: ${className}`,
});
const plugin = stylelint.createPlugin(ruleName,
(const stylelint = require('stylelint'));
const { ruleMessages, validateOptions } = stylelint.utils;
const ruleName = 'custom-plugin/no-invalid-classes';
const messages = ruleMessages(ruleName, {
invalidClass: (className) => `Invalid class: ${className}`,
});
const plugin = stylelint.createPlugin(ruleName,
(enabled, options) => {
return (root, result) => {
root.walkRules((rule) => {
const classNames = rule.selector.split('.').slice(1);
classNames.forEach((className) => {
if (className.startsWith('invalid-')) {
stylelint.utils.report({
ruleName,
result,
node: rule,
message: messages.invalidClass(className),
});
}
});
});
};
});
plugin.ruleName = ruleName;
plugin.messages = messages;
module.exports = plugin;, options) => {
return (root, result) => {
root.walkRules((rule) => {
const classNames = rule.selector.split('.').slice(1);
classNames.forEach((className) => {
if (className.startsWith('invalid-')) {
stylelint.utils.report({
ruleName,
result,
node: rule,
message: messages.invalidClass(className),
});
}
});
});
};
});
plugin.ruleName = ruleName;
plugin.messages = messages;
module.exports = plugin;
|
Step 4: Create a Stylelint configuration file called “.stylelintrc.js” and add the following code to configure Stylelint to use your custom plugin.
Javascript
module.exports = {
plugins: ['./custom-plugin.js'],
rules: {
'custom-plugin/no-invalid-classes': true,
},
};
|
Step 5: Open cmd and run the following command to lint your CSS using stylelint.
npx stylelint yourcssfilelicaton
Example: This is the basic example that illustrates including the @tailwind CSS rule to CSS checker to check the error in the Tailwind code.
Step 1: Write your HTML and CSS code.
HTML
<html>
<head>
<meta charset="UTF-8">
<title>Custom plugin</title>
<link rel="stylesheet"
href="styles.css">
</head>
<body>
<h1 class="valid-class">
Valid Heading
</h1>
<p class="invalid-class">
Invalid Paragraph
</p>
</body>
</html>
|
CSS
.valid-class {
color: blue;
}
.invalid-class {
color: red;
}
|
Step 2: Run Stylelint
npx stylelint styles.css
Output:

Approach 2: Using manual configuration
Some CSS checkers allow configuring custom rules through a configuration file. You can define the @tailwind CSS rules within the configuration file specifying the valid class names, properties, and values that should pass the validation.
Steps to Install & Configure manually:
Step 1: Create a new npm project. Run the following command to initialize a new npm project.
npm init -y
Step 2: Install ESlint and the ESlint plugin for Tailwind CSS.
npm install eslint eslint-plugin-tailwindcss --save-dev
Step 3: Make an ESlint configuration file called “.eslintrc.js” in your project directory and add your tailwind-specific rules inside it.
Javascript
module.exports = {
plugins: ['tailwindcss'],
rules: {
'tailwindcss/no-invalid-classes': 'error',
},
};
|
Step 4: Finally Run the ESlint using this command
npx eslint --ext .css yourcssfilelocation
Example: This is another example that illustrates adding the @tailwind CSS rule to CSS checker by configuring manually.
Step 1: Write your HTML and CSS code
HTML
<!DOCTYPE html>
<html>
<head>
<link rel="stylesheet"
href="styles.css">
</head>
<body>
<h1 class="text-center font-bold">Hello</h1>
<div class="bg-blue-500">
<p class="invalid-class">This class is not valid.</p>
</div>
</body>
</html>
|
CSS
.invalid-class {
color: red;
}
|
Step 2: Run ESlint
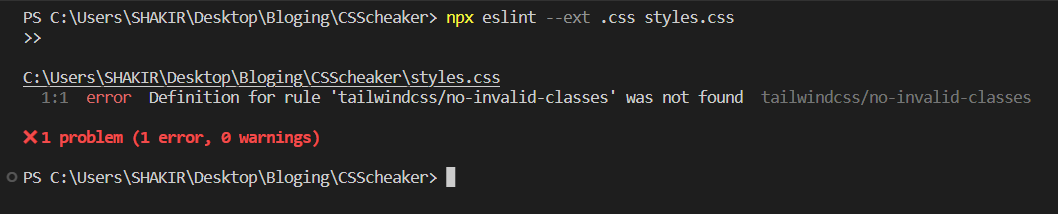
npx eslint --ext .css styles.css
Output:
Share your thoughts in the comments
Please Login to comment...