How to add a button to an image using CSS ?
Last Updated :
10 Jan, 2024
In the article, we will explore how to add a button to an image using CSS. Adding a button to an image is often used to create an overlay effect to a button on an image that provides an interactive and engaging layout on a webpage. We can achieve this effect with the combination of various CSS Properties including position relative and position absolute. Use right, left, top, and bottom to define button position.
Using Properties Position, Bottom, and Right
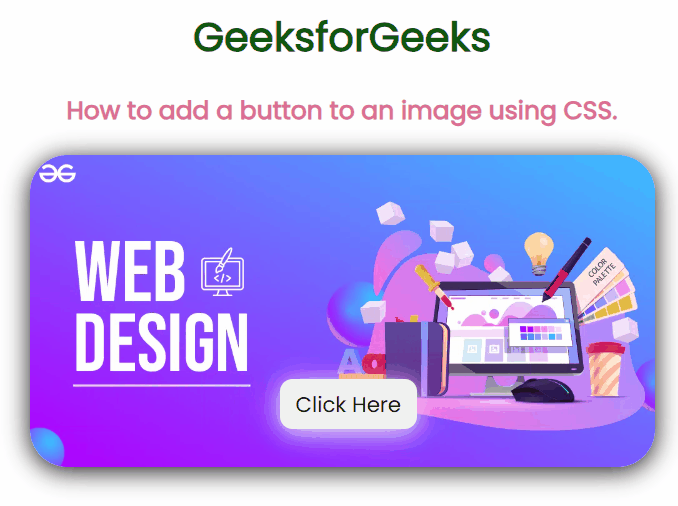
It utilizes the properties position: absolute, bottom: 0, and right: 0 to place a button at the bottom right corner of an image. It offers a clean and integrated visual design, and the values can be adjusted to position the button differently on the image.
Approach
- Make the basic structure of the web page using
<h1> heading, a paragraph <p>, and an image <img> within a container div having class named "imgbox".
- A button with the class name
mybtn is added to the image container. Set the universal selector (*) to include the Google font, box-sizing, and zero margins and padding.
- Now make element having a class name
.imgbox is styled to the position relative to its container and set its width.
- Give button the class name “
.mybtn" and set the position absolute at the bottom-right corner of the image, styled with border radius, font size, and box shadow.
Example: In this example, we will see how to add a button to an image using CSS.
HTML
<!DOCTYPE html>
<html lang="en">
<head>
<meta charset="UTF-8">
<meta name="viewport" content="width=device-width,
initial-scale=1.0">
<title>Button to an image</title>
<link rel="stylesheet"
href="index.css">
</head>
<body>
<div class="box1">
<div class="box">
<h1>GeeksforGeeks</h1>
<p>
How to add a button to
an image using CSS.
</p>
<div class="imgbox">
<img src=
alt="gfg">
<button class="mybtn">
Click Here
</button>
</div>
</div>
</div>
</body>
</html>
|
CSS
@import url(
* {
font-family: 'Poppins', sans-serif;
box-sizing: border-box;
margin: 0;
padding: 0;
}
.imgbox {
position: relative;
width: 500px;
}
.mybtn {
position: absolute;
bottom: 20px;
right: 20px;
width: 110px;
height: 40px;
border-radius: 20px;
font-size: 15px;
border: none;
box-shadow: rgba(242, 242, 242) 0px 3px 20px;
transition: 0.3s linear;
font-weight: 700;
}
.mybtn:hover {
transform: translateY(5px);
}
img {
width: 500px;
margin: 0;
padding: 0;
border-radius: 30px;
box-shadow: rgb(21, 20, 20) 0px 3px 20px;
}
h1 {
color: rgb(16, 87, 16);
text-align: center;
margin-bottom: 20px;
}
p {
font-size: 20px;
color: palevioletred;
font-weight: 700;
text-align: center;
margin-bottom: 20px;
}
.box1 {
display: flex;
justify-content: center;
align-items: center;
height: 100vh;
}
|
Output:

Using Properties Position, Top, and Left
In this method we will use position property of CSS with top and left property to set the position of button on the image.We will use top:70% and left:40%.
Approach
- Make the basic structure of the web page using
<h1> heading, a paragraph <p>, and an image <img> within a container div having class named "imgbox".
- A button with the class name
mybtn is added to the image container. Set the universal selector (*) to include the Google font, box-sizing, and zero margins and padding.
- The element having a class name
.imgbox is styled to position it relative to its container and set its width.
- The button having class name “
.mybtn" is setting the position absolute with property top 70% and left 40% of the image, styled with border-radius, font size, and box shadow.
Example: In this example we will see how to add a button to an image using CSS.
HTML
<!DOCTYPE html>
<html lang="en">
<head>
<meta charset="UTF-8">
<meta name="viewport" content="width=device-width,
initial-scale=1.0">
<title>Button to an image</title>
<link rel="stylesheet"
href="index.css">
</head>
<body>
<div class="box1">
<div class="box">
<h1>GeeksforGeeks</h1>
<p>
How to add a button to
an image using CSS.
</p>
<div class="imgbox">
<img src=
alt="gfg">
<button class="mybtn">
Click Here
</button>
</div>
</div>
</div>
</body>
</html>
|
CSS
@import url(
* {
font-family: 'Poppins', sans-serif;
box-sizing: border-box;
margin: 0;
padding: 0;
}
.imgbox {
position: relative;
width: 500px;
}
.mybtn {
position: absolute;
top: 70%;
left: 40%;
width: 110px;
height: 40px;
border-radius: 10px;
font-size: 17px;
border: none;
box-shadow: rgba(242, 242, 242) 0px 3px 20px;
transition: 0.3s linear;
}
.mybtn:hover {
transform: translateY(-5px);
}
img {
width: 500px;
margin: 0;
padding: 0;
border-radius: 30px;
box-shadow: rgb(21, 20, 20) 0px 3px 20px;
}
h1 {
color: rgb(16, 87, 16);
text-align: center;
margin-bottom: 20px;
}
p {
font-size: 20px;
color: palevioletred;
font-weight: 700;
text-align: center;
margin-bottom: 20px;
}
.box1 {
display: flex;
justify-content: center;
align-items: center;
height: 100vh;
}
|
Output:
Share your thoughts in the comments
Please Login to comment...