Flutter – Cupertino Icons
Last Updated :
05 May, 2023
Sometimes it happens we did not get the exact icons normally then we have to use the Cupertino icons and Cupertino icons contain mainly the iOS icons. This is an asset repo containing the default set of icon assets used by Flutter’s Cupertino widgets.
How to install it?
First, we know how to install it. so first we have to go on pub.dev and then search Cupertino icons and then you have to click on that which has a popularity percentage high.
Now when you tap then there are five things you will see Readme, changelog, installing, and version scores. You simply tap on the installing and then you find two methods to install the Cupertino icons in your project.
Method 1: In method one, you need to open your terminal and run the given command dart pub add Cupertino icons.
flutter pub add cupertino_icons
When you run and it shows the successful status it means it installs in your project and now you can use the Cupertino icons
Method 2: In the second method you need to copy the dependencies and replace them with the default dependencies just because we need the latest version, in the latest version we get some extra icons.
Note: Always use the latest version of packages it is mandatory.
cupertino_icons: ^1.0.5
Copy from here and paste it into pubsec.yml.
After replacing you need to save it in vscode and if you are using an android studio then you need to run pub get, it shows automatically when you paste it after the successful status then you just copy the given line and paste it in your home page where you use icons.
import 'package:cupertino_icons/cupertino_icons.dart';
Copy from here and paste it into your home page.
This is the whole process to install Cupertino icons. You can see in the example how I did just copy code and understand if you are facing any problems.
Example: How to use Cupertino icons
Dart
import 'package:flutter/cupertino.dart';
import 'package:flutter/material.dart';
import 'package:cupertino_icons/cupertino_icons.dart';
void main() {
runApp(const MyApp());
}
class MyApp extends StatelessWidget {
const MyApp({super.key});
@override
Widget build(BuildContext context) {
return MaterialApp(
title: 'Flutter Demo',
theme: ThemeData(
primarySwatch: Colors.green,
),
home: MyHomePage(),
);
}
}
class MyHomePage extends StatefulWidget {
const MyHomePage({super.key});
@override
State<MyHomePage> createState() => _MyHomePageState();
}
class _MyHomePageState extends State<MyHomePage> {
@override
Widget build(BuildContext context) {
return Scaffold(
appBar: AppBar(
title: Text("CuperTino Icons"),
),
body: SingleChildScrollView(
child: Column(
children: [
Center(
child: Icon(
CupertinoIcons.add,
color: Colors.red,
size: 100,
),
),
SizedBox(
height: 50,
),
Row(
mainAxisAlignment: MainAxisAlignment.spaceBetween,
children: [
Icon(
CupertinoIcons.airplane,
color: Colors.yellow,
size: 100,
),
Icon(
CupertinoIcons.antenna_radiowaves_left_right,
color: Colors.cyanAccent,
size: 100,
),
],
),
SizedBox(
height: 50,
),
Row(
mainAxisAlignment: MainAxisAlignment.spaceBetween,
children: [
Icon(
CupertinoIcons.ant,
color: Colors.green,
size: 100,
),
Icon(
CupertinoIcons.xmark_square,
color: Colors.brown,
size: 100,
),
],
),
SizedBox(
height: 100,
),
Row(
mainAxisAlignment: MainAxisAlignment.center,
children: [
Icon(
CupertinoIcons.gobackward,
color: Colors.green,
size: 200,
),
Icon(
CupertinoIcons.goforward,
color: Colors.green,
size: 200,
)
],
),
],
),
),
);
}
}
|
Output:
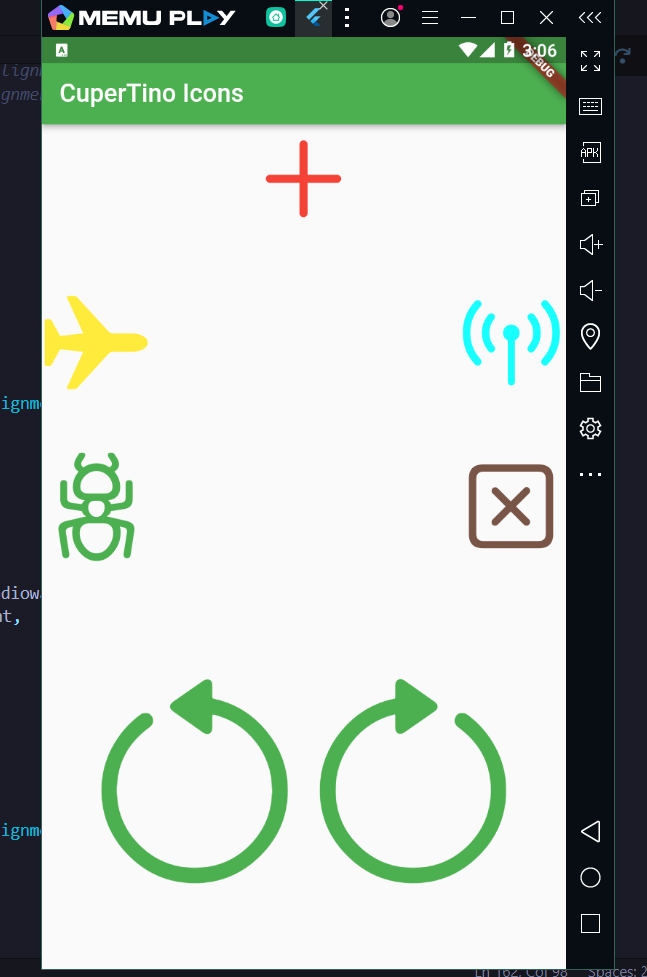
Cupertino Icons
Explanation
Here we basically take the simple stateful widget and in this widget, we take the AppBar and body. In the body, we take the column and in the column, it takes much more children so we take the icons and in icons, we take the Cupertino icons. Cupertino icons take size and color.
Share your thoughts in the comments
Please Login to comment...