Flutter – Add Quick Actions Button
Last Updated :
09 Jan, 2024
Quick actions for your launcher screen so that your users can access commonly used functions, such as opening a particular screen, transferring records or using a template in the mobile app, etc. Also called as App Shortcuts(in Android) and Home Screen Actions(in iOS) which allow users to perform certain app actions without having to open the app. A sample video is given below to get an idea about what we are going to do in this article.
Step-By-Step-Implementation
Step 1: Create a Flutter App
Create a flutter app or add the code to an existing app.
If you are using the feature in an existing app follow step 2.
Step 2: Add the following package
Add quick_actions package in your pubspec.yaml file
Dart
flutter pub add quick_actions
|
Step 3: You need to firstly create instance of QuickAction
Create a instance for quick action either in initstate or as normal declaration
Dart
QuickActions quickActions = const QuickActions();
|
Step 4: Intialise the quick actions
We will initialise the quick actions and in this we will also handle what to do on different action
Dart
quickActions.initialize((String shortcutType) {
});
|
This will intialise the quickaction and in next step. we wil add the icons details
Step 5: Add Quick actions button
Set quickactions button shortcut is init state like this
Dart
quickActions.setShortcutItems(<ShortcutItem>[
const ShortcutItem(
type: 'action_one',
localizedTitle: 'Action One',
icon: 'AppIcon',
),
const ShortcutItem(
type: 'action_two',
localizedTitle:
'Action Two',
icon:
'ic_launcher'
),
]).then((void _) {
setState(() {
if (shortcut == 'no action set') {
shortcut = 'Actions Ready';
}
});
});
|
In this we have passed some parameters in which type means unique key and localizedTitle will be shown to user and icon image will be shown to customer. Here we have added two icons different for android and IOS but when we build this feature in our app we will add same icons for both android and iOS. Let’s learn how to do this settings in your app in next step
Step 6: Set icon in android and iOS folder
Generate App Icon from here App Icon Generator and give it a name like “image1” or “ic”. It will generate folder and download it. If you unzip the folder you will get all the icons for iOS,android and web. In Android folder you will get 5.
Let’s set icon for android
Copy all the 5 folders from android folder you get in previous step in \android\app\src\main\res. Now go to first folder named as mipmap-hdpi and copy the icon and now paste it in \android\app\src\main\res\drawable. In the same folder create 1 more file named as quick_actions.xml in \android\app\src\main\res\drawable
Add the following code
XML
<?xml version="1.0" encoding="utf-8"?>
<item android:drawable="@drawable/image1" />
</layer-list>
|
In \android\app\src\main\res\values you will get styles.xml add following code in that
XML
<style name="QuickActions">
<item name="android:windowBackground">@drawable/quick_actions</item>
</style>
|
If not found this file create and add the following code
XML
<?xml version="1.0" encoding="utf-8"?>
<resources>
...
<style name="QuickActions">
<item name="android:windowBackground">@drawable/quick_actions</item>
</style>
</resources>
|
You have successfully created icon for quick action in android copy the name you have given to icon and paste it in your dart file where you have set quick actions icon
Note:
For iOS: Prefer black color image other wise it will not reflect
Let’s do it for iOS also
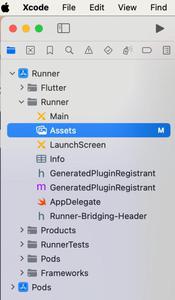
1. Open the ios folder in xcode
You can do this through visual studio also just select the ios folder and click menu will appear select Open in Xcode
2. In the sidebar, “Show the Project Navigator” (icon on the left ) and click on “Assets”
It will be on Runner > Runner > Assets like below
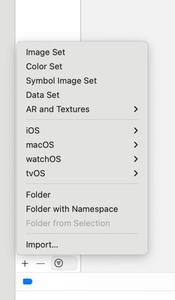
3. In bottom you will see + and – icon select it
4. Select Image set from menu
5. Change the image name which you have mentioned in your code or for android and save it.
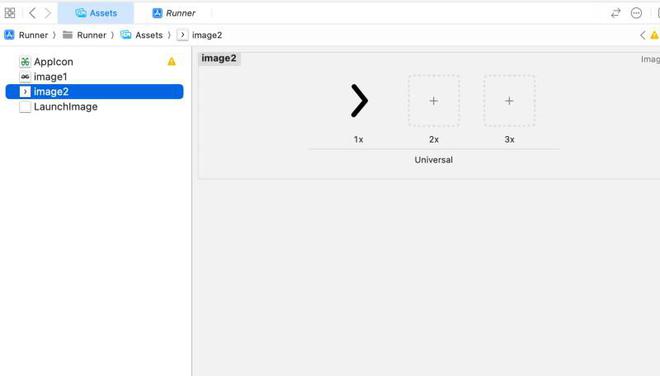
You can load this configruation file that may help
1x: Load image “29.png”
2x: Load image “60.png”
3x: Load image “120.png”
6. Uninstall the app and install it again
Step 7: Handle what to do when user click on actions button
Currently I am just changing the variable value you can do anything on this like navigating or any functionality. You can do this by checking shortcut_type label and perform action according to that
Dart
quickActions.initialize((String shortcutType) {
setState(() {
shortcut = shortcutType;
});
});
|
Here you Go !! You have added the quick actions in your app.
Complete Source Code
Dart
import 'package:flutter/material.dart';
import 'package:quick_actions/quick_actions.dart';
void main() {
runApp(const MyApp());
}
class MyApp extends StatelessWidget {
const MyApp({super.key});
@override
Widget build(BuildContext context) {
return MaterialApp(
title: 'Quick Actions Button Flutter Template',
theme: ThemeData(
colorScheme: ColorScheme.fromSeed(seedColor: Colors.deepPurple),
useMaterial3: true,
),
home: const QuickActionScreen(),
);
}
}
class QuickActionScreen extends StatefulWidget {
const QuickActionScreen({super.key});
@override
State<QuickActionScreen> createState() => _QuickActionScreenState();
}
class _QuickActionScreenState extends State<QuickActionScreen> {
String shortcut = 'no action set';
@override
void initState() {
super.initState();
QuickActions quickActions = const QuickActions();
quickActions.initialize((String shortcutType) {
setState(() {
shortcut = shortcutType;
});
});
quickActions.setShortcutItems(<ShortcutItem>[
const ShortcutItem(
type: 'action_one',
localizedTitle: 'Geeks For Geeks',
icon: 'AppIcon',
),
const ShortcutItem(
type: 'action_two',
localizedTitle: 'GFG',
icon:
'ic_quick_actions'
),
]).then((void _) {
setState(() {
if (shortcut == 'no action set') {
shortcut = 'Actions Ready';
}
});
});
}
@override
Widget build(BuildContext context) {
return Scaffold(
appBar: AppBar(
title: const Text("Flutter Quick Actions Template"),
),
body: Center(
child: Text('Current Action type $shortcut'),
),
);
}
}
|
How to check this?
On home screen, long press the app icon to ‘get Action one or Action two options. Tapping on that action should set the toolbar title. We will explain this though output videos.
Output:
In Android
In IOS
Share your thoughts in the comments
Please Login to comment...