Explain the purpose of ActivatedRoute in Angular
Last Updated :
17 Apr, 2024
In Angular applications, navigation is a fundamental feature, that helps to move between different views and components easily. The ActivatedRoute service plays an important role in this navigation process, providing valuable information about the current route, including route parameters, query parameters, and other route-specific metadata. In this article, we’ll learn more about the ActivatedRoute in detail.
What is ActivatedRoute in Angular?
The ActivatedRoute is a service provided by the Angular Router module. It represents the route associated with the currently loaded component. In Simple words, ActivateRoute provides access to information about the route, including route parameters, query parameters, and route URL segments.
When the user navigates to a different route, The Angular Router module updates the ActivatedRoute instance containing the current route’s information. Finally, we can inject the ActivatedRoute into the component’s constructor to access the information.
Purpose of ActivatedRoute
The main purposes of the ActivatedRoute service include:
- Accessing Route Parameters: Route parameters are dynamic values that are part of the URL path. For example, in the URL
/users/:id, id is a route parameter. The ActivatedRoute allows components to access these parameters, enabling dynamic content based on the route. - Accessing Query Parameters: Query parameters are key-value pairs appended to the URL after a question mark (
?). For instance, in the URL /search?q=angular, q is a query parameter. With ActivatedRoute, components can retrieve and utilize query parameters for various purposes, such as filtering data or customizing views. - Accessing Route Data: Angular’s router allows to attach additional data to route configurations. This data can include metadata about the route or any other information needed by the associated component. The
ActivatedRoute service provides access to this data, enabling components to retrieve and utilize it as required. - Observing Route Changes: Angular applications are dynamic, and routes can change based on user interactions or application state. The
ActivatedRoute service provides observables that emit events whenever route parameters, query parameters, or route data change. Components can subscribe to these observables to reactively update their state or behavior based on route changes. - Accessing the URL: In addition to route-specific information, the
ActivatedRoute service also provides access to the URL associated with the current route. This can be useful for components that need to inspect or manipulate the URL programmatically, such as implementing navigation logic or generating dynamic links.
Examples
1: Accessing Route Parameters
In this example, we’ll have a list of products and the user can click on any of the products to have a detailed look at the product. Here we’ll pass the product ID along with the route and then fetch it in the other module using ActivatedRoute.
Step 1: Create the new Angular project using the following command.
ng new my-app
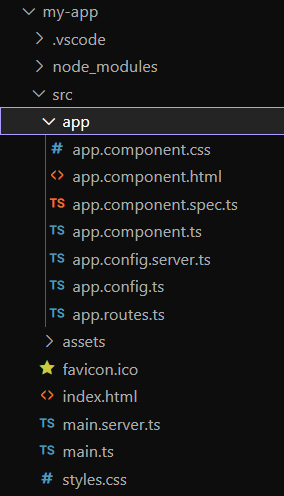
Folder Structure:

project structure
Step 2: Create two components, one that displays the list of products and other that displays the product detail.
ng generate component product-list
ng generate component product-detail
Step 3: Add the following codes in required files.
HTML
<!-- app.component.html -->

<router-outlet></router-outlet>
//app.routes.ts

import { Routes } from '@angular/router';
import { ProductListComponent } from './product-list/product-list.component';
import { ProductDetailComponent } from './product-detail/product-detail.component';

export const routes: Routes = [
    { path: '', component: ProductListComponent },
    { path: 'product/:id', component: ProductDetailComponent },
];
//product-list.component.ts

import { Component } from '@angular/core';
import { Router } from '@angular/router';

@Component({
    selector: 'app-product-list',
    standalone: true,
    imports: [],
    template: `
    <h1>Product List</h1>
    <ul>
      <li (click)="navigateToProduct(1)">Product 1</li>
      <li (click)="navigateToProduct(2)">Product 2</li>
      <li (click)="navigateToProduct(3)">Product 3</li>
    </ul>
  `,
    styleUrl: './product-list.component.css',
})
export class ProductListComponent {
    constructor(private router: Router) { }

    navigateToProduct(productId: number): void {
        this.router.navigate(['/product', productId]);
    }
}
//product-detail.component.ts

import { Component, OnInit } from '@angular/core';
import { ActivatedRoute } from '@angular/router';

@Component({
    selector: 'app-product-detail',
    standalone: true,
    imports: [],
    template: `
    <h1>Product Detail</h1>
    <p>Product ID: {{ productId }}</p>
  `,
    styleUrl: './product-detail.component.css',
})
export class ProductDetailComponent implements OnInit {
    productId: number = 0;

    constructor(private route: ActivatedRoute) { }

    ngOnInit(): void {
        this.route.params.subscribe((params) => {
            this.productId = +params['id'];
        });
    }
}
Step 4: Apply all the changes and run the application using the below command.
ng serve
Output:

output for example 1
2: Responding to Route Changes
In this example, we’ll see how to respond to the route changes using ActivatedRoute.
Step 1: Create the new Angular project using the following command.
ng new my-app
Step 2: Create two components. The first components is a home component and other one is the route info component.
ng generate component home
ng generate component route-info
Step 3: Add the following codes in required files.
HTML
<!-- app.component.html -->

<router-outlet></router-outlet>
//app.routes.ts

import { Routes } from '@angular/router';
import { HomeComponent } from './home/home.component';
import { RouteInfoComponent } from './route-info/route-info.component';

export const routes: Routes = [
    { path: '', component: HomeComponent },
    { path: 'route/routeInfo', component: RouteInfoComponent },
];
//route-info.component.ts

import { Component } from '@angular/core';
import { ActivatedRoute } from '@angular/router';

@Component({
    selector: 'app-route-info',
    standalone: true,
    imports: [],
    template: `
    <h1>Current Route Information</h1>
    <p>URL: {{ url }}</p>
  `,
    styleUrl: './route-info.component.css',
})
export class RouteInfoComponent {
    url: string = '';

    constructor(private route: ActivatedRoute) {
        this.route.url.subscribe((urlSegments) => {
            this.url = urlSegments.join('/');
        });
    }
}
//home.component.ts

import { Component } from '@angular/core';
import { Router } from '@angular/router';
import { RouteInfoComponent } from '../route-info/route-info.component';

@Component({
    selector: 'app-home',
    standalone: true,
    imports: [],
    template: `
    <h1>GeeksForGeeks</h1>
    <button (click)="navigateToRoute()">Navigate Me</button>
  `,
    styleUrl: './home.component.css',
})
export class HomeComponent {
    constructor(private router: Router) { }

    navigateToRoute(): void {
        this.router.navigate(['route', 'routeInfo']);
    }
}
Step 4: Apply the changes and run the application using the below command.
ng serve
Output:

output for example 2
Share your thoughts in the comments
Please Login to comment...