DNS in Wireshark
Last Updated :
21 Aug, 2022
DNS or Domain Name System abbreviated as DNS is a system used to resolve domain names, IP addresses, different servers for e.g., FTP servers, game servers, active directories, etc., and keep their records. Invented by Jon Postel and Paul Mockapetris in 1982, DNS has now become one of the most significant players in the modern-day web world.
DNS actually gives a mapping of the hostname of a network and its address. It has proved to ease human life manifold when one looks at its working and the service it offers. It helps users by translating the domain names into IP addresses, allowing them to surf the web without memorizing such complex IP codes. Coming on to Wireshark, which is an open-source packet analyzer and has been widely in use since its inception in the web world, to analyze packets received or sent in a network. We can use Wireshark to segment the DNS system and get a detailed look at it. The default port for DNS traffic in Wireshark is 53, and the protocol is UDP (User Datagram Protocol). After we start Wireshark, we can analyze DNS queries easily. We shall be following the below steps:
- In the menu bar, Capture → Interfaces.
- Select a particular Ethernet adapter and click start.
- After this, browse to any web address and then return to Wireshark. Browsing would get packets captured and in Wireshark click the stop in the Capture menu to stop the capture.
- If you haven’t got the packet list by now, you can access it using Edit → Find Packets. This will give you the packet list.
- Since we are going to analyze DNS we shall be studying only DNS packets and to get DNS packets, only you can apply DNS in the filters above.
You can have access to the DNS details of any packet by clicking the Domain Name System label in the frame detail section of the Wireshark window. You can have a look at different sections of the interface in the image above.
A basic DNS response has:
- Transaction Id-for identification of the communication done.
- Flags-for verification of response whether it is valid or not.
- Questions-default is 1 for any request sent or received. It mainly denotes whether you have queried for something or not.
- Answers-default is 0 if the response is sent, and it’s 1 if received. If the received packet is viewed then the Answers section has the IP address of the desired domain name along with Time to Live which is basically a counter which expires after its allotted time.
Besides, these, it has a Queries section which gives the subjective details of the communication. The queries section has the following:
- Name: Domain name of the destination or web address to be reached or reached by in case of the received packet. This section further has its length, character by character under[Name-Length], and the count of words separated by separators, i.e., dot(.) under the name[Labels].
- Type: which is ‘A‘ for IPv4(32 bits) and is ‘AAAA‘ for IPv6(128 bits).
- Class: which is ‘IN‘ by default, which means an internet IP address has been asked for.
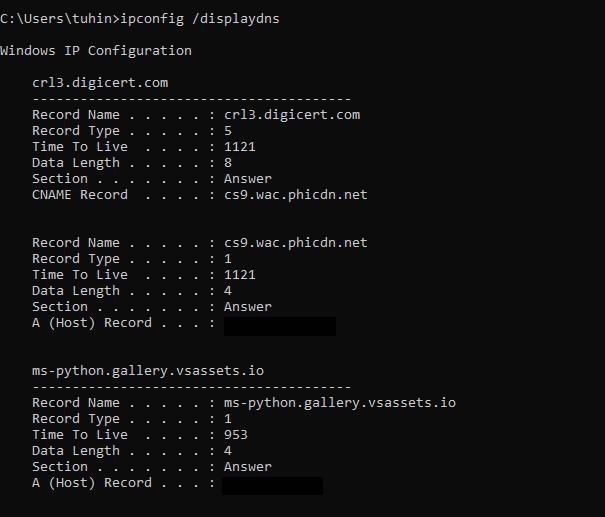
Captured packets are also stored in the local machine, We can also view our received packets in command prompt by typing the following instruction:
ipconfig /displaydns:
You can have a look at the below diagram for reference. Once you have visited a particular resource it will be stored and the next time you want to locate a particular resource, the host will try to find it in the local storage. So this is how we can analyze DNS queries in Wireshark and get a detailed knowledge of DNS packet functionalities. Checking DNS queries in Wireshark is one of the major tools for studying network behaviors, and Wireshark is by far the leading forum for protocol analysis because of its beginner-friendly and detailed nature.
Wireshark’s packet capturing and additional features of decoding various protocol responses have been the biggest factor in network analysis in today’s world. Examining DNS can be very useful as it shows where are the flaws present in the network. Especially in case of abnormal DNS behavior, problems arise such as delay in web page loading or greater response time. Weird DNS behavior is of major symptom of a hacked system or network. Such cases are mainly of the type called “MIM”(Man-in-the-Middle) which causes a delay in packet exchange as it gets access to all the packets, thus compromising the system. Cyber security analysts often look for the DNS query responses first in order to understand the network flaw.
Share your thoughts in the comments
Please Login to comment...