Difference between req.query and req.params in Express
Last Updated :
17 Jan, 2024
In this article, we will learn about the req.query and req.params and we will also learn the difference between them.
req.query: Dealing with URL Stuff:
- Where the Data Comes From: It’s from the extra bits attached to the end of a URL, like when you fill out a form or put something in the search bar.
- When to Use It: Great for handling info from URLs, especially when things like search terms are involved.
Example: using req.query:
Javascript
app.get('/search', (req, res) => {
const searchTerm = req.query.query;
});
|
req.params: Figuring Out Route Things:
- Where the Data Comes From: It grabs values from the changing parts in the URL, those bits with colons that can be different each time.
- When to Use It: Handy when you want your web page to work with different values in the same kind of URL setup.
Example: using req.params:
Javascript
app.get('/user/:id', (req, res) => {
const userId = req.params.id;
});
|
Difference between req.query and req.params in Express:
|
Aspect
|
req.query
|
req.params
|
|
Source of Data
|
Extra bits at the end of a URL (e.g., form inputs, search bar)
|
Changing parts in the URL marked by colons
|
|
Example URL
|
‘/search?q=example’
|
‘/users/:id’
|
|
Usage
|
Ideal for handling URL parameters, especially with search terms
|
Useful when dealing with dynamic values within a consistent URL structure
|
|
Express.js Example
|
‘javascript app.get(‘/search’, (req, res) => { const searchTerm = req.query.q; // Process search term });
|
`javascript app.get(‘/users/:id’, (req, res) => { const userId = req.params.id; // Fetch user details based on dynamic user ID });
|
|
Scenario Example
|
Handling a search feature on a website
|
Accessing user-specific information on a page
|
Steps to Setup Backend with Node.js and Express:
Step 1: Creating express app:
npm init -y
Step 2: Installing the required packages
npm install express
Example: Create a file named server.js and add the following code:
Javascript
const express = require('express');
const app = express();
const PORT = 3000;
app.get('/search',
(req, res) => {
const searchTerm =
req.query.q || 'No search term provided';
res.send(`Search Term: ${searchTerm}`);
});
app.get('/users/:id',
(req, res) => {
const userId =
req.params.id || 'No user ID provided';
res.send(`User ID: ${userId}`);
});
app.listen(PORT,
() => {
console.log(`Server is running at http:
});
|
Steps to run the App:
node server.js
Ouput for req.params:

Response when we send params
Ouput for req.query:
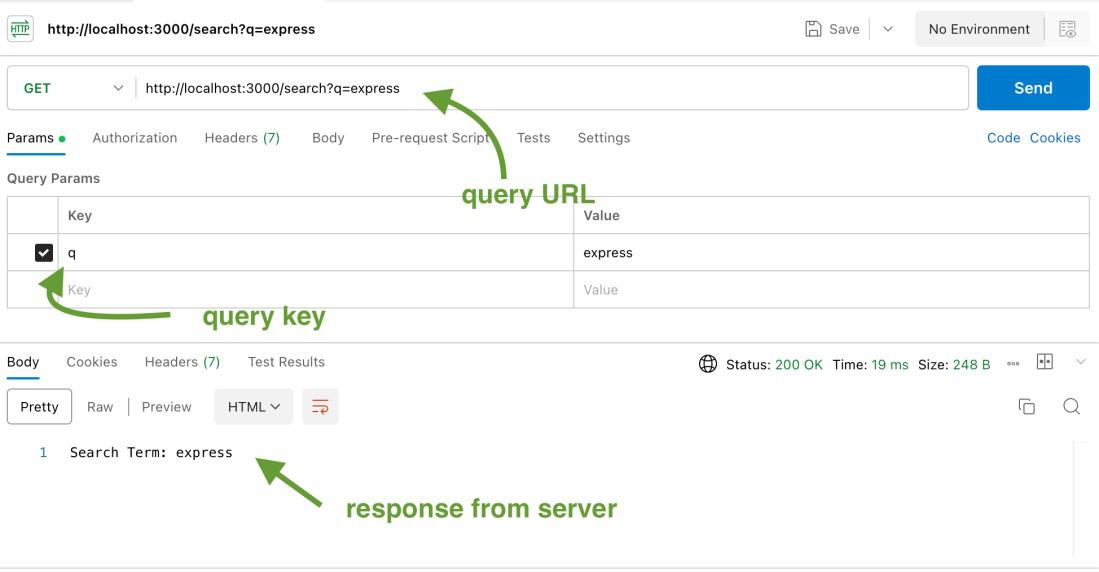
Response when we send query params
Conclusion:
To keep it simple, req.query deals with data from the end of a URL, while req.params grabs values from dynamic parts of the URL. Whether you’re dealing with a search form or creating web pages with changing parts, knowing when to use each makes Express.js a lot less confusing.
Share your thoughts in the comments
Please Login to comment...