Database Functions in Django
Last Updated :
15 Apr, 2024
In Django, database functions play an important role in querying, manipulating, and managing data stored in your application’s database. In this article, we will learn about database functions in Django.
What are Database Functions in Django?
In Django, functions such as annotate, aggregate, and filter make it easier to work with data in the database. Annotate lets you add custom fields to the data you retrieve, aggregate helps you calculate summary values like averages or counts, and filter allows you to refine your queries based on specific conditions.
Implementation of Database Functions in Django
Below is the implementation of database functions in Django in Python:
Starting the Project Folder
django-admin startproject core
cd core
To start the app use this command
python manage.py startapp home
Now add this app to the ‘settings.py’
INSTALLED_APPS = [
    "django.contrib.admin",
    "django.contrib.auth",
    "django.contrib.contenttypes",
    "django.contrib.sessions",
    "django.contrib.messages",
    "django.contrib.staticfiles",
    "home",
]
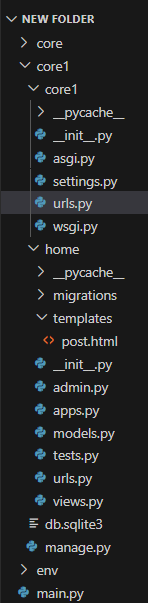
File Structure
Setting Necessary Files
models.py: Below code defines the structure of the database tables using Django’s ORM (Object-Relational Mapping). In this case, there are two models: Author and Post. An Author has a name, and a Post has a title, content, author (linked to an Author), and creation timestamp.
Python3
class Author(models.Model):
    name = models.CharField(max_length=100)

    def __str__(self):
        return self.name

class Post(models.Model):
    title = models.CharField(max_length=200)
    content = models.TextField()
    author = models.ForeignKey(Author, on_delete=models.CASCADE)
    created_at = models.DateTimeField(auto_now_add=True)

    def __str__(self):
        return self.title
views.py: Django view function post_list retrieves all posts and optionally filters them by author. It also calculates the total number of posts and authors with their respective post counts. The view then renders a template named ‘post.html’, passing the posts, authors, authors_with_posts, and total_posts as context variables..
Python3
from django.shortcuts import render
from home.models import Post
from django.db.models import Count

def post_list(request):
    author_filter = request.GET.get('author', None)
    posts = Post.objects.all()

    if author_filter:
        posts = posts.filter(author__name=author_filter)

    authors_with_posts = Post.objects.values('author__name').annotate(num_posts=Count('id'))
    total_posts = Post.objects.count()

    # Extract the authors from authors_with_posts
    authors = [author_with_posts['author__name'] for author_with_posts in authors_with_posts]

    return render(request, 'post.html', {
        'posts': posts,
        'authors': authors,  # Pass the authors instead of authors_with_posts
        'authors_with_posts': authors_with_posts,
        'total_posts': total_posts
    })
home/urls.py: These files define the URL patterns for the Django application
Python
from django.urls import path
from . import views

urlpatterns = [
    path('', views.post_list, name='post_list'),
]
core/urls.py : These files define the URL patterns for the Django application
Python3
from django.contrib import admin
from django.urls import path, include

urlpatterns = [
    path('admin/', admin.site.urls),
    path('', include('home.urls')),
]
Creating GUI
templates/post.html : This HTML template displays a post list with filtering by author. It includes a form for filtering, total post count, posts per author, and filtered posts in a table format.
HTML
<!DOCTYPE html>
<html lang="en">
<head>
    <meta charset="UTF-8">
    <meta name="viewport" content="width=device-width, initial-scale=1.0">
    <title>Post List</title>
    <style>
        table {
            width: 50%;
            border-collapse: collapse;
            margin-bottom: 20px;
        }
        th, td {
            border: 1px solid #ddd;
            padding: 8px;
            text-align: left;
        }
        th {
            background-color: #f2f2f2;
        }
    </style>
</head>

<body>
    <h1>Post List</h1>
    <form action="" method="get">
        <label for="author_filter">Filter by Author:</label>
        <select name="author" id="author_filter">
            <option value="">All Authors</option>
            {% for author in authors %}
                <option value="{{ author }}" {% if author_filter == author %}selected{% endif %}>{{ author }}</option>
            {% endfor %}
        </select>
        <button type="submit">Apply Filter</button>
    </form>
    <h2>Total Posts: {{ total_posts }}</h2>
    <h2>Posts per Author:</h2>
    <table>
        <thead>
            <tr>
                <th>Author</th>
                <th>Number of Posts</th>
            </tr>
        </thead>
        <tbody>
            {% for author_with_posts in authors_with_posts %}
                <tr>
                    <td>{{ author_with_posts.author__name }}</td>
                    <td>{{ author_with_posts.num_posts }}</td>
                </tr>
            {% endfor %}
        </tbody>
    </table>
    <h2>Filtered Posts:</h2>
    <table>
        <thead>
            <tr>
                <th>Title</th>
                <th>Content</th>
                <th>Author</th>
            </tr>
        </thead>
        <tbody>
            {% for post in posts %}
                <tr>
                    <td>{{ post.title }}</td>
                    <td>{{ post.content }}</td>
                    <td>{{ post.author.name }}</td>
                </tr>
            {% endfor %}
        </tbody>
    </table>
</body>
</html>
admin.py : below, are the admin.py file where we register the models.
Python3
from django.contrib import admin
from home.models import *

# Register your models here.
admin.site.register(Author)
admin.site.register(Post)
Deployment of the Project
Run these commands to apply the migrations:
python3 manage.py makemigrations
python3 manage.py migrate
For create superuser use the below command.
python3 manage.py createsuperuser
Run the server with the help of following command:
python3 manage.py runserver
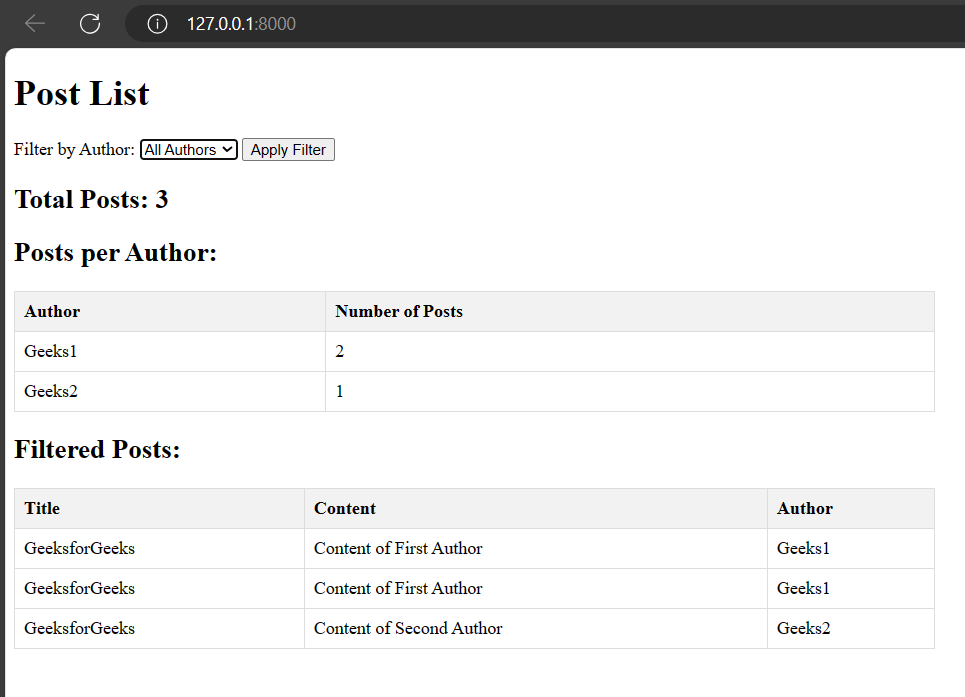
Output
Video Demonstration
Share your thoughts in the comments
Please Login to comment...